ActionTec ScreenBeam SBT100U User Manual Download Page 28

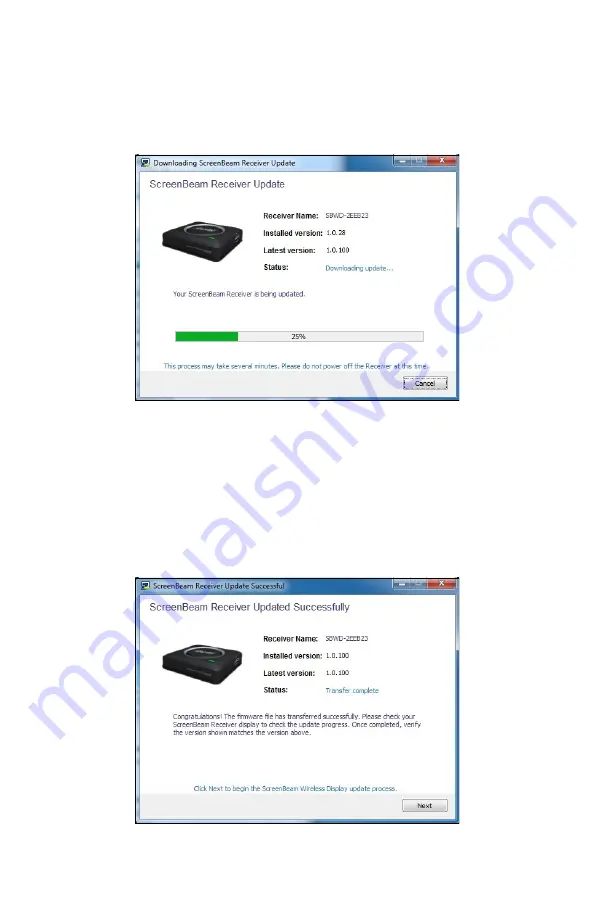
Updating the Firmware

4.

Th

e Receiver’s 

fi

rmware update is performed 

fi

rst. Do not power o

ff


the Receiver during this transfer. 


5.

Th

e Receiver’s 

fi

rmware will be downloaded and transferred to the 

receiver. Do not power o

ff

 the Receiver or remove the Transmitter 

during this transfer.


6. Once the 

fi

rmware transfer is complete, the Receiver will reboot. If 

there are more updates available for the ScreenBeam Wireless Display 

application, click 

Next


 28

Summary of Contents for ScreenBeam SBT100U

Page 1: ...Wireless Display Receiver Kit User Guide ScreenBeam Wireless Display Kit Model SBWD100B SBT100U rev 3...

Page 2: ...ecting to a Receiver 9 Connecting the Receiver to an HDTV 9 Setting Up a Windows 7 8 Computer 11 Setting Wireless Display Preferences 22 Preferences Window 22 Windows Viewing Configuration 25 Updating...

Page 3: ...Without a Transmitter 32 Connecting via the Intel WiDi App 32 Connecting via Windows 8 1 35 Connecting via Android Devices 37 Frequently Asked Questions 38 Specifications and Technical Support 43 Spec...

Page 4: ...r smartphone screen onto an HDTV monitor ScreenBeam Pro Receiver is compatible with laptops PCs running Windows 7 or 8 8 1 and connects seamlessly with smartphones tablets and other devices running Mi...

Page 5: ...ick Start Guide Features Wireless display mirror and extend modes Compatible with almost every HDTV monitor The only wireless display solution to support compatible Windows 7 8 8 1 laptops Miracast de...

Page 6: ...ous available USB port Recommended system requirements for video streaming Processor AMD A8 or Intel Gen 3 Core i5 equivalent processor Memory 3 GB RAM or more Miracast WiDi Devices If ScreenBeam Pro...

Page 7: ...ons from compatible Windows 7 8 8 1 computers Wi Fi Miracast devices or laptops with Intel WiDi 3 5 or later The ScreenBeam USB Transmitter is used for non Miracast or non WiDi laptops ScreenBeam Pro...

Page 8: ...The Reset button is used to reset the receiver to default settings Press and hold the Reset button with a pin to reset the Receiver ScreenBeam USB Transmitter The USB Transmitter has a single USB conn...

Page 9: ...necting the Receiver to an HDTV To connect the ScreenBeam Pro Receiver to an HDTV monitor make sure you have the following items handy ScreenBeam Pro Receiver HDMI Cable Power cord To connect the Rece...

Page 10: ...C and plug the power adapter to a power outlet The Receiver s Power LED illuminates blue When Steps 1 2 and 3 are complete the hardware should be connected as shown in the figure below 4 Turn on the H...

Page 11: ...r to one of the following sections of this chapter Setting Up a Windows 7 8 Computer If your Windows 7 8 computer does not have Miracast or WiDi enabled you must load the ScreenBeam Wireless Display s...

Page 12: ...indow appears Click Run setup exe and then follow the onscreen instructions If the AutoPlay screen does not appear locate the CD ROM folder then double click setup exe If the computer does not have a...

Page 13: ...Connecting to a Receiver 4 When the screen shown below appears insert the Transmitter into a USB port on the computer Click Next 13...

Page 14: ...ScreenBeam Wireless Display Kit 5 Click the button next to Yes I want to restart my computer now and then click Finish The computer reboots After it finishes rebooting go on to the next section 14...

Page 15: ...ring the Transmitter make sure the Receiver is connected to an HDTV monitor and powered on and the Transmitter is connected to a computer To pair the Transmitter 1 After the computer reboots double cl...

Page 16: ...eless Display screen appears Click Add a Receiver Note If the ScreenBeam Wireless Display screen is not displayed after the software is launched locate it in the Notification Area Click the ScreenBeam...

Page 17: ...Connecting to a Receiver 3 The Add a ScreenBeam Receiver screen appears Select the appropriate Receiver then click Connect 17...

Page 18: ...ScreenBeam Wireless Display Kit Note A registration key may need to be entered before the Add a ScreenBeam Receiver screen appears The registration key is found in the product packaging 18...

Page 19: ...pears on the HDTV monitor connected to the Receiver Enter the PIN in the Add a ScreeBeam Receiver screen on the computer within 60 seconds then click Next The Receiver and Transmitter are now paired a...

Page 20: ...s Display software then click Add a receiver from the main screen 2 The Add a ScreenBeam Receiver window appears Select a channel from the Channel drop down menu Note When selecting a wireless channel...

Page 21: ...nnected from the Receiver then open the ScreenBeam Wireless Display s Preferences window 2 Select the desired channel from the Wireless Channel list then click OK 3 Reconnect the computer to the Recei...

Page 22: ...ScreenBeam Wireless Display Preferences window Preferences Window To open the ScreenBeam Wireless Display Preferences window right click the ScreenBeam icon from the Notification Area of the computer...

Page 23: ...TV By default Video Playback is selected for better video display Select Presentation Slideshow for a better still image display Adjust Screen Size Adjusting this slider changes the size of the pictur...

Page 24: ...ivating this option causes the ScreenBeam Wireless Display software to start up anytime the laptop PC is turned on or rebooted Restore Defaults Click Restore defaults to reset all settings in the Pref...

Page 25: ...ScreenBeam can be used withWindows Extended Desktop mode on the computer which creates a single desktop that stretches across both the computer screen and the HDTV monitor To use Extended Desktop tog...

Page 26: ...isplay software or USB flash drive Updating Using the Software Follow the procedure below to update the firmware using the ScreenBeam Wireless Display software 1 Make sure that ScreenBeam Wireless Dis...

Page 27: ...isplay application to restart If this occurs relaunch the ScreenBeam Wireless Display application after the update is completed 2 Another window appears checking for available updates 3 When the check...

Page 28: ...fer 5 The Receiver s firmware will be downloaded and transferred to the receiver Do not power off the Receiver or remove the Transmitter during this transfer 6 Once the firmware transfer is complete t...

Page 29: ...ScreenBeam Wireless Display Kit 7 The ScreenBeam Wireless Display application update downloads the upgrade installation files 29...

Page 30: ...SB Flash Drive 1 Download the ScreenBeam Pro s firmware sbpro_fw_x x xx x zip at http www actiontec com sbupdate 2 Extract the zip file An autorun folder an install file and this upgrade instructions...

Page 31: ...utomatically after a few seconds A Firmware Upgrade message appears on the HDTV Note The HDTV screen may go temporarily blank for a few seconds during the upgrade process Warning Do not power off the...

Page 32: ...nch the Intel Wireless Display Application on the device To find the application go to Windows Search on the device and search for Intel WiDi 2 The device scans for available receivers Select the same...

Page 33: ...ScreenBeam Wireless Display Kit 4 The HDTV displays messages to show the status of the connection process 33...

Page 34: ...te to the Picture and Sound section select Adjust cropping and adjust the HDTV picture by clicking plus or minus WiDi Software Version Support Make sure the device supports Intel Wireless Display WiDi...

Page 35: ...am Wireless Display Kit Connecting via Windows 8 1 1 From the Windows desktop go to the Charms menu and select Devices You can also use the shortcut keys Windows logo K 2 From the Charms menu click Pr...

Page 36: ...Connecting Without a Transmitter 3 From the Project screen select Add a wireless display 4 Select the appropriate Receiver from the list 36...

Page 37: ...lay Application check for the application under Settings Note The name of the Wireless Display Application depends on the device type and model Refer to the device s carrier or manufacturer user manua...

Page 38: ...or Intel WiDi enabled device No For Miracast devices refer to the user guide of the device s manufacturer For WiDi 3 5 and higher laptops make sure your system driver and WiDi software are up to date...

Page 39: ...Windows Device Manager and make sure the ScreenBeam Transmitter is NOT disabled locate it under Network Should I be concerned if Windows firewall or anti virus software warns that ScreenBeam is trying...

Page 40: ...o and out of sync audio If this occurs make sure your system meets the recommended requirements for optimal video playback experience You can also place the ScreenBeam Receiver in an open space and tr...

Page 41: ...software cannot connect or pair with ScreenBeam Pro receiver Reboot the laptop and power cycle the Wireless Display Receiver Also try selecting a different wireless channel before connecting To do th...

Page 42: ...he ScreenBeam Pro Receiver you ll be able to play your iTunes content and it will display on the TV Can I connect to multiple ScreenBeam Pro Receivers simultaneously No You can only connect to one Scr...

Page 43: ...tter Minimum System Requirements AMD A6 or Intel Gen 3 Core i3 equivalent processor 2GB of RAM 150MB of hard disk space Available USB port Recommended System Requirements AMD A8 or Intel Gen 3 Core i5...

Page 44: ...iver Wireless Display Technology Actiontec Wireless Display requires ScreenBeam Transmitter and software 1 Intel Wireless Display WiDi 3 5 and higher Wi Fi Miracast standard Features Wireless display...

Page 45: ...ces 5 Wireless IEEE 802Au 11a b g n Dual band 5GHz and 2 4GHz Wireless security WPA2 WPS PIN Pairing and AES 128 bit Content Protection No support for protected content e g Blu ray DVD if using Screen...

Page 46: ...er External 110 240v 0 2a 50 60 Hz Regulatory FCC part 15 IC UL Operating Temperature 0 C to 40 C 32 F to 104 F Storage Temperature 0 C to 70 C 32 F to 158 F Operating Humidity 10 to 85 non condensing...

Page 47: ...f you need technical assistance contact Actiontec s Technical Support Department through the following Phone USA 1 888 436 0657 Email http support actiontec com email_support support_form php Internet...

Reviews: