


actiLib Autoloader 1U – Quick Start Guide
Page 16 of 17
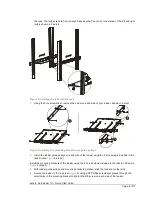
7 Connecting the Library
7.1
SCSI installation:
1) Power-off the unit and the host system before plugging in the SCSI cables. If your loader includes
SCSI tape drives, connect the SCSI cables to the connectors on the unit and to the host.
SCSI bus. Secure the cable with the thumbscrews on the connectors.
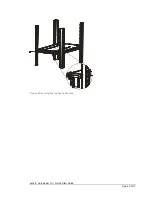
2) Terminate the last device on the SCSI bus
using the appropriate SCSI terminator.
3) Connect a cable between the first drive on the SCSI bus and the host. NOTE: There are limitations
to the length of the SCSI cable. In typical installation, the total cable length should NOT exceed 9
meters / 30 feet.
7.2
SAS installation:
If your loader includes tape drives with SAS interface, connect SAS cables to the tape drives.
Attach one end of the SAS cable to the SAS port on the unit and the other end of the cable to the
host.
7.3
Fibre-channel installation:
If your loader includes fibre channel tape drives, connect fibre cables to the unit and the other end of
the cable to the host.
7.4
Configuring the library:
1) Connect your Ethernet cable to the Ethernet port at the rear of the library. The Ethernet connection
allows use of the Web Client.
2. Connect a power cord to the power connector at the rear of the library. US and European power
cords are supplied with the library.
3. Power-on the library.
4) Power up the host system.
5) Verify that each host can communicate with the library’s tape drives.


