background image


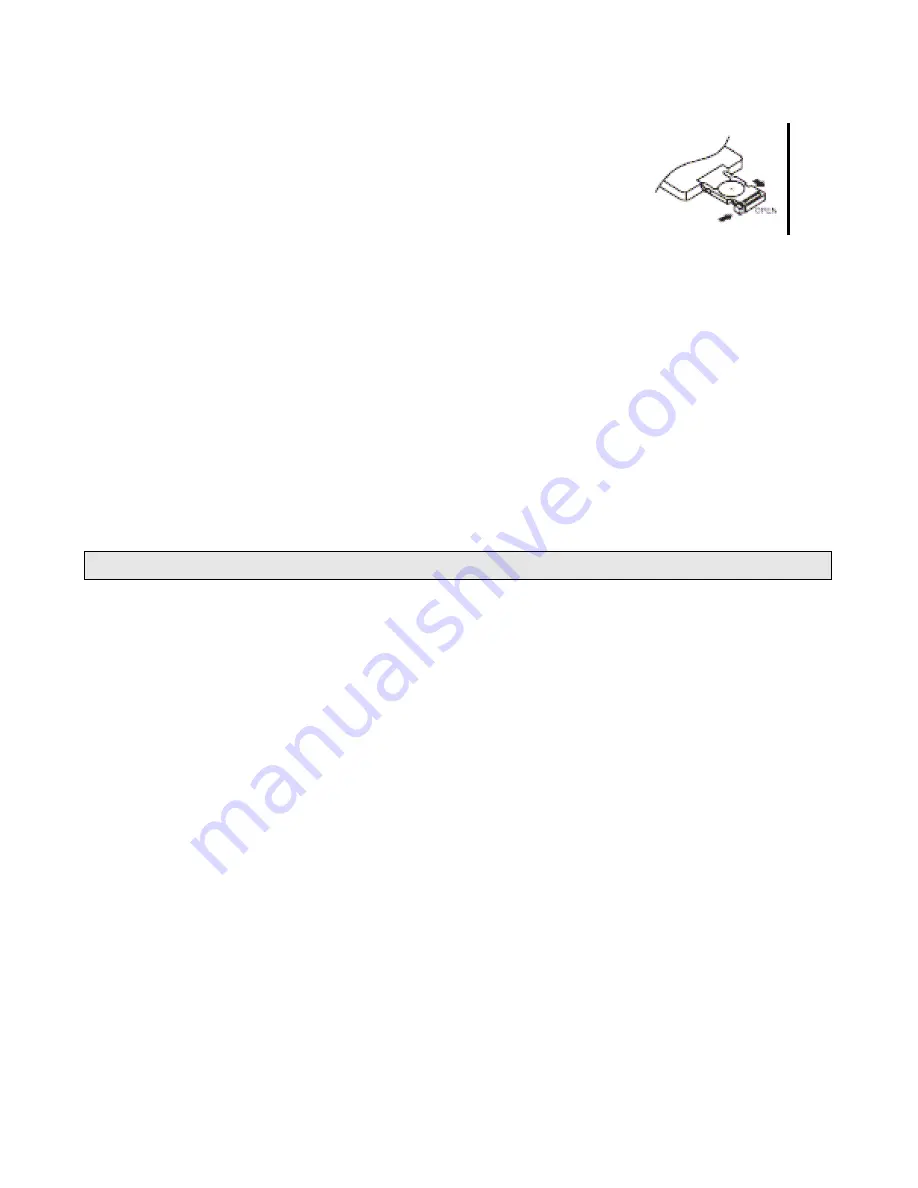
Installing the battery


Slide the tray out on the back of the remote control and insert the battery with the (+) and minus (-) 
poles pointing in the proper direction.   
• When use for the first time, pull out the film protruding the tray.   

CAUTIONS


• Remove the battery if the remote control is not used for a month or 

longer. 

• Do not recharge, disassemble, heat or dispose the battery on fire. 
• Do not store the battery with metallic materials. 
•  In  the  event  of  battery  leakage,  wipe  the  remote  control  completely  clean  and  install  a  new 

battery 

• When disposing of used batteries, please comply with government regulations or environmental 

public institution’ s rule that apply in your country/area. 

• Always check carefully that you are loading the battery with plus (+) and minus (-) poles facing 

the proper directions. 

Using the remote control


Point the remote control in the direction of the front panel to operate. 

IMPORTANT


• Do not store the remote control in high temperatures or direct sunlight. 
• Do not let the remote control fall onto the floor, where it may become jammed under the brake 

or accelerator pedal. 

GENERAL OPERATIONS 

Turning the unit ON/OFF/Mute (PWR)


• Head Unit: Press   to turn on the unit. To turn off, long press this button again. 
  Remote Control: Press   button to turn on the unit. To turn off, press this button again. 

Mute Button


• Head Unit: Press the   button to mute the sound at once. Press again to return to previous 

volume level.   

•  Remote  Control:  Press 

MUTE

  button  to  mute  the  sound  at  once.  Press  again  to  return  to 

previous volume level. 

Selecting a source (SRC)


• Head Unit: Press 

SRC

 repeatedly to switch between DISK, AUX IN, USB sources. 

• Remote Control: Press 

SRC

 repeatedly. 

Loading a Disc


Insert a disc into the disc loading slot 

Ejecting a Disc ( )


Press the   button to eject disc 

Display (DISP)


When  this  key  is  pushed,  it  is  showed  different  information  according  to  the  display  mode  as 

follow. 

CD PLAYER MODE


TIME OF TRACK –TIME TO FINISH TRACK--TIME OF TRACK—TIME TO FINISH DISC 

MP3 PLAYER MODE


TIME OF FILE –TIME TO FINISH FILE 

DVD PLAYER MODE


NAME OF TITLE, CHAPTER AND TIME –TIME TO FINISH CHAPTER—TIME TO FINISH 

TITLE 

• 

The information regarding the time of the movie or file has the following format:   

Summary of Contents for ACT501

Page 1: ...USER MANUAL ACT501 W Coach DVD SVCD VCD CD MP3 Player with USB Input ...

Page 2: ...ntrol CD playback Music CD CD R CD RW playback is possible MP3 file playback It is possible to play back MP3 files recorded on CD ROM CD R CD RW PAL NTSC compatibility This unit is PAL NTSC system compatible When connecting other components to this unit be sure components are compatible with the same video system or else images will not be correctly reproduced Multi aspect Switching between wide s...

Page 3: ... unit from the vehicle RCA Connector AUDIO VIDEO INPUT GRAY AUDIO VIDEO OUTPUT BLACK 1 CAN L Brown 2 CAN R120 Black 3 CAN H Pink 5 Ground Black 6 Battery12 24Vdc Yellow 7 ACC Red 8 TEL Mute Orange NOTE ACC Red must be connected by car ignition key in order to avoid that car battery becomes weak when the car will be not used for long period Maintenance FUSE REPLACEMENT If the fuse blows check the p...

Page 4: ...ed on LCD Monitor Receives a light signal from the remote controller Turns the power on off Mute Display info about the current state of player and disc Disc are ejected from this button Reset the unit by hardware Insert the USB and play the file Next track file 1 AUX ICON Indicate the selection of AUX source 2 DISK ICON Indicate the selection of DISK source 3 USB ICON Indicate the selection of US...

Page 5: ...n menu screens Repeats the selected segment Use to move to the desired menu and use ENTER button to choose menu you want Zooms in on picture Displays the titles on the disc under play Shows the menus of the disc under play Reverses through the disc form 2x to x20 fast Forwards through the disc form 2x to x20 fast Moves to the previous chapter DVD or track VCD CDDA MP3 465 4 7 7 5 Moves to the next...

Page 6: ...ote control fall onto the floor where it may become jammed under the brake or accelerator pedal GENERAL OPERATIONS Turning the unit ON OFF Mute PWR Head Unit Press to turn on the unit To turn off long press this button again Remote Control Press button to turn on the unit To turn off press this button again Mute Button Head Unit Press the button to mute the sound at once Press again to return to p...

Page 7: ... all track file names will be displayed on the monitor screen with their corresponding track number You can use the ARROW and ENTER keypads on the remote control to access the file To play selected file simply press ENTER Searching for particular track During playback you can simply press the corresponding track number using the number pad on the remote control Note To select 3 press 0 3 To select...

Page 8: ...memorized enabling playback from that point when you play the disc again To resume playback press on head unit or on remote control Specifying Title Chapter Press NUMBER corresponding to a desired title chapter number during playback The number is displayed and playback starts from the selected title To select 3 press0 3 To select 13 press 1 3 To select 23 press 2 3 Changing audio language during ...

Page 9: ...nto the picture during playback 1 Press ZOOM on the remote control during playback 2 Every time you press this button the unit will zoom 2 3 4 1 2 1 3 1 4 times and OFF Go back to Main Menu You can go back to Main Menu of the DVD anytime during playback Press TITLE on the remote control during playback Displaying information During playback you can see all DVD disc information and current play set...

Page 10: ... 1 Press Slow on the remote control during playback or press on the head unit then long press to enter the slow selection mode 2 Pressing it repeatedly will switch you to the following steps 1 2 1 3 1 4 1 5 1 6 1 7 Note To resume normal playback press on head unit or on remote control There is no sound during slow motion playback With some disc slow motion may be unclear during slow motion playbac...

Page 11: ...AGE LANGUAGE SETUP MENU LANGUAGE SELECT PREFERRED AVAILABLE OPTIONS APPEAR ON SCREEN AUDIO SETUP KEY BRIGHTNESS 0 12 CONTRAST 0 12 HUE 6 6 SATURATION 0 12 VIDEO SETUP SELECT LOGO RESTORE MPEG LOGO DOWNMIX LT RT STEREO VSS SPEAKER SETUP FRONT LARGE SMALL DYNAMIC RANGE OFF FULL DUAL MONO STEREO MONO L MONO R MIX MONO DIGITAL SETUP Setting Rating Password 1 Press SETUP on the remote control 2 Using N...

Page 12: ... product is equipped with CAN2 0B interface which allows it to be connected and commanded by external devices such as steering wheel keys dashboard controls etc Those are products under development by Actia Group Consult Actia technical assistance for further information TECHNICAL SPECIFICATIONS CD MP3 PLAYER SECTION Video performance Composite video Output 1Vpp into 75 Ohm Load Horizontal Resolut...

Reviews: