


ANR-C236N1-K Series User Manual
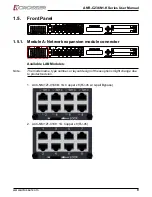
16
Acrosser Technology Co., Ltd.
2. Installation
2.1. Rack Installaion
To mount this server into a 19-inch 4-post rack, you will need to purchase an optional
slide-rail kit from Acrosser.
2.1.1. Required Tools
• 1x Phillips Screwdriver
• 1x 7mm 6-Point Hex Wrench
2.1.2. Slide-rail Kit Contents
The slide-rail kit is an optional 19-inch 4-post rack-mount accessory consist of:
• 2x Slide Rail Assemblies. A slide rail assembly can be installed on either the right
or left side of the rack.
• 1x Screw Pack
Note:
The front-to-back rail spacing must be at least 671 mm (22.01 inches) and not more
than 935.2 mm (30.68 inches) from the outside face of the front rail to the outside
face of the back rail.
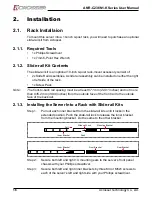
2.1.3. Installing the Server Into a Rack with Slide-rail Kits
Step 1: Pull out each inner bracket from the slide-rail kits until it locks in the
extended position. Push the slide-rail lock to release the inner bracket
from the mounting bracket. Do the same to the other bracket.
Push
Pull
Inner Bracket
Mounting Bracket
Slide-rail Lock
Front Bracket
Inner Bracket
Rear Bracket
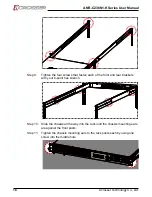
Step 2: Secure both left and right 1U mounting ears to the server’s front panel
chassis with your Phillips screwdriver.
Step 3: Secure both left and right inner brackets by three M4 or M5x5 screws to
each of the server’s left and right side with your Phillips screwdriver.


