background image

8

Using Activities

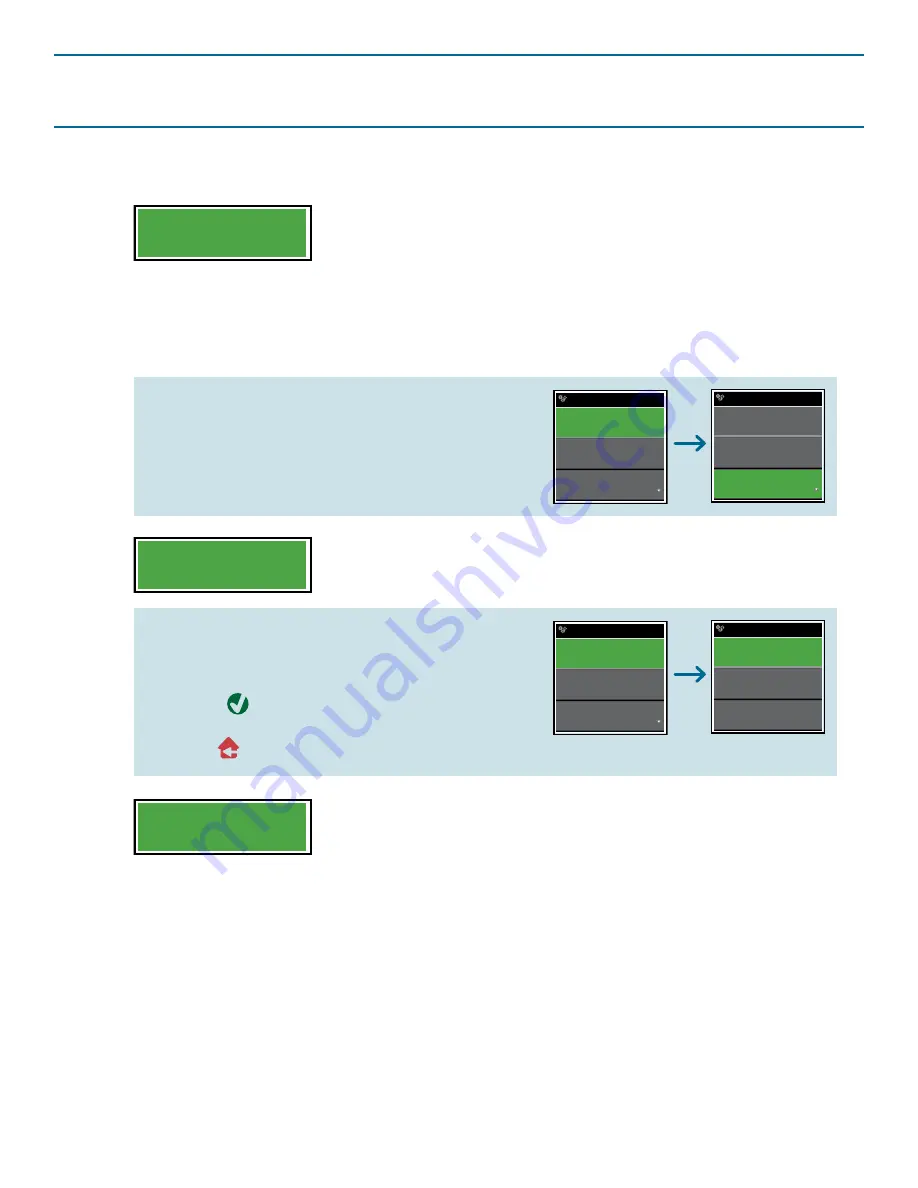
1.  When you start using your home theater—

before you turn 

anything on

—choose the 

Hello

 activity on the 

Xsight™ 

remote. 

IMPORTANT:

 Keep the remote pointed at your home 

entertainment devices until you can see the activity 

has finished and your devices have responded to the 

remote’s commands.

Need help after the “Hello” activity has 
finished?

Select 

Assist

. Then select 

Power

 to turn devices 

on manually. Use the arrow keys below the 
screen to access more devices.

2.  Choose the home entertainment activity you want to 

perform (for example, 

Watch TV

).

Hello

Hello

Assist?

Back

PIP

Watch Movie

Assist

Picture

Sound

Power

3.  When you’re finished with your home theater, choose the 

Good Night

 activity.

Note:

 The Assist function for each activity offers only the 

kinds of commands used in that activity. So, for example, 

if the activity you’re using has power commands only, the 

Assist function will offer the Power option only—the Sound 

and Picture options will be grayed out.

Need help after a “Watch...” or “Listen...” 
activity has finished?

Select 

Assist

. Then select 

Picture 

or

 Sound

Press the 

 key for the input displayed until 

you see or hear the correct signal. Press and 
hold the 

 key to go to the main menu.

Watch Movie

Assist?

Subtitle

Skip+

Assist

Picture

Sound

Power

Good Night

Activities

Summary of Contents for Xsight uno

Page 1: ...Owners Manual UNO ...

Page 2: ... Expand and customize features to control your entire home theater with simple one touch activities like Watch TV or Listen to CD and a favorite channel list This Owners Manual guides you through the remote menus that let you get the most from your Xsight Uno Contents Unpacking 3 Getting Started 3 Tour of the Remote 4 Hard keys 4 Interactive LCD screen 5 Home Screen 6 Devices 6 What is Quick Power...

Page 3: ...2 Follow the Remote s On Screen Setup Routine Once the remote has working batteries installed it s ready to start its setup routine To start using your remote at any time simply pick it up The remote s LCD screen will come on and the backlight will illuminate For more information on the Xsight Uno on screen setup routine see the Setup Guide 3 Connect to Your PC for Advanced Setup Once you ve set u...

Page 4: ...u INFO displays information about your video or audio signal EXIT leaves the device guide or menu and Channel keys operate channel up down functions in video devices and preset up down in audio devices Go Back takes you to the previous channel or menu guide screen on your device and Volume keys increase or decrease the volume Mute decreases the volume to its lowest level Arrow keys and OK navigate...

Page 5: ...you want on a menu screen look for the arrow in the lower right corner of the screen that means there are more items in this menu To access these items just keep pressing the down arrow when you get to the last item showing The top of the remote also offers Shortcut keys to give you one touch access to some of the remote s advanced functions Home Back goes back one screen in the menus Holding this...

Page 6: ... your TV Once you ve selected a device to control the remote screen displays the soft keys for that device These are keys that your original device remote may have that the Xsight Uno does not have physical or hard keys for Devices can be set up using the remote via Device Setup or Learning in the Settings menu or using PC Setup To access the Devices Screen at any time Press the Devices shortcut k...

Page 7: ...keys control which devices when you re watching a movie like having the transport keys play reverse fast forward etc control the DVD player but the volume keys control your A V receiver Setting Up Activities 1 Connect the Xsight Uno to your PC using the supplied USB cable 2 Double click on the EZ RC Remote Control Setup Wizard icon on your PC desktop to launch NOTE If you haven t already installed...

Page 8: ...r example Watch TV Hello Hello Assist Back PIP Watch Movie Assist Picture Sound Power 3 When you re finished with your home theater choose the Good Night activity Note The Assist function for each activity offers only the kinds of commands used in that activity So for example if the activity you re using has power commands only the Assist function will offer the Power option only the Sound and Pic...

Page 9: ...uble click on the EZ RC Remote Control Setup Wizard icon on your PC desktop to launch NOTE If you haven t already installed the EZ RC Remote Control Setup Wizard on your PC you can install it using the CD ROM that came with your remote See the Setup Guide that came with your remote for instructions 3 Follow the prompts from the EZ RC Remote Control Setup Wizard website until you get to the screen ...

Page 10: ...d 3 Select the device type you are adding After you select a device type the available device brands are listed NOTE If you don t see the device type you want to add press the down arrow key beneath the screen to scroll through the pages to view more device types If your desired device type is not listed you can use the EZ RC Remote Control Setup Wizard to search for additional brands or learn the...

Page 11: ...ss the down arrow key beneath the screen to scroll through the pages to view more devices 3 Select the device whose code you want to view The remote will display the code being used for that device NOTE If you don t find a functioning code you can use the EZ RC Remote Control Setup Wizard website on your PC to search for additional codes or Learn the device from your original remote Add Device Ent...

Page 12: ...en to scroll through the pages to view more devices 3 Select the device you want to delete A confirmation screen appears NOTE If the device you are deleting is in use by one or more Activities or Favorites the remote will display a warning message 4 Select Yes to delete the device or No to exit without deleting the device To access the Home Screen at any time Hold down the Home Back key for 2 seco...

Page 13: ...scroll through more device pages 4 Enter a name for the device Use the number keys on the Xsight Uno to enter letters and numbers like texting on a mobile phone Press to delete the previous character Press when you re finished 5 Press the first key on the Xsight Uno you want to learn onto either a physical key or an on screen soft key select On Screen keys to choose a soft key NOTE You can Learn o...

Page 14: ...uccessfully learns the key it saves the learned function to its memory NOTES If you re learning an on screen key the remote will prompt you to save a label Use the number keys on the Xsight Uno to enter letters and numbers like texting on a mobile phone Press to delete the previous character Press when you re finished To learn additional keys for this device Press the key on the Xsight Uno you wan...

Page 15: ... learning the function onto already has a function you will be asked if you want to overwrite it Settings Device Setup Learning Volume Control Learning New Device TV Cable Box For which device Learning Point the original remote towards the top lens and press the key you want to learn 2 Select the device you want to use the function with NOTE If you don t see the device you want press the down arro...

Page 16: ...r entire home entertainment system s volume For example if you have the sound from your TV and DVD player routed through your A V receiver you can tell the Xsight Uno to control volume on the A V receiver regardless of which device mode you re in So if you re using the rest of the keys on the remote to control your DVD player you can still control just the A V receiver with the volume keys You can...

Page 17: ...nish Settings Unlocking All Volume Control 1 Select Volume Control from the Settings menu 2 Review the explanatory screen then select OK Or select Tell me more if you d like more information 3 Select Unlock All The remote asks you to confirm Select Yes to unlock volume control completely Select No to cancel 4 Select Finish To access the Home Screen at any time Hold down the Home Back key for 2 sec...

Page 18: ...to set the brightness level Settings Contrast Set contrast OK Brightness Set brightness OK Timeout To save battery power the key backlight and LCD screen automatically dim after a period of inactivity the default period is 10 seconds You can view and adjust this timing under the Timeout setting 1 Select Timeout from the Settings menu 2 The screen displays the current period of time before the remo...

Page 19: ... the Home Screen at any time Hold down the Home Back key for 2 seconds Pressing this key once takes you back one screen Language English Español Deutsch About The About screen tells you which version of software the remote is using as well as other information about the technology used in the remote To access the About screen Select About from the Settings menu The first About screen tells you the...

Page 20: ... Reset from the Settings menu The remote will display the Reset Screen 2 Press the 9 8 1 number keys 3 Select Factory Reset 4 Select Yes in the confirmation screen to delete all device programming activities profiles and favorites and setup information the remote s initial setup program will start Select No to cancel the reset and retain all settings To access the Home Screen at any time Hold down...

Reviews: