background image

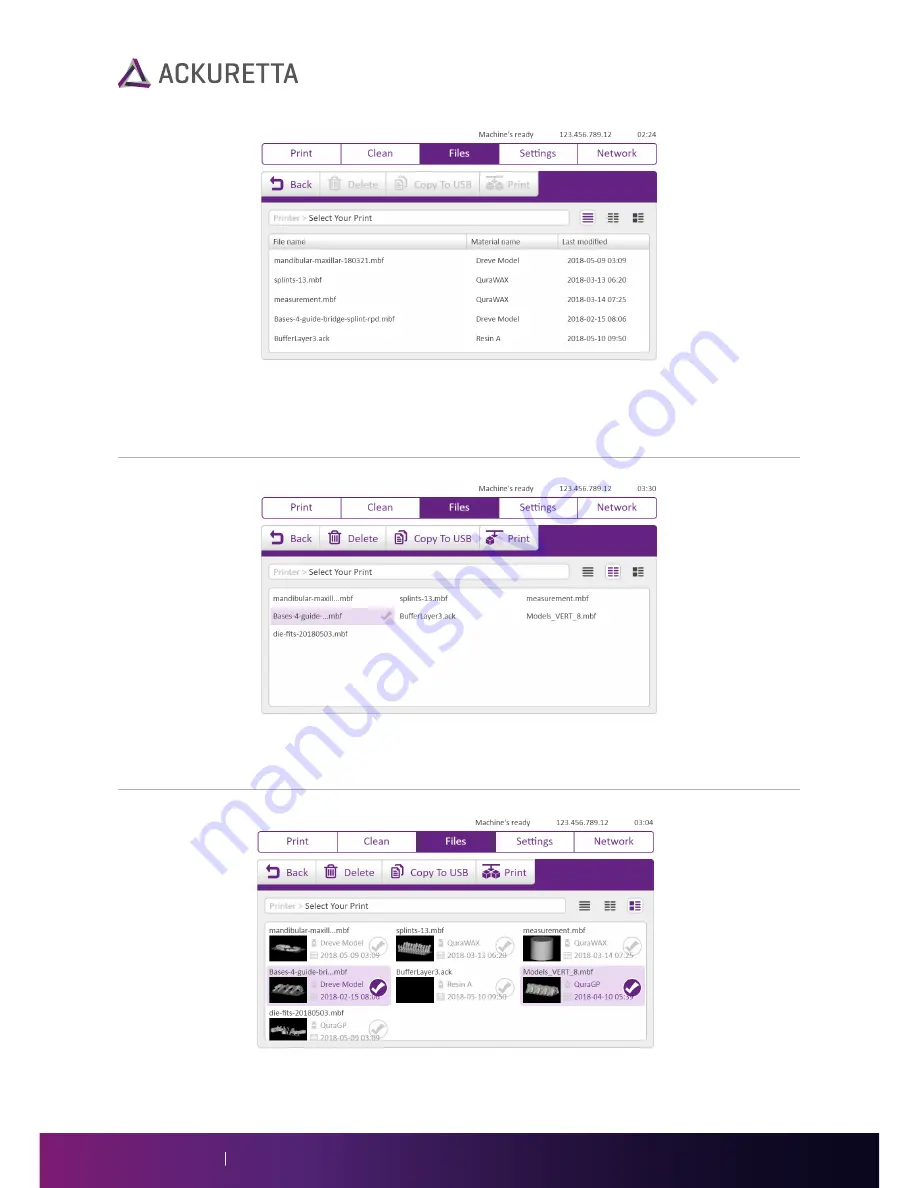
Details View

In the 

Details

 view, you can see all file names in a single list, along with the print material inherited 

from the software, as well as the last time that the print was modified. Press the respective header row 
to sort by 

File name

Material name

, or 

Last modified

 time.

Columns View

The 

Columns

 view shows many more files at one time than 

Details

 or 

Preview

 views. Use this view if 

you have many files.

Preview View

Underneath each file name, the image for that file is shown in the 

Preview

 view. This allows you to scan 

through each of your files to find which file you want to manage visually.

Diplo User Manual

16

Summary of Contents for Diplo

Page 1: ...Diplo User Manual 2017 07 2018 06 Document Version 1 1 ...
Page 2: ...Manual Unboxing Print Network Software and Print File Types Files Updating Your Printer Firmware Diplo Machine Overview Setting up Your Printer Settings Clean Printing from the Diplo Web Console Setup Environment CONTENTS ...

Page 3: ...onal DLP printers and with Wi Fi connectivity you can start pause and monitor your prints anytime or anyplace About the Diplo Diplo Machine Overview Diplo Back Sides Diplo Interior Diplo Front Sides Door Side Doo r Console Screen button Wi Fi USB dongle and port USB port Console Side Auxiliary port Fan Fan Side Cable Side Serial number sticker Service port Power port Power switch Ethernet LAN port...

Page 4: ...ild platform Wi Fi dongle Diplo Package Items Unboxing Lift the top box upward This box is just a protective shell that envelops the other boxes Remove the side box Inside this box are any additional vats or build platforms that you purchased If you did not purchase any additional vats or build platforms this box is empty Diplo User Manual 02 Bottles of resin and finishing kit tools are only store...

Page 5: ...u did not purchase the finishing kit this box is empty Remove final box off of the Diplo machine Inside the Diplo machine is protected by styrofoam and plastic The power cable is placed on top of the Diplo Place the power cable to the side Remove the plastic and styrofoam protection from the Diplo The Diplo is packaged with a vat and a build platform attached The Wi Fi dongle is connected to a USB...

Page 6: ...ats without obstruction UV Filtered Lighting The UV protected door of the Diplo protects the resin from outside lighting while the door is closed As you use the printer the door will be opened many times and the resin will be exposed to outside light To protect the resin set up the printer in a place where the lighting is controllable or covered by a UV filter Similarly use the same UV filtering i...

Page 7: ...binet with an opaque door The plastic shells are approximately 32 32 8 cm 12 6 12 6 3 15 in in size and a little space is necessary for lifting and removing them The shells are stackable so 3 shells comfortably fit in a cubic space of 35 cm 14 in on each side Beyond vats leave space for unused resin bottles bottles for used resin cleaning alcohol and waste Usually an additional 35 35 cm space 14 1...

Page 8: ... you receive your printer Ackuretta will additionally send your software to you with special installation instructions Ackuretta printers only operate using output files from Ackuretta software Setting Up Your Printer The Diplo was designed to be plug and play so setup is minimal The printer is packaged with a vat and build platform attached so no assembly is required Each printer is pre calibrate...

Page 9: ... front and the back of the vat are symmetrical You can push it in either way Note Place your vat on the vat guideway and push it all the way back Place your build platform on the platform guideway and push it all the way back Close the door If your distributor gave you a firmware update attach a USB device with the firmware package See Updating Your Firmware on page 23 ...

Page 10: ...ab is open by default In this tab you can select and start your prints Before You Begin Make your print files in your software See Software and Print File Types on Page 5 Clean your vat and build platform Fill your vat with at least 2 mm of resin Attach your vat by pushing it as far back as possible along the vat guideway Attach your build platform by pushing it back along the build platform guide...

Page 11: ...ild platform is aligned parallel to the console In the Print tab the Left Print Area and Right Print Area are from the perspective of the console If you are looking at the door the Left Print Area would be the area closest to you and the Right Print Area would be toward the interior of the machine USB Select a print file from your USB device You must have a USB device attached to the printer Print...

Page 12: ...s button See step 5 Switch the sides of the prints Select an additional print file and or modify your prints to prepare them for printing The following options are available Optional If your curing time is incorrect press the modify symbol to change the curing time In the screen that appears press Change to choose your curing time Set a different value for the curing time and press the checkbox sy...

Page 13: ...t This option is only available after the print has paused Turn off the printer screen This does not pause the print or shut down the printer This may be used to conserve energy or keep the room dark You may turn off the screen at any time not only when the printer is printing The print will proceed You do not need to perform any action at this point The print will be displayed on the screen so yo...

Page 14: ...tform during printing The Clean function cures one layer of resin at the bottom of the vat and then you can easily remove that cured layer and throw away any lingering debris with it Small pieces of paper note cards sticky notes or business cards work well At least 0 5 mm of resin across the vat Tissues What You Need Do not use any metal tools in the vat because metal tools may damage the vat surf...

Page 15: ... curing time of at least 5 times the curing time of the resin at 0 100 mm per layer For most resins 10 seconds is enough time Note Press one of the three buttons to begin cleaning the appropriate side or sides Clean Both Sides Clean Left or Clean Right In the confirmation screen press Clean to confirm The machine will begin curing one layer off the bottom of the vat You do not need to perform any ...

Page 16: ...ving the layer remove the vat from the machine and place the vat in its plastic shell While in the plastic shell tilt the vat so that one corner of the layer is visible At an angle it is easier to slide paper under the layer Tip Files The Files tab is used for printer file and disk space management In the File Management screens you can preview your print files copy files between your printer and ...

Page 17: ... and perform actions on it Touch and hold on a file or folder to enable multi select mode Delete Delete selected file s Copy to USB Copy to Printer Copy selected file s from their current location to the USB device or printer memory respectively Print If one or two files are selected go to the Print tab with those files selected Path bar This area shows which folder you are currently viewing View ...

Page 18: ...e header row to sort by Filename Materialname or Lastmodified time Columns View The Columns view shows many more files at one time than Details or Preview views Use this view if you have many files Preview View Underneath each file name the image for that file is shown in the Preview view This allows you to scan through each of your files to find which file you want to manage visually Diplo User M...

Page 19: ...es the setting immediately so be careful with which settings you adjust and record the previous settings before modifying Print Settings This screen contains two related settings regarding buffer layers The Diplo cures the first several layers much longer than the rest of the print This ensures that the print stays attached to the platform To change numbers in this screen touch and slide to the le...

Page 20: ...e settings in this dialog up and down to change your month day year and time Firmware version The currently installed version of the Diplo firmware Machine ID The unique ID for this Diplo This is not the same as the serial number which is affixed to the back fan side of the Diplo Storage used The Diplo has 4 GB of on board storage About 2 GB of that storage is dedicated to the Diplo firmware and l...

Page 21: ...rint files and logs will be deleted and printer performance may be affected Perform this action with caution Warning Network Connect to a Wi Fi network or LAN from the Network tab After connecting to a network you can access the printer from your browser using the Web Console Connect Your Wi Fi Dongle The Diplo arrives with a Wi Fi dongle attached to one of the USB ports Ensure that your Wi Fi don...

Page 22: ...nections use dynamic IP address and DNS servers Go to the IP Addresses tab if your office security systems require you to set a static IP address or DNS server Find IP address automatically Disable this setting if you need to set a static IP address In the options that appear below you will need to set your IP address Subnet mask and Default gateway A number pad will appear whenever you select a s...

Page 23: ... the Diplo Web Console After you have set up a network connection you can upload start and monitor prints directly from your computer through your Internet browser The Diplo Web Console is only able to upload start and monitor prints as well as update firmware To clean your vat manage files or monitor your settings use the console directly on the Diplo machine Note Before You Begin Prepare your pr...

Page 24: ...parameters and the estimated print time Click one of the following buttons to continue Go back to the previous screen and select different prints See Step 2 Back Change the curing time or positioning of the prints Both prints may have different curing times See step 4 Modify Start the print A confirmation screen will appear after you press this button See step 5 Print The Diplo is positioned such ...

Page 25: ...has completely paused the options to Resume Cancel and Raise Platform become available Updating Your Printer Firmware Installing firmware on the Diplo is mostly an automated process You can install the firmware either by loading a firmware package to your USB device or automatically over the Internet The following guide helps you to update your firmware by a few methods Ackuretta recommends updati...

Page 26: ...e and if one is found an update screen will appear 7 Press Update 8 The printer will restart after updating Method 2 Update over the Internet from the Console 1 Connect to a Wi Fi network with internet access See Network on page 19 2 Go to Settings System 3 Press Update firmware online 4 The machine will check for an update from the Ackuretta server and if one is found an update screen will appear...

Page 27: ...ile on the same network as the Diplo and type the IP address shown on the Diplo console into the address bar 3 The browser will search for an update from the Ackuretta server automatically 4 If an update is found a New Version Released screen appears 5 Click Update Now 6 The printer will restart after updating 7 Reload your browser 25 Diplo User Manual ...

Page 28: ...Ackuretta Technologies Pvt Ltd No 322 4th Floor B Section 1 Neihu Road Neihu District Taipei City 11493 Taiwan R O C Tel 886 2 7737 8330 www ackuretta com ...

Reviews: