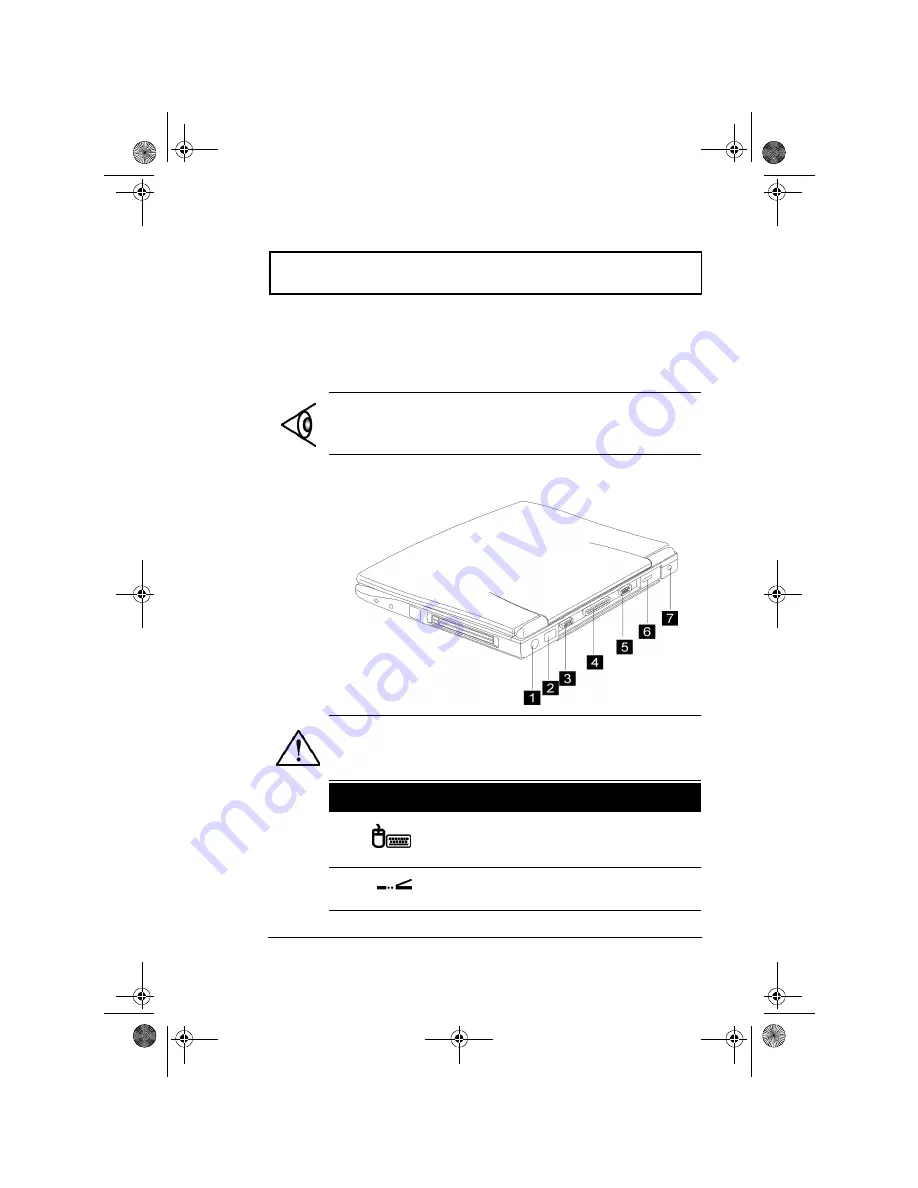
Acer TravelMate 310 User Manual Download Page 39

Ports

Chapter 1  Getting Familiar with your Computer 

19

Ports

Ports allow you to connect peripheral devices to your 
computer as you would with a desktop PC.

Rear Ports  

Note: 

See Chapter 3 on how to connect external devices to 

the computer.

Caution: When opening the rear port cover, carefully 
slide it under the computer using both hands.

#

Icon

Port

Connects to...

1

PS/2 Port

PS/2-compatible devices (e.g., 
PS/2 keyboard, keypad, 
mouse)

2

FIR Port

Infrared devices (e.g., infrared 
printer, IR-aware computers)

310-e.book  Page 19  Tuesday, October 27, 1998  5:17 PM

Summary of Contents for TravelMate 310

Page 1: ...may be reproduced stored in a retrieval system or transmitted in any form or by any means electronic mechanical photocopy recording or otherwise without the prior written permission of Acer Incorporated TravelMate Notebook Computer Model___________Serial No ____________Purchase Date_______________ TravelMate is a trademark and a product of Acer Inc developed with Texas Instruments Inc All other tr...

Page 2: ...ii 310 e book Page ii Tuesday October 27 1998 5 17 PM ...

Page 3: ...2 Operating on Battery Power 31 Battery Pack 32 Power Management 39 Chapter 3 Peripherals and Options 45 External Monitor 46 External Keyboard 47 External Keypad 48 External Pointing Device 49 Printer 51 Audio Devices 52 PC Cards 53 External PCMCIA CD ROM optional 54 USB Devices 55 Miscellaneous Options 56 Key Component Upgrades 59 Chapter 4 Moving with your Computer 61 Disconnecting from the Desk...

Page 4: ...ter 67 Chapter 5 Software 69 System Software 70 PhDISK 71 Notebook Manager 72 Setup Utility 81 Chapter 6 Troubleshooting 95 Frequently Asked Questions 96 Error Messages 100 Appendix A Specifications 103 Index 107 310 e book Page iv Tuesday October 27 1998 5 17 PM ...

Page 5: ... 310 series notebook computer has been tested both by Acer s internal test labs and NSTL s YMARK2000 certification test These tests certify that the Travelmate 310 series notebook computer will successfully make the year 2000 transition For more details check the Acer Year 2000 Resource Center at http www acer com year2000 Notices 310 e book Page v Tuesday October 27 1998 5 17 PM ...

Page 6: ...the device off and on the user is encouraged to try to correct the interference by one or more of the following measures 1 Reorient or relocate the receiving antenna 2 Increase the separation between the device and receiver 3 Connect the device into an outlet on a circuit different from that to which the receiver is connected 4 Consult the dealer or an experienced radio television technician for h...

Page 7: ...s 1 this device may not cause harmful interference and 2 this device must accept any interference received including interference that may cause undesired operation Notice Canadian Users This Class B digital apparatus meets all requirements of the Canadian Interference Causing Equipment Regulations Remarque à l intention des utilisateurs canadiens Cet appareil numérique de la classe B respected to...

Page 8: ...The openings should never be blocked by placing the product on a bed sofa rug or other similar surface This product should never be placed near or over a radiator or heat register or in a built in installation unless proper ventilation is provided 7 This product should be operated from the type of power indicated on the marking label If you are not sure of the type of power available consult your ...

Page 9: ...d If the product does not operate normally when the operating instructions are followed Adjust only those controls that are covered by the operating instructions since improper adjustment of other controls may result in damage and will often require extensive work by a qualified technician to restore the product to normal condition e If the product has been dropped or the cabinet has been damaged ...

Page 10: ...d set provided in your accessories box for this unit It should be a detachable type UL listed CSA certified type SPT 2 rated 7A 125V minimum VDE approved or its equivalent Maximum length is 15 feet 4 6 meters 310 e book Page x Tuesday October 27 1998 5 17 PM ...

Page 11: ...efalt av apparatfabrikanten Brukte batterier kasseres i henhold til fabrikantens instruksjoner VARNING Explosionsfara vid felaktigt batteribyte Anvãnd samma batterityp eller en ekvivalent typ som rekommenderas av apparattillverkaren Kassera anvãnt batteri enligt fabrikantens instruktion VAROITUS Päristo voi räjähtää jos se on virheellisesti asennettu Vaihda paristo ainoastaan laitevalmistajan suos...

Page 12: ...xii 310 e book Page xii Tuesday October 27 1998 5 17 PM ...

Page 13: ...ut the day to day operation of your TravelMate notebook computer Use the Just for Starters instructions that came with your computer to get your computer running for the first time You should also take advantage of the online help files that are available with almost all of the programs shipped with your computer We hope you enjoy your TravelMate computer With proper care your computer will provid...

Page 14: ...the compartment cover back into the computer c and then lock the battery in place d Note Make sure the cover latch is unlock before inserting the battery pack otherwise you won t be able to insert the battery pack Note When using a battery pack for the first time fully recharge the battery then disconnect the adapter to use up the battery before recharging again You only need to do this once with ...

Page 15: ... release it to turn on the power The POST Power On Self Test routine executes and Windows begins loading Note To turn off power slide the power switch again If you are using Windows 95 or higher version operating system we recommend you use the Shutdown command to turn off the computer If you turn off the computer and want to turn it on again wait at least 2 seconds before powering up 310 e book P...

Page 16: ...ess the online documentation 1 Press the Windows logo button or Click on the Start button 2 Select Programs 3 Click on TravelMate Online The online help is easy to navigate with hypertext and hypergraphics Clear illustrations help describe notebook operation as well Getting Online If you are connected to the Internet and have World Wide Web access visit our home page http www acer com and get the ...

Page 17: ...cal assistance and support in the United States and Canada you can call 1 800 816 2237 You can also contact the local dealer or distributor in the country you are traveling in for assistance To view support information follow these steps 1 Click on Start Settings Control Panel 2 Double click on System 3 Click on Support Information Note Always have your ITW passport on hand especially when you tra...

Page 18: ... notebook Do not subject the computer to heavy shock and vibration Do not expose the notebook to dust and dirt Never place objects on top of the notebook to avoid damaging the notebook Never place the notebook on uneven surfaces Taking Care of your AC Adapter Here are some ways to take care of your AC adapter Do not connect the adapter to any other device Do not step on the power cord or place hea...

Page 19: ... batteries Do not tamper with batteries Keep them away from children Dispose of used batteries according to local regulations Recycle if at all possible Cleaning and Servicing When cleaning the notebook follow these steps 1 Power off the notebook and remove the battery pack 2 Disconnect the AC adapter 3 Use a soft cloth moistened with water Do not use liquid or aerosol cleaners Contact your dealer...

Page 20: ...xx User s Guide 310 e book Page xx Tuesday October 27 1998 5 17 PM ...

Page 21: ... Display 4 Indicators and Microphone 6 Keyboard 8 Special Keys 8 Lock Keys 8 Embedded Keypad 9 Windows Keys 10 Hot Keys 11 Keyboard Ergonomics 14 Touchpad 15 Touchpad Basics 15 Storage 17 Hard Disk 17 External Drive 17 Connecting an External Floppy Drive 18 Ports 19 Rear Ports 19 Fast Infrared 20 Universal Serial Bus 21 Right Ports 22 Fax Data Modem 23 PC Card Slots 23 Audio 26 Securing your Compu...

Page 22: ...y drive External CD ROM drive optional High capacity enhanced IDE hard disk Lithium Ion battery pack Heuristic power management system with standby and hibernation power saving modes Multimedia 16 bit high fidelity stereo audio with 3 D sound Built in speaker Built in microphone Connectivity High speed fax data modem port Fast infrared wireless communication USB Universal Serial Bus port Human cen...

Page 23: ...and curved palm rest Ergonomically centered touchpad pointing device Expansion CardBus PC card formerly PCMCIA slots two type II I or one type III with ZV Zoomed Video port support Upgradeable memory and hard disk 310 e book Page 3 Tuesday October 27 1998 5 17 PM ...

Page 24: ...presentation from your computer and at the same time face your audience You can even connect other output display devices such as LCD projection panels for large audience presentations Power Management The power management system incorporates an automatic LCD dim feature that automatically decides the best settings for your display and at the same time conserve power See Power Management on page 3...

Page 25: ...tly until the display cover latch clicks into place Note If an external monitor is connected the computer turns off the display but does not enter standby mode when you close the display cover Caution To avoid damaging the display do not slam it when closing Do not place any object on top of the computer when the display is closed 310 e book Page 5 Tuesday October 27 1998 5 17 PM ...

Page 26: ... status of the computer while the cover is closed The LED panel also has an internal microphone for multimedia purposes Icon Function Description Power Lights when the computer is on Standby Lights when the computer enters Standby mode Media Activity Lights when the hard disk is active Battery Charge Lights when the battery is being charged Power Standby Media Activity Battery Charge Caps Lock Num...

Page 27: ... Getting Familiar with your Computer 7 Caps Lock Lights when Caps Lock is activated Num Lock Lights when Numeric Lock is activated Microphone Use for sound input Icon Function Description 310 e book Page 7 Tuesday October 27 1998 5 17 PM ...

Page 28: ...racters typed are in uppercase Num Lock Fn SL When Num Lock is on the embedded keypad is in numeric mode The keys function as a calculator complete with arithmetic operators and Use this mode when you need to do a lot of numeric data entry A better solution would be to connect an external keypad Scroll Lock When Scroll Lock is on the screen moves one line up or down when you press or respectively ...

Page 29: ...ck On Num Lock Off Number keys on embedded keypad Type numbers in a normal manner Cursor control keys on embedded keypad Hold Shift while using cursor control keys Hold Fn while using cursor control keys Main keyboard keys Hold Fn while typing letters on embedded keypad Type the letters in a normal manner Note If an external keyboard or keypad is connected to the computer the numlock feature autom...

Page 30: ...n Combinations with this key perform special functions Below are a few examples ÿ Tab Activate next Taskbar button ÿ E Explore My Computer ÿ F Find Document ÿ M Minimize All Shift ÿ M Undo Minimize All ÿ R Display Run dialog box Application key Opens the application s context menu same as right click 310 e book Page 10 Tuesday October 27 1998 5 17 PM ...

Page 31: ...a list of the hotkeys and their functions Fn F2 Notebook Manager Access the notebook configuration utility See Notebook Manager on page 72 Fn F3 Standby Puts the computer in Standby mode Press any key to return See Standby mode on page 40 to know more about Standby mode Fn F4 Hibernation Puts the computer in Hibernation mode Save to Disk Press the power switch to resume See Hibernation mode on pag...

Page 32: ...lume up Increases the speaker s volume level Fn F9 Brightness down Decreases the screen brightness Fn F10 Brightness up Increases the screen brightness Fn F11 Contrast down Decreases the screen contrast available only for models with STN displays Fn F12 Contrast up Increases the screen contrast available only for models with STN displays Fn PgUp Page Up Scrolls the screen one page up Fn PgDn Page ...

Page 33: ...en backlight off to save power Press any key to return Fn T Touchpad on off1 Turns the internal touchpad on and off See Touchpad on page 15 Fn SL Num Lock When Num Lock is on the embedded keypad is in numeric mode Fn Ins Print Screen Prints the information currently displayed on screen Fn Del System Request Software specific function 1Fn T only works when no external PS 2 mouse or external serial ...

Page 34: ...eyboard 14 User s Guide Keyboard Ergonomics Located below the keyboard the wide and curved palm rest gives you a place to rest your hands while you type 310 e book Page 14 Tuesday October 27 1998 5 17 PM ...

Page 35: ...nd support Touchpad Basics The following items teach you how to use the touchpad Move your finger across the touchpad to move the cursor Press the left and right buttons located on the edge of the touchpad to do selection and execution functions These two buttons are similar to the left and right buttons on a mouse Tapping on the touchpad produces similar results Note Connecting an external PS 2 m...

Page 36: ...e at the same speed as double clicking the mouse button and hold finger to the touchpad on the second tap to drag the cursor Access context menu Click once Note Keep your fingers dry and clean when using the touchpad Also keep the touchpad dry and clean The touchpad is sensitive to finger movements Hence the lighter the touch the better the response Tapping too hard will not increase the touchpad ...

Page 37: ...hare the parallel port with both a printer and an external floppy drive It can automatically detect whether a printing device or a floppy drive has been inserted You can connect these two devices together using an optional parallel cable See Parallel Cable on page 57 External 3 5 inch floppy drives come with a capacity of 720KB 1 2MB or 1 44MB You can also connect an external PCMCIA CD ROM drive t...

Page 38: ...f the floppy drive cable to the parallel port and the other end to the connector on the external floppy drive Note The external floppy drive is hot pluggable You do not need to turn off the computer to connect and use the floppy drive 310 e book Page 18 Tuesday October 27 1998 5 17 PM ...

Page 39: ...e See Chapter 3 on how to connect external devices to the computer Caution When opening the rear port cover carefully slide it under the computer using both hands Icon Port Connects to 1 PS 2 Port PS 2 compatible devices e g PS 2 keyboard keypad mouse 2 FIR Port Infrared devices e g infrared printer IR aware computers 310 e book Page 19 Tuesday October 27 1998 5 17 PM ...

Page 40: ...transfer data at speeds of up to four megabits per second Mbps at a distance of up to one meter 3 Serial port Serial devices e g serial mouse 4 Parallel port Parallel devices e g parallel printer 5 External monitor port Display monitors up to 1024x768 resolution 64K colors 6 USB Port USB devices 7 DC in jack AC adapter and power outlet Icon Port Connects to 310 e book Page 20 Tuesday October 27 19...

Page 41: ...rt and offset no more than 15 degrees When the two computers are in position simply begin the data transfer as you normally would See your file transfer software for details Universal Serial Bus The Universal Serial Bus USB port allows you to connect USB peripherals without occupying system resources 310 e book Page 21 Tuesday October 27 1998 5 17 PM ...

Page 42: ...crophone audio CD player stereo walkman 2 Speaker out jack Speakers or headphones 3 Modem jack Phone line 4 PC Card slots 16 bit PC Cards and 32 bit CardBus PC Cards Only the lower PC Card socket supports ZV PC Cards 5 Security Lock a Kensington compatible key based computer security lock 310 e book Page 22 Tuesday October 27 1998 5 17 PM ...

Page 43: ...credit card sized cards that enhance the usability and expandability of the computer PC Cards formerly PCMCIA are add on cards for portable computers giving you expansion possibilities long afforded by desktop PCs Popular type II cards include flash memory SRAM fax data modem LAN and SCSI cards Common type III cards are 1 8 inch ATA drives and cellular modems CardBus improves on the 16 bit PC card...

Page 44: ...e the proper connections e g network cable if necessary See your card manual for details For type III cards insert card into the lower slot Ejecting a Card Before ejecting a PC card Exit the application using the card Left click on the PC card icon on the taskbar and stop the card operation Note Refer to your card s manual for details on how to install and use the card and its functions 310 e book...

Page 45: ...Ports Chapter 1 Getting Familiar with your Computer 25 Then press the slot eject button to eject the card 310 e book Page 25 Tuesday October 27 1998 5 17 PM ...

Page 46: ...r positioned beside the display directs sound towards you which allows for excellent sound output Besides the built in speaker there is an audio port on the right panel of the computer See Audio Devices on page 52 for more information on connecting external audio devices Speaker Speaker For TFT Display Type Model For STN Display Type Model 310 e book Page 26 Tuesday October 27 1998 5 17 PM ...

Page 47: ...ling Volume The volume of the computer is easily controlled using hotkeys Press Fn F7 to decrease the speaker s volume level or press Fn F8 to increase the volume level See Hot Keys on page 11 for more information 310 e book Page 27 Tuesday October 27 1998 5 17 PM ...

Page 48: ...ch and turn the key to secure the lock Passwords A two level password scheme protects your computer from unauthorized access When set no one can access the computer without entering the correct password See Security on page 88 for more information on setting and removing a password There are two types of passwords you can set Supervisor Password secures your computer against unauthorized use and p...

Page 49: ...ssword secures your computer against unauthorized use Important Do not forget your password If you forget your password you need to contact your dealer Note You must set the supervisor password before you can set the user password 310 e book Page 29 Tuesday October 27 1998 5 17 PM ...

Page 50: ...30 User s Guide 310 e book Page 30 Tuesday October 27 1998 5 17 PM ...

Page 51: ... 32 Installing and Removing the Battery Pack 33 Charging the Battery 34 Charging Modes 34 Checking the Battery Level 35 Using the Windows Battery Meter 35 Optimizing Battery Life 36 Battery low Warning 37 Power Management 39 Power Management Modes 39 Display Standby Mode 39 Hard Disk Standby Mode 40 Peripheral Standby Modes 40 Standby mode 40 Hibernation mode 41 Advanced Power Management 43 Operat...

Page 52: ...is critically low You can correct this situation by recharging the battery pack Whenever possible use the AC adapter The battery will come in handy when you travel or during a power failure It is advisable to have an extra fully charged battery pack available as backup Note When using a battery pack for the first time fully recharge the battery then disconnect the adapter to use up the battery bef...

Page 53: ...own the cover 2 Attach the battery to the cover Align the battery s clasp to the cover and slide it down until the battery is properly seated Warning Do not expose battery packs to temperatures below 0ºC 32ºF or above 60ºC 140ºF This may adversely affect the battery pack Note Make sure the cover latch is unlock before inserting the battery pack otherwise you won t be able to insert the battery pac...

Page 54: ...r pull out the battery pack Charging the Battery To charge the battery place the battery pack inside the battery compartment and plug the AC adapter into the computer and an electrical outlet Charging Modes The adapter has three charging modes Rapid mode The computer uses rapid charging when power is turned off and a powered AC adapter is connected to it In rapid 310 e book Page 34 Tuesday October...

Page 55: ...aining while the computer is in use Checking the Battery Level The computer features battery low warning signals that are both audible and visible When the battery pack is low the computer emits warning beeps and the battery indicator flashes at regular intervals Also you can check the battery charge level using the Windows battery gauge Using the Windows Battery Meter The Windows battery meter in...

Page 56: ...evel to eliminate the battery self discharge effect The charge in use function also charges the battery pack Disable the parallel and serial ports if no devices are connected to these ports You can do this through the Setup Utility See Advanced on page 86 Eject the PC card from the card slot when not in use since the PC card draws extra power Store the battery pack in a cool dry place The recommen...

Page 57: ...ar intervals until battery power is depleted When you receive a battery low warning you have around three minutes to save your work If you do not connect the AC adapter within this period the computer enters Hibernation mode if the Battery Low Suspend parameter in Setup is enabled and the following conditions exist The Hibernation file created by PHDISK is present and valid See PhDISK on page 71 T...

Page 58: ...ttery rapidly An extra fully charged battery pack available 1 Save all necessary files 2 Exit the application 3 Power off the computer 4 Replace the battery pack 5 Power on the computer and resume work or 1 Save all necessary files 2 Enter Hibernation mode 3 Install the extra battery pack 4 Resume from Hibernation mode AC adapter or power outlet not available 1 Save all necessary files 2 Exit the ...

Page 59: ...lay Standby Mode Screen activity is determined by the keyboard the built in touchpad and an external PS 2 pointing device If these devices are idle for the period specified by the Display Timeout the display shuts off until you press a key or move the touchpad or external mouse Automatic Dim Feature The computer has a unique automatic dim power saving feature When the computer is using AC power an...

Page 60: ...dio serial ports floppy drive and parallel port Standby mode The computer consumes very low power in Standby mode All data remains intact in the system memory until the battery is drained There is one necessary condition for the computer to enter Standby mode Heuristic Power Management must be set to ENABLED There are five ways to enter Standby mode Pressing the Standby hot key Fn F3 Allowing the ...

Page 61: ...bernation mode all power shuts off the computer does not consume any power The computer saves all system information onto the hard disk before it enters Hibernation mode Once you turn on the power the computer restores this information and resumes where you left off Note If the computer beeps but does not enter Standby mode after pressing the Standby hot key it means the operating system will not ...

Page 62: ...low condition for about a minute With the Battery Low Suspend parameter in Setup set to ENABLED Allowing the operating system power saving modes to invoke it To exit Hibernation mode press the power switch The computer also resumes from Hibernation mode if the Resume Timer is set and matched Note If the computer beeps but does not enter Hibernation mode after pressing the Hibernation hot key it me...

Page 63: ...out degrading performance For more information about APM under Windows 95 or Windows 98 refer to your Windows 95 or 98 user s manual Note If you enable Heuristic Power Management in Setup without APM installed and enabled the system time and date do not display the correct settings after the computer returns to normal operation from Standby or Hibernation mode To update the time and date reboot th...

Page 64: ...44 User s Guide 310 e book Page 44 Tuesday October 27 1998 5 17 PM ...

Page 65: ...nology You can purchase most of these and other options directly from Acer Contents External Monitor 46 External Keyboard 47 External Keypad 48 External Pointing Device 49 External PS 2 Mouse 49 External Serial Mouse 50 Printer 51 Audio Devices 52 PC Cards 53 External PCMCIA CD ROM optional 54 USB Devices 55 Miscellaneous Options 56 Additional Power Packs 56 Battery Pack 56 AC Adapter 56 Cables 56...

Page 66: ...s on a larger display connect an external monitor to the CRT port Read the monitor manual for additional instructions Note If an external monitor is not connected closing the display cover puts the computer into standby mode 310 e book Page 46 Tuesday October 27 1998 5 17 PM ...

Page 67: ... keyboard with full sized keys and an embedded keypad If you feel more comfortable using a desktop keyboard you can install a PS 2 compatible external keyboard To connect an external keyboard plug the external keyboard into the PS 2 connector 310 e book Page 47 Tuesday October 27 1998 5 17 PM ...

Page 68: ... Guide External Keypad You can also use a 17 key numeric keypad for number sensitive data entry applications To connect the keypad plug in the keypad connector to the PS 2 port 310 e book Page 48 Tuesday October 27 1998 5 17 PM ...

Page 69: ...rial mouse or similar pointing device External PS 2 Mouse The built in touchpad works alternately with an external PS 2 mouse which is hot pluggable To use a PS 2 compatible mouse simply plug it into the PS 2 port Note The touchpad will be automatically disabled when using an external PS 2 310 e book Page 49 Tuesday October 27 1998 5 17 PM ...

Page 70: ...0 User s Guide External Serial Mouse If you use a serial mouse plug it into the serial port To enable the serial mouse use the Add New Hardware tool in the Windows Control Panel 310 e book Page 50 Tuesday October 27 1998 5 17 PM ...

Page 71: ...e printer cable into a serial port For a parallel printer plug the printer cable into the parallel port See your printer manual for operating instructions Note If the printer does not function enter Setup and verify that the parallel port is enabled See Advanced on page 86 for assistance 310 e book Page 51 Tuesday October 27 1998 5 17 PM ...

Page 72: ...ect with the audio ports accessible from the right side of the computer You can plug in an external microphone or audio line in device to the microphone in jack Amplified speakers or headphones connect to the speaker out jack 310 e book Page 52 Tuesday October 27 1998 5 17 PM ...

Page 73: ...ards The computer has two CardBus PC card slots that accommodate two type I II or one type III PC card s Please consult your dealer for PC card options available that you can purchase for your computer 310 e book Page 53 Tuesday October 27 1998 5 17 PM ...

Page 74: ...o the PC Card slot The computer will automatically detect the PC Card 4 Insert one end of the audio cable into the external CD ROM and the other end into the microphone in jack of the computer or Insert an external speaker into the line out jack of the external CD ROM drive Note When you connect the audio to the computer you have to activate the sound by unchecking the mute function or by increasi...

Page 75: ...n about the external CD ROM please refer to its user s manual USB Devices The computer has a USB Universal Serial Bus port that allows you to connect peripherals without occupying too many resources Common USB devices include the mouse and keyboard Most USB devices also include a built in USB port connector which allows you to daisy chain other USB devices 310 e book Page 55 Tuesday October 27 199...

Page 76: ...dapter The compact AC adapter charges your battery pack and supplies power to your computer You can order a spare AC adapter so you do not need to carry it from the office to your home or destination Cables PS 2 Y Bridge Cable The PS 2 Y bridge cable allows you to connect two PS 2 devices mouse and keyboard to your computer simultaneously Note The keyboard must be connected to the connector marked...

Page 77: ...e two PS 2 devices Parallel Cable The Parallel cable allows you to connect a printer and an external floppy drive to your computer simultaneously However you can only use one device at a time Connect the single connector end of the parallel cable to the computer s parallel port and the double connector ends to the two devices 310 e book Page 57 Tuesday October 27 1998 5 17 PM ...

Page 78: ...infrared port you can also transfer files between computers using a file transfer cable Connect the file transfer cable between the parallel ports of the two computers and use your file transfer utility to perform the transfer 310 e book Page 58 Tuesday October 27 1998 5 17 PM ...

Page 79: ...performance Memory Upgrade Memory is upgradeable from 16 to 80MB employing 16 32 64 MB soDIMMs Small Outline Dual Inline Memory Modules Memory Configurations The following table lists the possible memory configurations Note Contact your authorized dealer if you decide to perform a key component upgrade Important This system can only support SDRAM memory type Slot 1 Total Memory 0 MB 16 MB 16 MB 32...

Page 80: ...ade your hard disk with a higher capacity drive when you need more storage space The computer uses a 9 5mm 2 5 inch Enhanced IDE hard disk Note Contact your authorized dealer if you decide to perform a hard disk upgrade 310 e book Page 60 Tuesday October 27 1998 5 17 PM ...

Page 81: ...lding or traveling locally Traveling Internationally with the Computer when you are moving from country to country Contents Disconnecting from the Desktop 62 Moving Around 63 Preparing the Computer 63 What To Bring to Short Meetings 63 What To Bring to Long Meetings 63 Taking the Computer Home 64 Preparing the Computer 64 What To Bring with You 64 Special Considerations 64 Setting Up a Home Office...

Page 82: ...s 1 Save your work in progress 2 Shut down the operating system 3 Turn off the computer 4 Disconnect the cord from the AC adapter 5 Disconnect the keyboard pointing device printer external monitor and other external devices 6 Disconnect the Kensington lock if you are using one to secure the computer 310 e book Page 62 Tuesday October 27 1998 5 17 PM ...

Page 83: ...s under most circumstances If your meeting is shorter than that you probably do not need to bring anything with you other than the computer What To Bring to Long Meetings If your meeting will last longer than 2 hours or if your battery is not fully charged you may want to bring the AC adapter with you to plug in your computer in the meeting room If the meeting room does not have an electrical outl...

Page 84: ... home bring the following items with you AC adapter and power cord The printed user s manual Media bay modules external floppy and CD ROM drive Special Considerations Follow these guidelines to protect your computer while traveling to and from work Minimize the effect of temperature changes by keeping the computer with you If you need to stop for an extended period of time and cannot bring the com...

Page 85: ...ture slowly If possible leave the computer for 30 minutes in an environment with a temperature between outside and room temperature Setting Up a Home Office If you frequently work on your computer at home it may be worthwhile purchasing a second AC adapter for use at home With a second AC adapter you can avoid transporting the extra weight to and from home If you use your computer at home for sign...

Page 86: ...ry packs Media bay modules external floppy and CD ROM drive Additional printer driver files if you plan to use another printer Special Considerations In addition to the guidelines for taking the computer home follow these guidelines to protect your computer while traveling Always take the computer as carry on luggage If possible have the computer inspected by hand The computer can safely pass thro...

Page 87: ...case you need to show it to Customs officials International Traveler s Warranty passport Special Considerations Follow the same special considerations as when traveling with the computer In addition these tips are useful when traveling internationally When traveling in another country check that the local AC voltage and the AC adapter power cord specifications are compatible If not purchase a powe...

Page 88: ...68 User s Guide 310 e book Page 68 Tuesday October 27 1998 5 17 PM ...

Page 89: ... Password 75 Setting the Supervisor Password 76 Setting the User Password 77 Power Management 78 Display Device 79 Setup Utility 81 Navigating the Setup Utility 81 Main 82 Hard Disk 0 Submenu 84 Boot Device Priority Submenu 85 Advanced 86 Security 88 Setting a Password 89 Removing a Password 90 Power Saving 91 Exit 93 Software 5 310 e book Page 69 Tuesday October 27 1998 5 17 PM ...

Page 90: ...ities drivers and application software Note To access Windows software applications click on the Start button and select the application folder Then click on the application icon to run the selected application To learn about the software and utility make use of the online help provided by the software 310 e book Page 70 Tuesday October 27 1998 5 17 PM ...

Page 91: ...rtition DELETE FILE or PARTITION deletes the hibernation file or partition INFO displays information on the hibernation file or partition REFORMAT PARTITION reformats the existing hibernation file or partition Note By default this program is automatically loaded and set up on your computer so you do not need to run this program by yourself You only need to run this if you upgrade your memory You c...

Page 92: ...anager application to run the program Notebook Manager consists of five sections Information Viewer Boot Sequence Password Power Management Display Device To select a section click on the tab of the section you want to view Note Certain hot key functions are disabled when you access the notebook manager because these functions are also found in the notebook manager Note Changes made to most settin...

Page 93: ...ay differ slightly from the ones onscreen Item Description CPU Brand type and clock speed of the CPU Central Processing Unit Total Memory Total amount of main memory in megabytes Video RAM Total amount of video memory in megabytes Hard Disk Size of hard disk in megabytes Serial Port 1 Resource settings of serial port 1 Serial Port 2 Resource settings of serial port 2 310 e book Page 73 Tuesday Oct...

Page 94: ...e bootable devices in your computer and the order in which the booting sequence will occur The devices include the following Floppy Drive Parallel Port Resource settings of the parallel port External Cache Total amount of external cache memory in kilobytes Touchpad Setting of the internal pointing device Pointing Device Type s of the pointing device s detected internal and external Item Descriptio...

Page 95: ...sed in the system Supervisor Password The supervisor password prevents unauthorized access to sensitive parameters in the Notebook Manager and BIOS Utility It also prevents unauthorized access to your computer at system startup and at resume from standby hibernation mode User Password The user password prevents unauthorized access to your computer at system startup and at resume from standby hiber...

Page 96: ...type in up to seven alphanumeric characters A Z a z 0 9 which you want to be your Supervisor Password 4 Click in the Confirm Password textbox and retype the password 5 Click on OK to accept it Note Before you can set the User Password you need to set the Supervisor Password Note To change a password follow the same steps used to set a password To remove a password follow the same steps used to set...

Page 97: ... be your User Password 4 Click in the Confirm Password textbox and retype the password 5 Click on OK to accept it You can also set password checks when the computer boots up and or when the computer resumes from standby hibernation mode Simply click on the desired checkbox es and click on Apply Note To change a password follow the same steps used to set a password To remove a password follow the s...

Page 98: ... always on Select to leave your display always turned on useful when you need to make presentations on your computer Enable modem ring resume on indicator Select to allow the computer to wake up from standby mode when an incoming modem ring is detected Enable battery low warning beep Select to allow the computer to give off warning beeps when the computer runs low on battery Enable sleep upon batt...

Page 99: ...t the System Resume Timer Display Device Display Device is used to control various settings related to display device s such as the display brightness contrast levels The items in this screen include Boot Display Device Sets the default display device on boot up Switching Display Device Sets the current display device Note Make sure an external monitor is connected before External monitor is selec...

Page 100: ...item then click on Apply to accept To modify the brightness and or contrast levels click and hold the slider control and move to the right to increase move to the left to decrease the setting You can also click on the item and use the cursor keys to set the desired level Note TFT active matrix LCDs have fixed and optimized contrast levels 310 e book Page 80 Tuesday October 27 1998 5 17 PM ...

Page 101: ...u options Main Advanced Security Power Saving and Exit To navigate the Setup Utility Press the cursor right left keys to move between the main menu items Press Esc while you are in any of the menu options to display the Exit menu Press the cursor up down keys to move between parameters Press the plus minus keys to change the value of a parameter Press the Enter key to access a submenu A symbol in ...

Page 102: ...settings Parameter Description System Time Sets the system time Format HH MM SS hour minute second System Date Sets the system date Format DD MM YYYY day month year Floppy Disk A Selects the floppy disk drive type Options 1 44 MB 3 or Disabled Hard Disk 0 Shows the hard disk size Press Enter to access the Hard Disk 0 submenu Boot Device Priority Press Enter to access the Boot Device Priority subme...

Page 103: ...ber of the VGA BIOS Format Vx Rx version and release numbers BIOS Version Shows the version number of the BIOS Format Vx Rx version and release numbers Note The BIOS versions are important information about your computer If you experience computer problems and need to contact technical support this data helps our service personnel know more about your computer Parameter Description 310 e book Page...

Page 104: ...ettings in boldface are the default and suggested parameter settings Parameter Description Type Sets the hard disk type Options Auto User or None Cylinders Shows the number of cylinders of the hard disk Heads Shows the number of heads of the hard disk Sectors Shows the number of sectors per track of the hard disk Maximum Capacity Shows the maximum capacity of the hard disk 310 e book Page 84 Tuesd...

Page 105: ... specified in this submenu To set the boot device priority use the plus minus keys Note The values for Cylinder Heads Sectors Track and Maximum Capacity are automatically set when the hard disk type is set to Auto We suggest you set the hard disk type to Auto for hassle free and correct hard disk detection The computer s BIOS automatically sets the parameters in this screen to their optimal values...

Page 106: ...eters in this screen are for advanced users only You do not need to change the values in this screen because these values are already optimized Parameter Description Serial Port Enables or disabled the serial port Options Enabled or Disabled Base I O Address Sets the I O address of the serial port Options 3F8 2F8 3E8 or 2E8 Interrupt Sets the interrupt request of the serial port Options IRQ3 IRQ4 ...

Page 107: ...f you select Extended Capabilities Port ECP as the operation mode Options DMA 1 or DMA 3 Speaker Enables or disables the internal speakers You can override this by toggling Fn F6 during computer operation Options Enabled or Disabled Boot Display Device Sets the display on boot up When set to Auto the computer automatically determines the display device If an external display device e g monitor is ...

Page 108: ... default and suggested parameter settings Parameter Description Supervisor Password is When set this password protects the computer and this Setup Utility from unauthorized entry It also protects certain parameters in the Setup Utility When Password on boot and or Password check during Resume is enabled you need to enter this password to continue operation Options Disabled or Enabled 310 e book Pa...

Page 109: ...d Press Enter to set the supervisor password See Setting a Password on page 89 for how to set a password Set User Password Press Enter to set the user password See Setting a Password on page 89 for how to set a password Password on boot When enabled the computer prompts you for a password when the computer boots up Options Enabled or Disabled Password check during Resume When enabled the computer ...

Page 110: ...nge a password follow the same steps used to set a password Removing a Password Should you want to remove a password do the following 1 Use the and keys to highlight a Set Password parameter Supervisor or User and press the Enter key The password box appears 2 Enter your current password in the first parameter and then press Enter 3 Press Enter twice without entering anything in the next two passw...

Page 111: ...ent The following table describes the parameters in this screen Settings in boldface are the default and suggested parameter settings Parameter Description Heuristic Power Management Enables or disables power management based on timeout settings in this screen See Power Management on page 39 for more information on power management modes Options Enabled or Disabled 310 e book Page 91 Tuesday Octob...

Page 112: ...See PhDISK on page 71 Options Enabled or Disabled Resume on Modem Ring When on and an incoming modem ring is detected the computer wakes up from suspend mode Options On or Off Resume on Time When on and the system resume date and time are valid the computer resumes wakes up at the set time and date Options On or Off Resume Time Sets the time the computer resumes from if Resume on Time is on Format...

Page 113: ...ving Changes Saves any changes made exits the Setup utility and reboots Exit Discarding Changes Discards any changes made exits the Setup utility and reboots Load Setup Defaults Resets all parameters to their factory default values Load Previous Values Disregards any changes made in the current session and reloads their previous values Save Changes Saves any changes made 310 e book Page 93 Tuesday...

Page 114: ...Setup Utility 94 User s Guide Note If you make any parameter changes select Exit Saving Changes or Save Changes to store your changes 310 e book Page 94 Tuesday October 27 1998 5 17 PM ...

Page 115: ...lem occurs Solutions to more serious problems require opening up the computer Do not attempt to open the computer by yourself Contact your dealer or an authorized service center for assistance Contents Frequently Asked Questions 96 Error Messages 100 Troubleshooting 6 310 e book Page 95 Tuesday October 27 1998 5 17 PM ...

Page 116: ...e computer and to the power outlet If it is lit check the following If the Standby indicator is lit the computer is in standby mode Press any key the power button or tap on the touchpad to resume Is a non bootable non system diskette in the floppy drive Remove or replace it with a system diskette and press Ctrl Alt Del to restart the system The operating system files may be damaged or missing Inse...

Page 117: ...hen click on the Settings tab to make sure the resolution is set to 800x600 640x480 resolution is not full screen on the computer or on an external monitor No audio from the computer The volume may be muted In Windows 95 or Windows 98 look at the volume control icon on the taskbar If it is crossed out click on the icon and de select the Mute option The speakers may be turned off Press Fn F6 to tur...

Page 118: ...hat the printer is connected to a power outlet and it is turned on Make sure the printer cable is connected securely to the computer s parallel port and the corresponding port on the printer During POST press F2 to access the Setup Utility Go to the Advanced screen and verify that the parallel port is enabled See Advanced on page 86 for details I prefer using an external keyboard and mouse but bot...

Page 119: ...e is a clear path between the two infrared ports Nothing should be blocking the ports Make sure you have the appropriate software running on both devices for file transfers or you have the appropriate drivers for printing to an infrared printer During POST press F2 to access the Setup Utility Go to the Advanced screen and verify that the infrared port is enabled Make sure both devices are IrDA com...

Page 120: ...ontroller Error or No Controller Present Contact your dealer or an authorized service center Diskette Drive Error Contact your dealer or an authorized service center Diskette Drive Type Mismatch Press F2 during POST to reconfigure the computer Equipment Configuration Error Press F2 during POST to reconfigure the computer Hard Disk 0 Error Contact your dealer or an authorized service center Hard Di...

Page 121: ...Auto for hard disk drive auto detection Non system disk or disk error Replace and strike any key when ready Insert a system disk in drive A then press Enter Pointing Device Error Contact your dealer or an authorized service center Pointing Device Interface Error Contact your dealer or an authorized service center Protected Mode Test Fail Contact your dealer or an authorized service center RAM BIOS...

Page 122: ...ase contact your dealer or an authorized service center for assistance Some problems may be solved using the BIOS Setup Utility See Setup Utility on page 81 Video RAM BIOS Bad Contact your dealer or an authorized service center Error Messages Corrective Action 310 e book Page 102 Tuesday October 27 1998 5 17 PM ...

Page 123: ...memory banks 256KB Flash ROM BIOS Data Storage One 2 5 inch 9 5mm hard disk Display and Video 8 0 inch Supertwist Nematic STN LCD or 8 4 inch high color Thin Film Transistor TFT LCD 640x480 VGA resolution 8 0 inch STN or 800x600 SVGA resolution 8 4 inch TFT Integrated 128 bit graphics accelerator PCI and 1 1MB EDO video memory Simultaneous LCD and CRT display Audio 16 bit stereo audio PnP ISA 3 di...

Page 124: ...11 phone jack One DC in jack AC adapter One FIR wireless communications port IrDA compliant One RS 232 serial port UART16550 compatible One parallel port ECP compliant or external FDD port One external monitor port DDC 2 0 compliant One keyboard mouse port PS 2 compatible One speaker out jack One microphone in jack One USB port Weight and Dimensions 1 32 kg 2 9 lbs 236 x 175 x 36 mm 9 29 x 6 89 x ...

Page 125: ...ttery management technology 2 3 hour rapid charge for Li Ion AC Adapter 36 Watt Auto sensing 100 240Vac 50 60Hz Options 16 32 64 MB SDRAM memory upgrade module Higher capacity hard disk drive PS 2 Y cable for external mouse and keyboard Parallel cable for external floppy drive and printer Additional AC adapter and battery pack External PCMCIA CD ROM drive optional 310 e book Page 105 Tuesday Octob...

Page 126: ...106 User s Guide 310 e book Page 106 Tuesday October 27 1998 5 17 PM ...

Page 127: ...cator 6 care AC adapter AC adapter caring for xviii battery pack xix computer xviii cleaning computer xix computer bringing to meetings 63 caring for xviii cleaning xix connecting xiv disconnecting 62 features 2 information 73 microphone 6 moving around 63 on indicator 6 power management 39 security 28 setting up a home office 65 taking home 64 traveling internationally 67 traveling on local trips...

Page 128: ...ked questions file transfer cable connecting 58 FIR See infrared floppy drive 17 frequently asked questions 96 H hard disk upgrade 60 help Internet home page xvi online help xvi support information xvii Heuristic Power Management 91 Hibernation mode 41 conditions 42 entering 42 hot key 11 resuming from 42 utility 71 hot keys 11 HPM See Heuristic Power Management I indicator lights 6 infrared 19 IT...

Page 129: ...spare battery pack 56 P palm rest 14 password 28 changing in Setup Utility 90 checking during boot 89 checking during resume 89 removing in Setup Utility 90 setting in Notebook Manager 76 77 setting in Setup Utility 89 PC Card 23 ejecting 24 inserting 24 peripherals power management 39 PhDISK 71 ports 19 rear 19 right 22 power managing in Notebook Manager 78 managing in Setup Utility 91 turning on...

Page 130: ...ords 28 serial mouse connecting 50 serial port setting in Setup Utility 86 service when to call xvii xix Setup Utility 81 94 Advanced menu 86 Boot Device Priority submenu 85 entering 81 Exit menu 93 Hard Disk 0 submenu 84 Main menu 82 navigating 81 Power Saving menu 91 Security menu 88 software bundled 70 speakers hot keys 12 T time setting in Setup Utility 82 U utility BIOS Setup 81 94 Notebook M...

Reviews: