background image

English

38

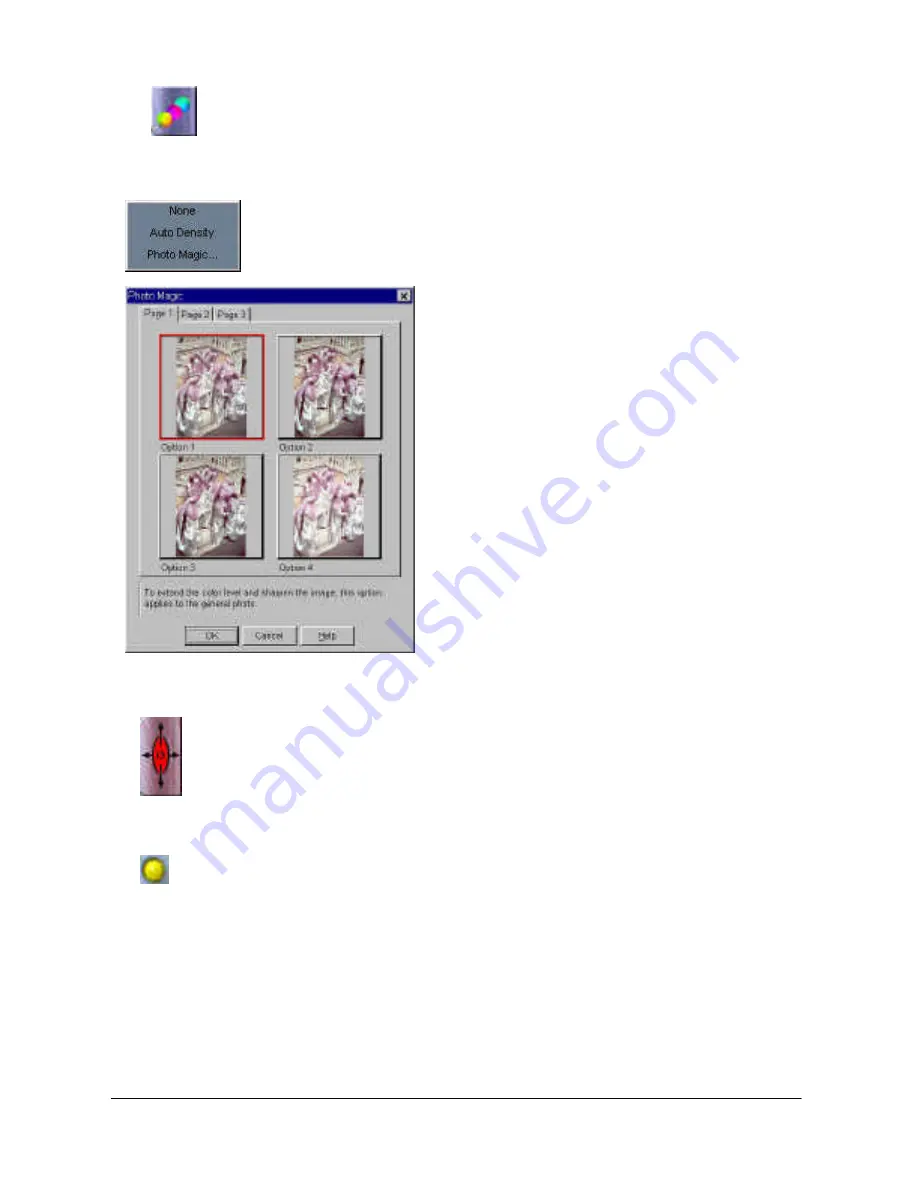
Color Wizard button

The Color Wizard button offers two quick and convenient tools
for you to adjust the overall quality of the scanned image:

Auto Density: if you choose this item, MiraPhoto will
optimize the density of the image automatically.

Photo Magic: There are three tabs in
the Photo Magic dialog box.  Each tab
contains certain thumbnail image
enhancement options. Click on a
thumbnail to select it, and a red frame
will appear around the selected
thumbnail. Meanwhile, a related
description on the modification applied
will be shown in the lower part of the
dialog box.

If you find a satisfactory effect to use,
click OK to exit the dialog box and
apply the effect while scanning.
Otherwise, click Cancel to exit the
dialog box without applying the effect.

Apply all button
Click on the Apply All button to apply the setting changes you
make in the Tool Bar to all images.

Switch button

 Click on the Switch button to hide the Tool Bar.

Summary of Contents for Film Scanner

Page 1: ...Film Scanner User s Manual English Français Deutsch Italiano Español ...

Page 2: ......

Page 3: ...Film Scanner User s Manual English ...

Page 4: ... Brands and product names are trademarks or registered trademarks of their respective companies IMPORTANT SAFETY INSTRUCTIONS 1 Read these instructions carefully Save these instructions for future reference 2 Follow all warnings and instructions marked on the product 3 Unplug this product from the wall outlet before cleaning Do not use liquid cleaners or aerosol cleaners Use a damp cloth for clean...

Page 5: ... attempt to service this product yourself as opening or removing covers may expose you to dangerous voltage points or other risks Refer all servicing to qualified service personnel 12 Unplug this product from the wall outlet and refer servicing to qualified service personnel under the following conditions a When the power cord or plug is damaged or frayed b If liquid has been spilled into the prod...

Page 6: ...ion However there is no guarantee that interference will not occur in a particular installation If this equipment dose cause harmful interference to radio or television reception which can be determined by turning the equipment off and on the user is encouraged to try to correct the interference by one or more of the following measures 1 Reorient or relocate the receiving antenna 2 Increase the se...

Page 7: ... 3 MAKING YOUR FIRST SCAN 9 STEP 1 TEST THE SCANNER 9 STEP 2 PLACE ORIGINAL ON THE HOLDER 9 STEP 3 SCAN 12 STEP 4 EDIT 13 CHAPTER 4 USING MIRAPHOTO 15 MENU BAR 16 File submenu 16 Load Config 16 Save Config 16 Save Config As 16 Reset Config 16 Auto Save Config 16 Settings submenu 17 Scan Size 17 Monitor Gamma 18 Film Type 19 Auto Preview 19 Help submenu 19 Contents 19 Scanner Info 19 About MiraPhot...

Page 8: ...button 31 Level button 33 Filter button 37 Color Wizard button 38 Apply all button 38 Switch button 38 PREVIEW AREA 39 Info button 39 CHAPTER 5 PHOTO EXPRESS 41 INTRODUCTION 41 GETTING STARTED 42 GETTING IMAGES 44 Working with Album 44 WORKING ON IMAGES 46 Adjusting Images 46 Sharing Images 48 Saving Images 49 Express Your Images 50 WORKING IN PROJECT MODE 52 To Begin a New Project 52 Working with...

Page 9: ...PRODUCT SPECIFICATION 60 MiraPhoto Quick Reference Map Menu Bar page 16 Image Thumbnail Area page 20 Combo Boxes page 20 Film Selection Area page 22 Control Buttons page 23 Tool Buttons page 23 Preview Area page 39 ...

Page 10: ...English iv Memo ...

Page 11: ...etails in the film Auto Positioning and Focusing Technology With the auto positioning and focusing technology you will no longer have to adjust the focus manually to get a sharp and clear image ScanWit will do it all automatically Zero Reflection Optical Design While most film scanners are using multi reflection mechanisms to do film scanning ScanWit utilizes its break through zero reflection opti...

Page 12: ...You can also use it to adjust the scanning parameters efficiently Its powerful functions can help you to optimize the scanned image for your specific purpose 1 2 Hardware Introduction Please refer to the following illustration to familiarize yourself with each part of the ScanWit film scanner Front Panel Holder insertion slot STATUS LED READY LED EJECT button SCAN button Power button ...

Page 13: ...rough this slot for scanning When the filmstrip slide holder is inserted into the slot the mechanism inside the film scanner will automatically bring the holder inside Power button You can turn the film scanner on or off by pushing this button EJECT button Push this button to eject the filmstrip slide holder SCAN button Push this button to start the scan job immediately without having to acquire t...

Page 14: ...r 5 for more guidelines on how to determine the SCSI ID number of your film scanner Power cord receptacle Connect the power cord here When you use the film scanner make sure that the power cord is connected securely to the power cord receptacle SCSI IN connector This is a 25 pin SCSI connector Use this connector to connect to your host system with the SCSI cable supplied SCSI IN SCSI OUT ID Ventil...

Page 15: ...onnector to connect other SCSI devices from the film scanner Note when you position the ScanWit film scanner be sure to leave the space illustrated below to ensure that the film slide holder moves into out of the film scanner without being blocked by any object 300mm 200mm ...

Page 16: ...licks With MiraPhoto you can Preview scan and import the scanned image into your image editing software Adjust image quality even before you actually start editing the image in your image editing software Using the batch scan function you can acquire up to 6 preview or scanned images in one scan session Add special effects to the scanned image by applying special functions such as Invert and Mirro...

Page 17: ...move its bracket Insert the SCSI interface card into the PCI slot and secure it by tightening the screw Close the computer cover Step 2 Connect the scanner to your computer Connect one end of the SCSI cable to the SCSI interface card and the other end to the SCSI IN connector on the rear panel of the scanner Select the appropriate SCSI ID by pressing the buttons on the SCSI ID selector Attach the ...

Page 18: ... will appear on the screen then the Update Device Driver Wizard dialogue box will pop up Click Cancel to close the dialogue box 2 Insert the scanner software CD ROM Disc 1 into your CD ROM drive The software installation menu will appear on the screen automatically after a few seconds 3 If the software installation menu does not appear please do the following 1 Double click My Computer icon on you...

Page 19: ...p 2 Place original on the holder Place the film in the film holder Two types of film holders are supplied with your film scanner You can select the appropriate film holder that fits the type of your film Note When you place the film slide in the filmstrip slide holder make sure that the film slide is free from dust You may also want to check that the film slide is cleaned properly If you want to s...

Page 20: ...lmstrip holder with the emulsion side facing up Close the cover and push the PUSH CLOSE mark at the middle of the cover You will hear a click when the cover is secured Insert the filmstrip holder into the holder insertion slot PUSH PUSH PUSH ...

Page 21: ...ide holder Pull the handle on the cover to open the cover Then place the slide on the slide holder with the emulsion side face up When you place the slide in the lattice insert the lower left corner of the slide into the plastic stopper then push the slide into the lattice until it is firmly fixed You can place up to 4 slides in the slide holder ...

Page 22: ... You will hear a click when the cover is secured Insert the slide holder into the holder insertion slot Step 3 Scan Now you can either push the SCAN button to activate automatic preview or manually open an image editing software to activate MiraPhoto and do the preview P U S H P U SH ...

Page 23: ..._32 source to select MiraPhoto as the TWAIN image source This differs according to the application you use 3 Choose Scan Acquire or TWAIN_32 source this also differs according to the application you use MiraPhoto will pop up on the screen Click Preview to preview the original According to the original you scan choose an appropriate image type from the Image Type drop down listbox in MiraPhoto Spec...

Page 24: ...English 14 Memo ...

Page 25: ...ications When you click Acquire or Scan in your application the MiraPhoto main screen will appear The following sections in this chapter will describe MiraPhoto in more detail Menu Bar Image Thumbnail Area Combo Boxes Film Selection Area Control Buttons Tool Buttons Job Info Button Preview Area ...

Page 26: ...the Artwork configuration file and MiraPhoto will apply the settings recorded in it Load Config Load the configuration file you created When the configuration file is loaded successfully MiraPhoto will apply the settings recorded in the configuration file automatically Save Config Save current MiraPhoto settings to the configuration file Save Config As Save current MiraPhoto Settings as another ne...

Page 27: ...ox There are two selectable items Max Area and Custom Choosing Max Area MiraPhoto will scan the full range of the image If you choose Custom you can enter the size you want into the Width max 0 94 inches and Height max 1 38 inches text boxes After you have completed setting the scan size click on the OK button to confirm your settings and close the dialog box You may now click on the Cancel button...

Page 28: ...ightness in the midtone display to more accurately represent the color details of the original image Drag the scroll bars to adjust the gamma values of red green blue and gray until the monitor displays the original colors accurately If the Syn box is checked you can adjust all the four gamma values simultaneously by dragging any scroll bar When the adjustment is done click on the OK button to con...

Page 29: ... or Cancel to abort Auto Preview If this item is checked MiraPhoto will perform the preview operation automatically each time it is invoked Help submenu Access the Help submenu whenever you require more information about your scanner or about MiraPhoto Contents Click on Contents to access the MiraPhoto on line help system Scanner Info When this item is selected a dialog box showing the scanner and...

Page 30: ...e Type box is used to select a particular data type for scanning You need to select a correct image type according to your original the material you scan and the purpose of the scanned image For example if you are scanning a color film choose Color Film If you are scanning a black and white film choose BW Film instead of Color Film to save file size If you are scanning slides choose Color Slide or...

Page 31: ...g the image quality It is therefore recommended that you select a scan resolution appropriate to the purpose of your scan job You can select resolution ranging from 200dpi to 2700dpi from the Resolution box or select Custom to customize resolution The following dialog box will appear You can adjust the resolution of the X horizontal and Y vertical axis independently by dragging the scroll bars in ...

Page 32: ...ts of information per pixel during its scan In High Quality 36 mode the image that you scan will be of the highest quality It will however take more time for the scanner to process the image data Film Selection Area In addition to the Image Thumbnail Area you can also select the image you want to scan in the Film Selection Area Current Frame Click to select the current frame for scanning Frame You...

Page 33: ...ip slide holder from the film scanner Zoom button Click this button to zoom in on the image Preview button Click this button to begin previewing the image Preview proceeds in color or in monochrome depending on the setting in the Image Type combo box Scan button Click this button to start scanning the image Exit button Click this button to exit MiraPhoto ...

Page 34: ...Photo will optimize the scanning image for the film type selected You can also check the Auto cast removal check box to let MiraPhoto remove the film cast automatically If you do not know the type of your film or if your film type is not listed select Generic from the drop down list When the selection is done click OK to confirm or Cancel to abort Flip button You can use this button to flip the pr...

Page 35: ...to get a mirror reflection effect on the original as if you were viewing the image in a mirror Crop button Use this tool to cut only the needed area from the original image To crop the image you will want to first select the desired area by moving adjust the dotted rectangle in the Preview Area then push the Crop button Original image Image after Mirror is applied Original image Cropped image ...

Page 36: ...nhancement Tools button Click this button to activate the Tool Bar which contains the buttons for the following tools Invert button Click this button to get an inverted image Original image Image after Invert is applied ...

Page 37: ...e the overall brightness of the image or click on the Auto button to let MiraPhoto adjust the brightness automatically Contrast control You can drag the triangle below the bar to increase decrease the overall contrast of the image or click on the Auto button to let MiraPhoto adjust the contrast automatically When you have finished with adjustments click on the OK button to confirm your settings an...

Page 38: ...so enter the desired values directly into the three entry boxes to the right of the color bars to adjust the color balance As an example if the color of the brighter area in the original you scan appears to be bluish you can eliminate the bluish effect by first selecting Highlight as the channel and then dragging the triangle below Cyan Red bar to the right alternatively you can drag the triangle ...

Page 39: ...o measure the amount of brightness in a color The lighter a color is the higher brightness it has Color Wheel Color Wheel is where you can specify the hue and saturation of the color you want to use Move your mouse cursor on the Color Wheel and then click on it Drag within the Color Wheel to select the hue of the color you want to use The distance from the center of the wheel decides the saturatio...

Page 40: ...nformation will also be shown in the Entry Boxes You can also enter the values here directly When you have finished with adjustments click on the OK button to confirm your settings and close the dialog box If you are not satisfied with the adjustments you can click on the Reset button and the settings will return to the default or click on the Cancel button to cancel and close the dialog box ...

Page 41: ...is allows you to adjust the curve property of each color channel respectively To three color channel simultaneously choose Master channel Tonal Map The x axis in the Tonal Map represents the input brightness level of the pixels in an image and the y axis represents the output brightness level of the image By clicking and dragging the curve to change its shape you can adjust the difference between ...

Page 42: ...ished with adjustments you can click OK to apply or click Reset to restore the default settings To abort and exit the dialog box click Cancel The original image and its Tonal Map The curve is straight and diagnal Drag the curve to the left and the midtone area of the image becomes brighter Drag the curve to the right and the midtone area of the image becomes darker Click to add a new point ...

Page 43: ...ge is described below Color Channel box Use this box to select the color channel to be adjusted This allows you to adjust the histogram property of each color channel respectively Histogram The Histogram displays the distributing status of dark and bright pixels in an image The x axis is divided into 256 equal portions representing the brightness level of 0 to 255 The y axis is used to represent t...

Page 44: ...ively in the center This implies that there are only a few midtone pixels in the image In image 2 pixels in objects have more brightness and darkness levels and the distribution is more even than that in Image 1 Therefore the brighter midtone and darker pixels share evenly the total pixels in the image which makes the histogram for Image 2 look smoother Image 1 Image 2 Brighter images have more br...

Page 45: ...Threshold triangle to the left the pixels with higher brightness level than the Highlight Threshold will turn white which makes the image look brighter The Midtone triangle is used to control the brightness level of midtone pixels Dragging the Midtone triangle to the left will increase the brightness level of midtone pixels and make the midtone area of image look brighter Dragging the triangle to ...

Page 46: ...Level is set as 20 to 230 then you may represent a total of 210 230 minus 20 color levels in the image If you set the Output Level as 10 to 250 you can expand the original 210 levels of color to 240 levels 250 minus 10 You can then enrich the color and add more detail in the image You can also click the Auto button in the dialog box to let MiraPhoto adjust the histogram properties automatically Wh...

Page 47: ...age select Unsharp Mask and the following the dialog box will appear In this dialog box you can adjust the sharpness accurately Dragging the scroll bar to the left will blur the image and dragging the scroll bar to right will sharpen the image You can also directly enter the desired value into the Amount entry box to change the sharpness When you get the desired effect click on the OK button to co...

Page 48: ... options Click on a thumbnail to select it and a red frame will appear around the selected thumbnail Meanwhile a related description on the modification applied will be shown in the lower part of the dialog box If you find a satisfactory effect to use click OK to exit the dialog box and apply the effect while scanning Otherwise click Cancel to exit the dialog box without applying the effect Apply ...

Page 49: ...to move the scan area To adjust the size of the scan area move the mouse cursor over the dotted line When the cursor becomes a double headed arrow click and drag to enlarge or minimize the scan area Info button The Info button is located at the lower right corner of the MiraPhoto main window You can click this button to read the detailed information of the image you are currently working on in the...

Page 50: ...English 40 Memo ...

Page 51: ...into high quality works of art With its guided workflow and intuitive interface you ll be printing out personalized birthday cards calendars and posters in no time at all Photo Express brings a whole new attitude to photo editing With its professional quality templates and easy to use editing and management tools added to an all new interface photo editing has never been easier or this much fun Hi...

Page 52: ...ress make sure that the monitor display is at a resolution of 800 600 or 1024 768 and Hi Color 15 16 bit or True Color 24 bit mode The following screen will appear It s better to familiarize yourself with the components in the interface before you actually start Tool Bar Workspace Options Panel Mode Tabs Command Panel Global Viewer Thumbnail Scroll Shortcut Bar ...

Page 53: ...any given tool Tool Bar The Toolbar contains all of the tools you need to edit your photos Each group of tools is divided into categories when you select a new category the tools on the Toolbar change accordingly Categories can be selected from the Command panel Shortcut Bar The Shortcut bar makes available to you all the most commonly used menu commands These commands vary depending on the Comman...

Page 54: ...and other images to the template please see Working with Templates Working with Album Album lets you organize the photos in your computer into convenient books similar to real world photo albums These books contain thumbnails of all the images you select to put in them as well as links to said images information and annotations This way you have instant access to all your photos from directly with...

Page 55: ...relink lost images right click over the album in the Options panel and select either Relink or Refresh Printing album thumbnails 1 Click the Album icon on the Get toolbar and then choose an album from the Options panel 2 Press the Ctrl key and in the workspace click the thumbnails you want to use The selected thumbnails are highlighted in green 3 Click the Print button on the Command panel and sel...

Page 56: ...u The Adjust tools appear on the Toolbar 3 Click the Transform button on the Adjust toolbar The Transform options appear in the Options panel To freely rotate a photo select the spin wheel in the upper right or lower left corner of the photo and rotate into position To position it more accurately enter an order of degrees in the Options panel and then click either Rotate Left or Rotate Right to im...

Page 57: ...dit Adjust category This opens the Size options in the Options panel 2 Select either a predefined size from the Standard drop down menu or enter custom dimensions for the image in the User defined option 3 Select the Keep aspect ratio button to maintain continuity between height and width as you resize This keeps the image from getting stretched unnaturally 4 Finally you can define the image s Res...

Page 58: ...age or images from an available album 2 Click the Print button on the Command panel The print tools appear on the Toolbar 3 Select a print tool to use o Normal lets you print images normally on various different types of paper from Letter to A4 to envelopes o Tile resamples the image down to tile it multiple times on the page creating custom picture cards or postcards o Poster resamples the pictur...

Page 59: ...4 Select an album from the Save to album drop down menu 5 Click Save o Data type describes how much color information the image is saved with The more color information included in the file the larger the file tends to be The highest color data type is True Color and files saved with this data type can be very large Indexed 256 and Grayscale each contain up to a maximum of 256 distinct colors and ...

Page 60: ...k and drag the photo or date object to move it Or resize it using the control handles on the image s border Edit text and dates by selecting the object that contains it then click the Planner button on the Shortcut bar to add notes or holidays to individual dates as well as add props from the Clipart box 5 When your calendar is ready set it as Windows wallpaper by clicking the Wallpaper icon in th...

Page 61: ...ation move your mouse cursor into the workspace and start painting 5 On the Shortcut bar click the Add Item to Storyboard button This adds the current image to the Storyboard You can remove the effects of a transformation and return the image to its original state by clicking the Restore button on the Shortcut bar Also click the Play button to view an on the fly rendering of the animation 6 When y...

Page 62: ...e process of customizing them To Begin a New Project 1 Click the Project tab when you start Photo Express Photo Express then switches over to Project mode which contains slightly different options and commands than Photo mode 2 Click the album icon on the Toolbar and then select an album from the Options panel Albums are categorized by type such as Flyers Greeting Cards and Invitations to name a f...

Page 63: ...ens click Place The Place tools appear on the Toolbar 2 Click the Album icon 3 In the Options panel select the image you want to insert from an available album 4 Click Replace To move one object over another 1 Select the object you want to move up 2 Click the Move Object Up button on the Shortcut bar This moves the object up one level placing it above and over objects lower than it in the hierarch...

Page 64: ...on button on the Edit submenu of the Command panel 3 Click the Edges icon on the Toolbar 4 From the Edges drawer click the Magic icon This opens the Magic Edges options in the Options panel 5 Select a Magic Edges preset and click Apply You can create unique Magic Edges by clicking the Custom tab in the Magic Edges Options panel To add frame to a photo object 1 Select a photo object 2 Click the Fra...

Page 65: ...options appear in the Options panel 3 Enter the number of rows and columns This establishes how many name cards are printed per page 4 Select your printer from the Printer name drop down menu 5 Select the paper size you want to use from Paper size drop down menu 6 Click Print o To further define the layout of the name cards on the page click the Options button This opens the Layout options dialog ...

Page 66: ... mail client from the Mail client drop down list for help on how to set it to work properly To fax a template 1 Click the Share Fax button on the Command panel 2 Set the desired Layout options 3 Click Send Microsoft Fax must be installed first before you can use this feature To output a template as a Web page 1 Click the Share Web Page button on the Command panel 2 Setup the web page s parameters ...

Page 67: ...o your computer and other SCSI devices Depending upon the configuration you use there will be certain guidelines to follow in order to ensure the proper function of your ScanWit film scanner and other devices Single Device Configuration you connect the ScanWit film scanner directly to your computer and there are no other SCSI devices inside your computer or connected to the ScanWit film scanner In...

Page 68: ...d push the or button on the selector to change the SCSI ID to an unused number 3 The new SCSI ID number will take effect the next time you turn on the film scanner 6 2 FAQ If there is one third party SCSI interface card installed in the computer is it all right to hook the scanner to it Answer since the scanner and the driver program both support ASPI compatible SCSI cards it is alright to use a t...

Page 69: ...ver updates product information and news release please visit the following web addresses http www acerperipherals com tw Taiwan http www acerperipherals com USA http www acerperipherals nl Europe For questions on using the bundled application please consult the following web address http www ulead com Photo Express Re packing Directions To avoid unpredictable damages during transportation please ...

Page 70: ...mm film 2Mega byte sec Scan Mode High speed mode High quality mode 24 bits pixel High quality mode 36 bits pixel Resolution Optical 2700 x 2700 dpi Scan Area Minimum 1 line 2 pixels in color Maximum 24 x 36 mm Scan Method 1 pass Scan Scaling 1 dpi increment Highlight Shadow 256 steps Contrast Brightness 256 steps Interface SCSI II Platform IBM PC compatibles Power Consumption 25W maximum Net Weigh...

Reviews: