background image

 
Aspire easyStore 


 19  

easyStore. 


Using the web user interface 

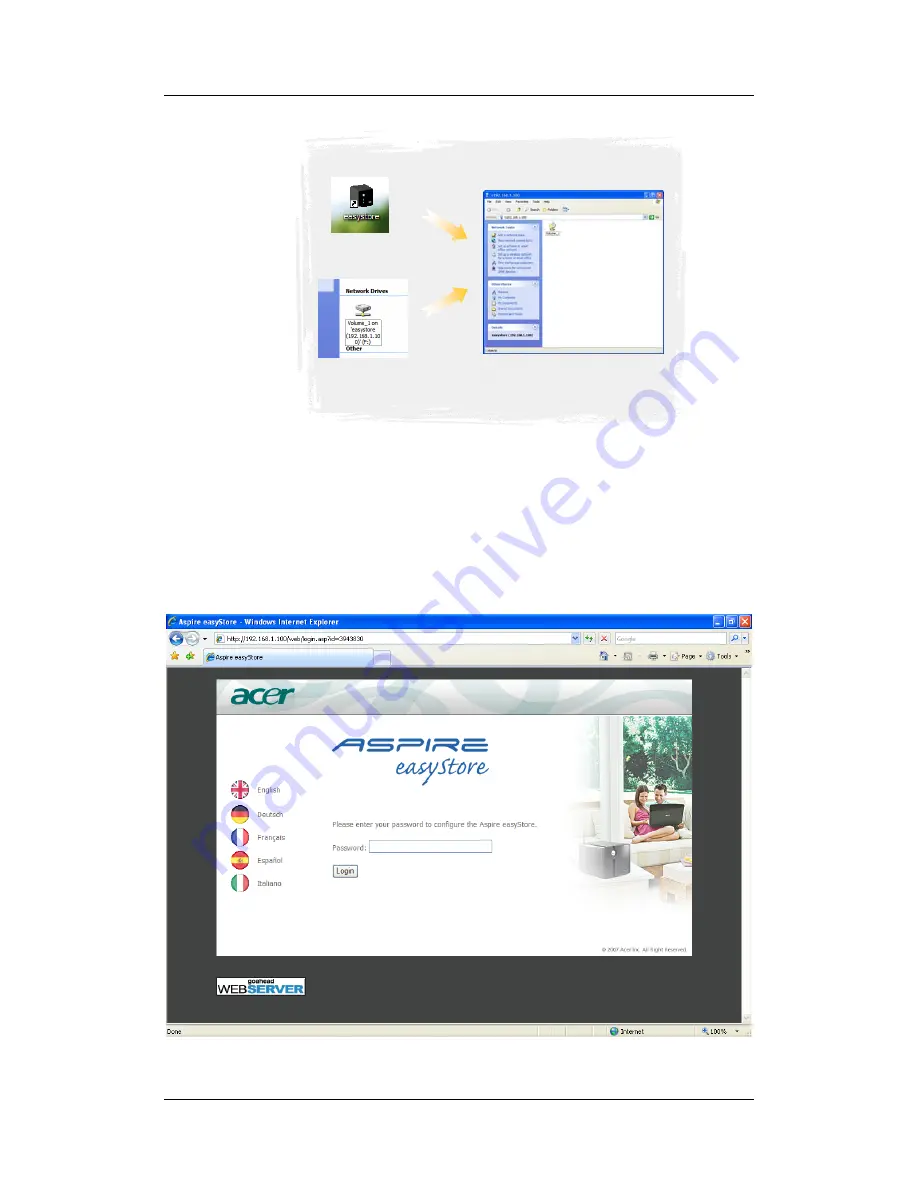
When the easySearch utility finds any Aspire easyStore devices, you can select the Aspire 

easyStore device found and click Log In. It will automatically bring you to the login page 

of the selected Aspire easyStore. 


The default password of the Aspire easyStore web UI is “admin”. Enter it and click the 

Summary of Contents for Aspire esayStore

Page 1: ...User s Guide Aspire esayStore ...

Page 2: ...nformation in the space provided below The serial number and model number are recorded on the label affixed to your computer All correspondence concerning your unit should include the serial number model number and purchase information No part of this publication may be reproduced stored in a retrieval system or transmitted in any form or by any means electronically mechanically by photocopy recor...

Page 3: ... be made using shielded cables to maintain compliance with FCC regulations Notice Peripheral devices Only peripherals input output devices terminals printers etc certified to comply with the Class B limits may be attached to this equipment Operation with non certified peripherals is likely to result in interference to radio and TV reception Caution Changes or modifications not expressly approved b...

Page 4: ...ble countries EU member states as of May 2004 are Belgium Denmark Germany Greece Spain France Ireland Italy Luxembourg the Netherlands Austria Portugal Finland Sweden United Kingdom Estonia Latvia Lithuania Poland Hungary Czech Republic Slovak Republic Slovenia Cyprus and Malta Usage allowed in the countries of European Union as well as Norway Switzerland Iceland and Liechtenstein This device must...

Page 5: ...lable for emergency use Laser compliance statement The CD or DVD drive used with this computer is a laser product The CD or DVD drive s classification label shown below is located on the drive CLASS 1 LASER PRODUCT CAUTION INVISIBLE LASER RADIATION WHEN OPEN AVOID EXPOSURE TO BEAM APPAREIL A LASER DE CLASSE 1 PRODUIT LASERATTENTION RADIATION DU FAISCEAU LASER INVISIBLE EN CAS D OUVERTURE EVITTER T...

Page 6: ...nmark Germany Greece Spain France Ireland Italy Luxembourg the Netherlands Austria Portugal Finland Sweden United Kingdom Estonia Latvia Lithuania Poland Hungary Czech Republic Slovak Republic Slovenia Cyprus and Malta Usage allowed in the countries of European Union as well as Norway Switzerland Iceland and Liechtenstein This device must be used in strict accordance with the regulations and const...

Page 7: ...ice may not cause interference and 2 This device must accept any interference including interference that may cause undesired operation of the device b Operation in 2 4 GHz band To prevent radio interference to the licensed service this device is intended to be operated indoors and installation outdoors is subject to licensing c Operation in 5 GHz band ...

Page 8: ...55024 1998 A1 2001 A2 2003 EN61000 3 2 2000 A2 2005 Class D EN61000 3 3 1995 A1 2001 Low Voltage Directive 2006 95 EC as attested by conformity with the following harmonized standard EN60950 1 2001 A11 2004 RoHS Directive 2002 95 EC on the Restriction of the Use of certain Hazardous Substances in Electrical and Electronic Equipment R TTE Directive 1999 5 EC as attested by conformity with the follo...

Page 9: ...s device must accept any interference received including interference that may cause undesired operation The following local Manufacturer Importer is responsible for this declaration Product Server Model number Aspire easyStore Name of responsible party Acer America Corporation Address of responsible party 333 West San Carlos St San Jose CA 95110 U S A Contact person Acer Representative Tel 254 29...

Page 10: ...ySearch utility 10 Storing your first data to Aspire easyStore 15 Using the web user interface 19 Managing user accounts and shared folders 23 Creating user accounts and shared folders using the wizard 23 Advanced configuration 25 Advanced services 32 FTP services 32 DHCP services 36 UPnP AV services 37 Apple iTunes server 39 Advanced system configuration and monitoring 41 ...

Page 11: ... Furthermore the equipped Acer eBackup backup and recovery software allows you to easily backup and synchronize all important data from your home computer to Aspire easyStore The small size ultra low noise operation and power saving features of Aspire easyStore mean you can put it in anywhere you like Its sleek and elegant design will blend with your office desk living room or even bedroom without...

Page 12: ...er cord European standard CD ROM with manual and Acer eBackup software Quick Installation Guide Ethernet cable Cat 5 If any of the above items is missing please contact your reseller System requirements For best results the following system requirements are recommended Computer with 1 GHz processor 512 MB of RAM 200 MB of available space CD ROM drive Web browser Internet Explorer version 7 0 or 6 ...

Page 13: ...m fails to detect any hard drives or other components or the system detects a non recoverable software error LAN LED This LED will be solid blue when there is an Ethernet connection and will flash to indicate LAN traffic WLAN LED This LED will be solid blue when the wireless LAN function is turned on It will flash to indicate wireless LAN traffic RAID LED This LED will be solid blue when hard driv...

Page 14: ...er switch Press this switch to turn on or turn off your Aspire easyStore Reset button Pushing this reset button with a paper clip or a ball point pen for more than 10 seconds will reset Aspire easyStore back to factory default settings All system settings including user modified settings system parameters and access permissions will be reset to factory default values However data stored on the har...

Page 15: ...d gently sliding out the hard drive To put in the replacement hard drive just slide it into an appropriate slot Backplane board This is the board that connects the hard drives to the system mainboard You will need to remove this board and its cage before you replace failed hard drive Mainboard connector Ensure the connector on the backplane board is aligned with the main board connector when repla...

Page 16: ...d and solid surface and near a power outlet 3 Connect the enclosed Ethernet cable to an available Ethernet port on your computer or network hub switch router Connect the other side of the cable to the Ethernet port on the back of Aspire easyStore Connect this cable first even if you intend to use the wireless interface of Aspire easyStore ...

Page 17: ...easyStore 7 4 Connect the enclosed power cord to the power adapter 5 Connect the power adapter to the power port on the back of Aspire easyStore 6 Connect the power cord to a power outlet System configuration ...

Page 18: ... a few seconds to let it complete searching your network for Aspire easyStore If you are using Microsoft Windows XP SP2 or later Windows Firewall might display a dialog box to ask your permission to unblock this utility Click on the Unblock button to ensure this utility functions correctly 4 When the easySearch utility has found your Aspire easyStore it will automatically create a shortcut to Aspi...

Page 19: ...e Aspire easyStore for advanced functions and services you can change Aspire easyStore settings by opening the easySearch utility and then clicking the Configure button It will launch your web browser automatically and open the Aspire easyStore login page ...

Page 20: ...ing and configuring the Aspire easyStore for the first time If you want to change the IP address of the Aspire easyStore or are unable to connect to the Aspire easyStore you can use the Acer easySearch utility provided on the product CD to locate the device on your network and make any needed changes Using the easySearch utility You can launch the easySearch utility by clicking the button on the A...

Page 21: ...spire easyStore and create an easy to access shortcut to your desktop IP Address Settings On this page you can change the IP address settings of your Aspire easyStore Drive Mapping On this page the easySearch utility will help you to map your favorite shares with a drive letter inside My Computer ...

Page 22: ...Store and click this button to launch your web browser and bring you to the web login page of the Aspire easyStore you selected Create Shortcut By default this function is enabled When the easySearch utility finds any Aspire easyStore devices on your network it will automatically create a shortcut for each device found on your desktop A small Aspire easyStore icon will represent each shortcut If y...

Page 23: ...to assign to the Aspire easyStore here This function cannot be used unless the DHCP Client function is set to disabled Netmask Please fill in the Subnet Mask you would like to assign to the Aspire easyStore here If you do not know how to set this value please check your home network router settings first This function cannot be used unless the DHCP Client function is disabled Gateway Please fill i...

Page 24: ...ailable shared folder displayed in Share Name then choose an available drive letter you like and click the Map Drive button The easySearch utility will automatically create a permanent drive inside your computer Please note if you change the IP address after you map a shared folder to drive the drive will not get updates to the new IP address automatically You will need to disconnect it first then...

Page 25: ...ing your first data to Aspire easyStore 1 Ensure all cables are firmly attached as described in previous chapter 2 Power on Aspire easyStore The power switch is located at the back of the device 3 Launch the easySearch utility ...

Page 26: ... 4 If the easySearch utility does not find any Aspire easyStore device please check i If the Power Status and LAN LEDs are all in solid BLUE ii Check your Windows Firewall setting to ensure it is not blocking this utility ...

Page 27: ...to an IP in the 192 168 1 xx subnet For example 192 168 1 99 Do not set your computer IP address to 192 168 1 100 since Aspire easyStore will use this IP address if it does not find any DHCP server 5 If the easySearch utility finds your Aspire easyStore device please select the device first and go to the Drive Mapping page ...

Page 28: ...re device it already created a shortcut on your desktop You can click the shortcut with an Aspire easyStore icon and it will open the root folder of your Aspire easyStore with a folder called Volume_1 You can start to store anything inside the Volume_1 folder ii Double click the My Computer icon in your Start menu or on your desktop You should see a network drive named Volume_1 Double click on the...

Page 29: ...ch utility finds any Aspire easyStore devices you can select the Aspire easyStore device found and click Log In It will automatically bring you to the login page of the selected Aspire easyStore The default password of the Aspire easyStore web UI is admin Enter it and click the ...

Page 30: ...lly Follow these steps to configure Aspire easyStore from the web UI 1 Change the web user interface login password You can enter any password you like between 5 to 16 characters Please note the password is case sensitive and cannot contain the following special characters _ 2 Choose your time zone The default time zone is GMT Greenwich Mean Time 3 Set the IP address of your Aspire easyStore 4 Set...

Page 31: ...ssword you set in the first step of the device setup wizard and click Login On the left side of the screen there are three options Wizards The first page after you login All current user accounts of Aspire easyStore will be listed on this page and you can create additional users through the User Share Folder Wizard Advanced Advanced configuration of Aspire easyStore Detailed information will be pr...

Page 32: ... to leave the web UI Please note Aspire easyStore will only allow one administrator to log in to the web UI at any given time If you did not logout by using the Logout function you may need to wait 10 minutes to allow the current session to time out before you can log in again in another computer ...

Page 33: ...d folders with different permissions to help you manage and organize data Creating user accounts and shared folders using the wizard After you log in to Aspire easyStore the first page you see is the User Shared Folder Wizard By clicking the User Shared Folder Wizard button Aspire easyStore will launch a wizard to help you create new user accounts and assign permission to shared folders User Share...

Page 34: ...d again to avoid mistyping Folder Browse and click the folder you would like to give access to the user account previously created New Folder If you would like to create a new folder enter the new folder name here Permission Set the user account permission to Read Only or Read Write on the disk directory folder selected or created Back Return to the previous step Assign ...

Page 35: ... the selected disk directory folder for the user account previously created Create Create a new folder under the selected disk directory folder and assign it with selected permission for the user account previously created Advanced configuration Users ...

Page 36: ...typing Add Click this to create a user account based on the information provided User Lists All user accounts on Aspire easyStore are displayed here Change Password Click this icon after the user account name to modify its password Delete Click this icon after the user account name to delete this user account Quota Aspire easyStore supports storage quotas for individual user accounts Assigning a q...

Page 37: ...by clicking on the notepad icon By default all user accounts are displayed on the Quota Settings page The default quota setting is Unlimited If quota is set on particular user account it will show the quota setting for the user account and how much space the user account has already consumed ...

Page 38: ...d to remove Susan s permission to access the default shared folder Volume_1 and re assign the shared folder Volume_1 to Joe only Susan can no longer access the Aspire easyStore since she now has no permission right to any shared folder on the Aspire easyStore After few weeks Joe decided to let Susan enjoy the music files on the Aspire easyStore again In order to prevent Susan from deleting any fil...

Page 39: ...Aspire easyStore 29 ...

Page 40: ...e and click the folder you would like to give access to the user account selected in User drop down menu New Folder If you would like to create a new folder enter the new folder name here Permission Set the user account permission to Read Only or Read Write on the disk directory folder selected or created Assign Assign selected permission to the selected disk directory folder for the user account ...

Page 41: ...account A with Read Write permission you can later assign the same disk directory folder as a shared folder to user account B with Read Only permission The last change you make will overwrite the first shared folder access rule This means user account A will no longer have access permission to the shared folder sample since the shared folder access rule was overwritten Only user account B will hav...

Page 42: ... FTP server The server is easy to configure and allows users access to important data whether they are on the local home network or in the office The FTP server can be configured to allow user access to specific directories and will allow up to 10 users to access the Aspire easyStore at a time The current settings and status of the Aspire easyStore FTP server are displayed here ...

Page 43: ...Aspire easyStore 33 Max User Sets the maximum number of users who can connect to the FTP server ...

Page 44: ...each user Save settings Click Save settings for the settings to take effect User Select the user for which the FTP server rule will apply Folder Browse to and select the folder or directory you are granting FTP access to Permission Set the user permission to Read Only or Read Write Save settings Click Save settings to add the user or group FTP rule FTP Access List Lists all current defined FTP rul...

Page 45: ...tore Additional filtering and firewall settings may need to be modified on your router to allow FTP access to the Aspire easyStore from the Internet Once the port has been forwarded from the router users on the Internet will access the FTP server through the WAN IP address of the router If you use an FTP port other than 21 users accessing the FTP server using an FTP client will have to specify the...

Page 46: ... a router on your local network DHCP Server Enables or disables the Aspire easyStore DHCP Server Starting IP Address Enter the starting IP address for the range of addresses assigned by the DHCP server Ending IP Address Enter the ending IP address for the range of addresses assigned by the DHCP server Lease Time Sets the duration of time that an IP address will remain assigned to a device Save set...

Page 47: ... If the server is enabled Aspire easyStore will be automatically detected by UPnP AV compatible media players on your local network Current supported file formats including Audio Type MP3 WAV PCM WMA AC3 AAC OGG AIF AIFF Video Type VOB AVI MPEG2 MPEG4 WMV9 PlayList Type M3U PLS WPL RMP ASX Photo Type JPG BMP GIF TIF PNG UPnP AV Server Enables or disables the Aspire easyStore UPnP AV server ...

Page 48: ...Select the interval for Aspire easyStore to re index all media files stored on its hard disk Please note that large amounts of media files may need longer time to re index Do not set the time interval too short if you have large amount of media files stored Save settings Click Save settings for the settings to take effect Refresh Click Refresh to manually re index media files after adding new file...

Page 49: ...spire easyStore will be automatically detected in iTunes and the music and videos contained in the specified directory will be available to stream over the network iTunes Server Enables or disables the Aspire easyStore iTunes server Folder Specifies the folder or directory that will be shared by the iTunes server Select root to share the entire volume or click Browse to select a specific folder Pa...

Page 50: ...Aspire easyStore 40 Save settings Click Save settings for the settings to take effect Refresh Click Refresh after adding new files to be used with iTunes ...

Page 51: ...tore a new device name and description like if you purchased a second Aspire easyStore for your family The default system name and description of Aspire easyStore are easystore It may cause confusion if you have multiple Aspire easyStore systems with the same name on your network It is very simple to change the device name and description 1 Log in to the web UI 2 Click Advanced System 3 Enter the ...

Page 52: ...e and Windows XP Home Edition systems For Windows XP Professional Edition and Windows Vista the default workgroup name is workgroup If the workgroup name of your Aspire easyStore does not match your computer you may not able to find or use the Aspire easyStore system by using Network Neighborhood It is very simple to change the device workgroup 1 Log in to the web UI 2 Click Advanced System 3 Ente...

Page 53: ...P address information from the DHCP server 1 Log in to the web UI 2 Click Advanced System 3 Click the LAN tab 4 Select the DHCP Client option 5 Click the Save settings button on the lower right corner To configure the IP address information of the Aspire easyStore manually 1 Log in to the web UI 2 Click Advanced System 3 Click the LAN tab 4 Select the Static IP option 5 Fill in every field with th...

Page 54: ...Aspire easyStore 44 After you click Save settings you will be forced to log out The system will bring you automatically to the login page of the Aspire easyStore with the new IP address ...

Page 55: ...e is that it comes with standard IEEE 802 11g interface that can be used with your wireless home network To configure the wireless interface of Aspire easyStore 1 Connect Aspire easyStore to a wired network for configuration 2 Configure Aspire easyStore with the correct IP address 3 Log in to the web UI 4 Click Advanced System ...

Page 56: ... may enter them manually into each respective column 8 If you do not know which wireless network you are connecting to you may click the Site Survey button on the right of SSID 9 Aspire easyStore will look for all available access points around your home and list them 10 For access points that are protected with WEP or WPA encryption a lock icon will be displayed in the WEP column 11 Select the SS...

Page 57: ... WEP or WPA encryption you will still need to key in the respective keys manually 13 Click the Save settings button on the lower right corner 14 If everything is configured correctly a message window appears with the message Connected Successfully ...

Page 58: ...g the power switch at the back of the device 17 Power on the Aspire easyStore the using the power switch at the back of the device After you have successfully configured the wireless interface be sure to remove the Ethernet cable from the Aspire easyStore Keeping both connections on may cause unpredictable results ...

Page 59: ... disk space is used for data storage and the other half is used for a duplicate mirror of that data If one disk fails you have a backup copy Better performance no data protection RAID 0 two disks minimum Aspire easyStore will combine all hard disks you put inside the system as one large storage area All the disk space is used for data storage Data stored on the Aspire easyStore are distributed amo...

Page 60: ... easyStore will displays a message telling you that you are about to reformat the hard drives If you are sure that you would like to reformat the hard drive please click OK Otherwise please click Cancel and no changes will be made on your data 7 Restart Aspire easyStore after it has successfully reformatted the hard drives ...

Page 61: ...eed an account to send mail you can choose Anonymous Otherwise you will need to provide the user name and passwords of your outgoing e mail server 5 Before you click Save settings for the changes to take effect you may wish to click on the Test E Mail button to test your e mail configuration If everything s right you will receive a test e mail 6 Select events for which you would like Aspire easySt...

Page 62: ...Aspire easyStore 52 ...

Page 63: ... the time settings from your computer i Log in to the web UI ii Click Advanced System iii Click the Time tab iv Click the Set Time button on the lower right corner of the From My Computer section 2 Have the Aspire easyStore synchronized with a public NTP server An NTP server is a server running NTP Network Time Protocol on the Internet Usually ...

Page 64: ...e correct time zone in the Time Zone Settings section v Enter the NTP server IP address or domain name of your choice in the NTP Server section There are many public NTP servers available on the Internet An example is pool ntp org vi Click the Set Time button on the lower right corner of the NTP Server section 3 Set the time manually i Log in to the web UI ii Click Advanced System iii Click the Ti...

Page 65: ...ire easyStore 55 iv Adjust each field of the Set the Date and Time Manually section to the correct value v Click the Set Time button on the lower right corner of the Set the Date and Time Manually section ...

Page 66: ...bsite and download the latest Aspire easyStore firmware 2 Log in to the web UI 3 Click Advanced System 4 Click the Firmware tab 5 Click the Browse button to select the firmware you just downloaded from the Acer support page 6 Click the Save settings button on the lower right corner Please do not power off Aspire easyStore during the upgrade process otherwise it may render your Aspire easyStore use...

Page 67: ...turned off wait for another 15 seconds then press the power switch again to power on the Aspire easyStore You can also use the web UI to restart Aspire easyStore 1 Log in to the web UI 2 Click Advanced System 3 Click the System tab 4 Click the Restart button in the Restart section 5 Aspire easyStore will display a message asking you to confirm restart Click Okay if you really want to restart the s...

Page 68: ...asyStore will initialize the reset to factory default function After the Status LED stops blinking the Aspire easyStore settings are back to factory default You can also use the web UI to reset the Aspire easyStore to factory default settings 1 Log in to the web UI 2 Click Advanced System 3 Click the System tab 4 Click the Reset to Factory Default button in the Defaults section 5 Aspire easyStore ...

Page 69: ...Aspire easyStore 59 ...

Page 70: ...u have configured the Aspire easyStore you may want to back up the configuration file 1 Log in to the web UI 2 Click Advanced System 3 Click the System tab 4 Click the Save button in the Configuration Settings section 5 Select a folder in your computer to save the configuration file ...

Page 71: ...Aspire easyStore 61 ...

Page 72: ...o the web UI 2 Click Advanced System 3 Click the System tab 4 Click the Browse button in the Configuration Settings section to find your configuration file 5 Click the Load button to load the configuration file After you load the configuration file the Aspire easyStore will restart the system automatically ...

Page 73: ...istrator session timeout 1 Log in to the web UI 2 Click Advanced System 3 Click the System tab 4 Change the value of the Inactivity Timer The default value is 10 minutes 5 Click the Save settings button in the Idle Time section for the changes to take effect ...

Page 74: ...us You can review the basic system settings like current IP address device name description and workgroup current system temperature and current system hard drive and RAID information on the Device Info page To view this page 1 Log in to the web UI 2 Click Advanced Status ...

Page 75: ...ened to the Aspire easyStore Aspire easyStore takes note of every important event that happens on its system You can review all the past 50 events on the System Log page 1 Log in to the web UI 2 Click Advanced Status 3 Click the System Log tab ...

Page 76: ...Aspire easyStore 66 ...

Page 77: ...re takes note of every important event that happens on its system You may want to save these logs for future use 1 Log in to the web UI 2 Click Advanced Status 3 Click the System Log tab 4 Click the Backup System Log button 5 Select a folder in your computer to save the log file ...

Page 78: ...Aspire easyStore 68 ...

Page 79: ...Store Aspire easyStore provides a hard disk status page to allow you review the hard disk brands serial size and RAID level If any disk failed it will be marked as Failed on this page 1 Log in to the web UI 2 Click Advanced Status 3 Click the Physical Disk Info tab ...

Reviews: