38
Chapter 2
DOS Flash Utility
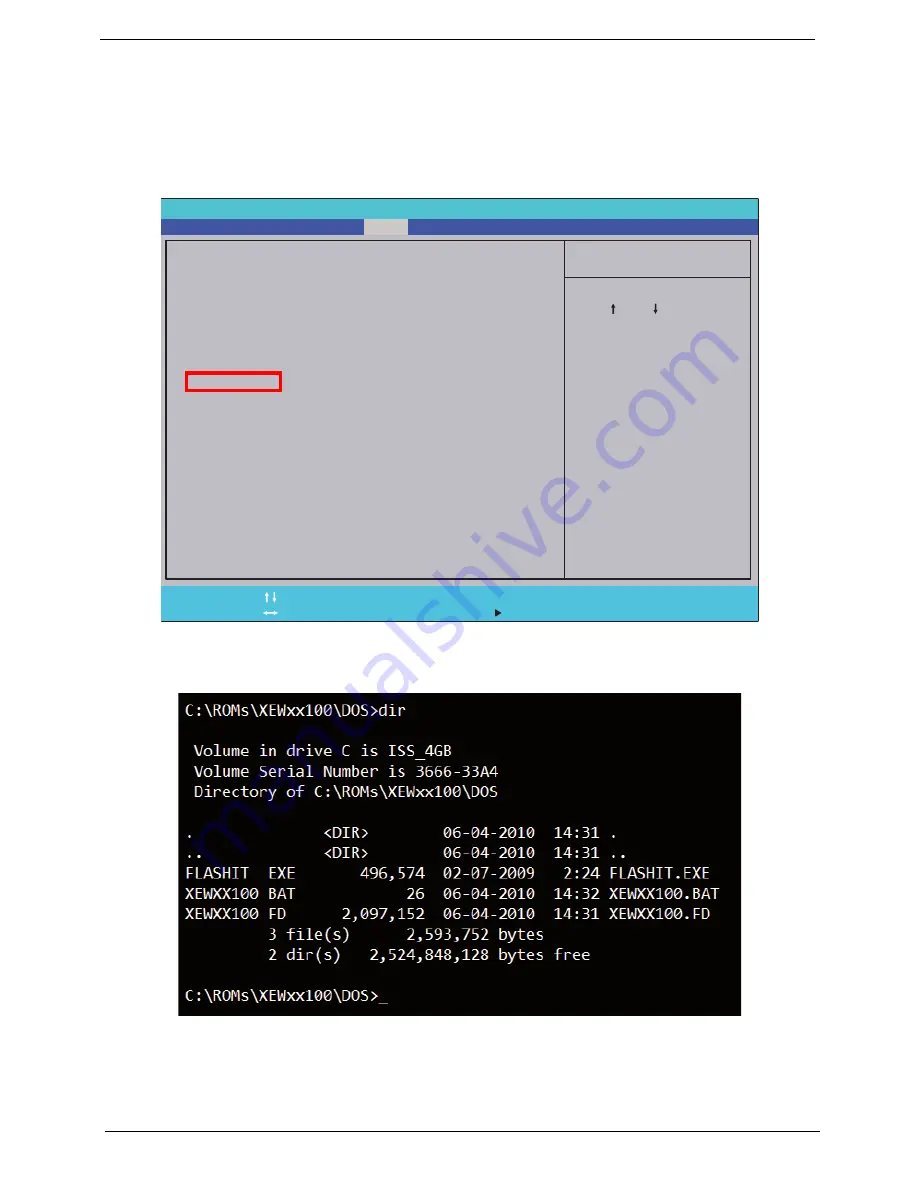
Perform the following steps to use the DOS Flash Utility:
1.
Press F2 during boot to enter the Setup Menu.
2.
Select
Boot Menu
to modify the boot priority order, for example, if using USB HDD to Update BIOS, move
USB HDD to position 1.
3.
Execute the
XEWXX100.BAT
batch file to update BIOS.
The flash process begins as shown.
I t e m S p e c i f i c H e l p
U s e < > o r < > t o s e l e c t
a d e v i c e , t h e n p r e s s
< F 5 > t o m o v e i t d o w n t h e
l i s t , o r < F 6 > t o m o v e
i t u p t h e l i s t . P r e s s
< E s c > t o e s c a p e t h e m e n u
F 1
E S C
H e l p
E x i t
S e l e c t I t e m
S e l e c t M e n u
C h a n g e Va l u e s
S e l e c t
S u b M e n u
E n t e r
F 9
F 1 0
S e t u p D e f a u l t
S a v e a n d E x i t
B o o t p r i o r i t y o r d e r :
1 . I D E O : W D C W D 6 4 0 0 B E V T - 2 2 A 0 R T 0
2 . I D E 1 : P I O N E E R B D - R O M B D C T D 0 3 R S
3 . U S B F D D :
4 . N e t w o r k B o o t : L E G A C Y P C I D E V I C E
5 . U S B H D D :
6 . U S B C D / D V D R O M :
B o o t p r i o r i t y o r d e r :
1 . I D E O : W D C W D 6 4 0 0 B E V T - 2 2 A 0 R T 0
2 . I D E 1 : P I O N E E R B D - R O M B D C T D 0 3 R S
3 . U S B F D D :
4 . N e t w o r k B o o t : L E G A C Y P C I D E V I C E
5 . U S B H D D :
6 . U S B C D / D V D R O M :
F 5 / F 6
I n s y d e H 2 0 S e t u p U t i l i t y R e v . 3 . 5
Information
Main
Boot
Exit
Security
Summary of Contents for ASPIRE 5252
Page 4: ...IV ...
Page 10: ...X Table of Contents ...
Page 38: ...28 Chapter 1 ...
Page 69: ...Chapter 3 59 4 Detach the WLAN module from the WLAN socket ...
Page 86: ...76 Chapter 3 5 Lift the Bluetooth cable from the cable guides Discrete UMA ...
Page 97: ...Chapter 3 87 8 Remove the LCD assembly from the lower cover ...
Page 108: ...98 Chapter 3 5 Lift the microphone set clear of the panel ...
Page 119: ...Chapter 3 109 4 Replace the adhesive tape securing the inverter board cable to the LCD cover ...
Page 125: ...Chapter 3 115 7 Replace the adhesive tape to secure the antennas to the lower cover ...
Page 136: ...126 Chapter 3 4 Connect the USB cable to the mainboard and lock the connector ...
Page 144: ...134 Chapter 3 4 Connect the speaker cable B 5 Connect and lock the touchpad FFC C ...
Page 148: ...138 Chapter 3 4 Slide the HDD module in the direction of the arrow to connect the interface ...
Page 158: ...148 Chapter 3 ...
Page 186: ...176 Chapter 3 ...
Page 254: ...244 Appendix B ...
Page 256: ...246 Appendix C ...
Page 260: ...250 ...


