background image

Ricoh StreamPunch Ultra/MP Installation Manual

                                                    7 


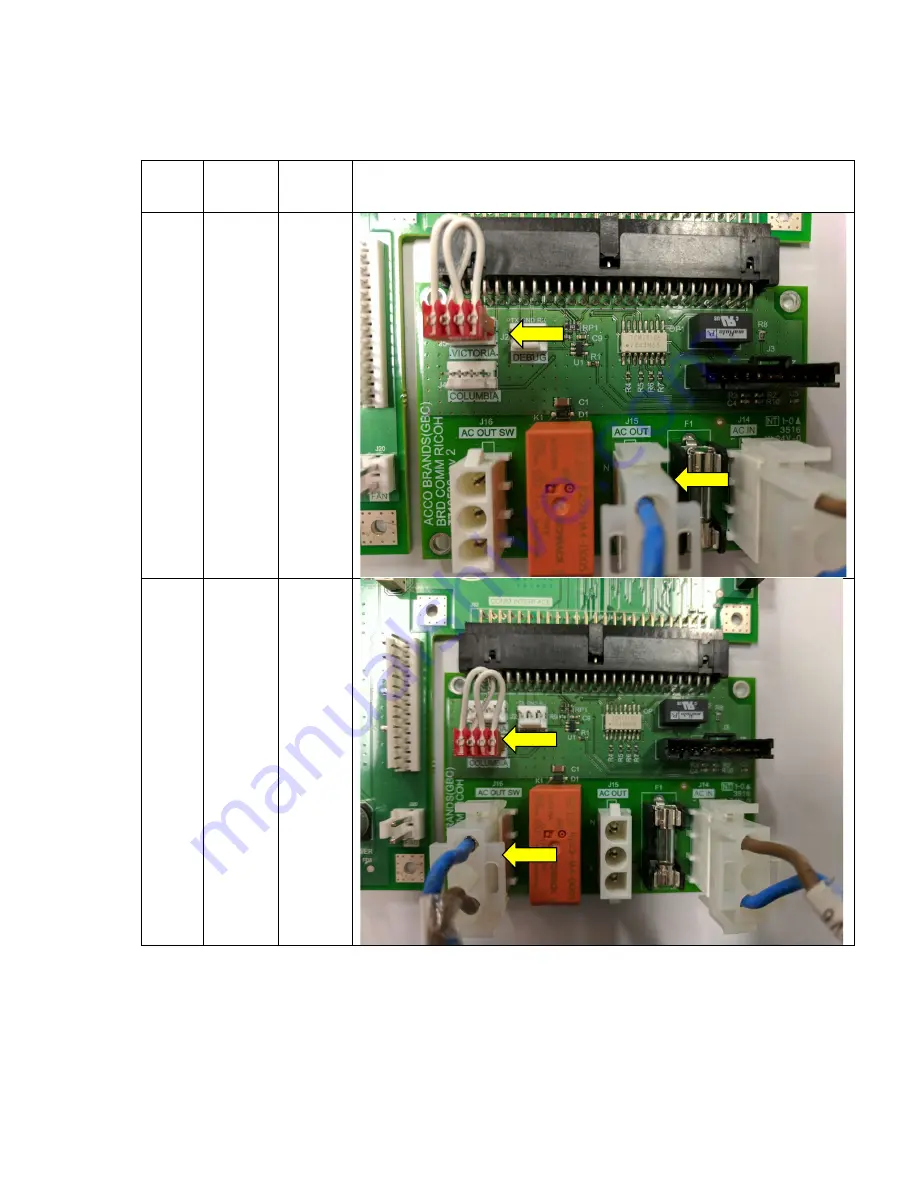
Punch  Finisher  Jumper/ 

AC 

cable 

Jumper position & AC power cable position 

St

ream

Punc

Ult

ra

 M


SR

4080 or

 S

R

4110 

fini

sher

Vic

to

ria


AC O

UT


St

ream

Punc

Ult

ra


SR5

05

0,

 S

R

5060


SR

50

70,

 S

R

5080


SK

50*

* s

er

ies


Co

lu

m

bia


AC

 O

U

T SW


Summary of Contents for GBC Ricoh StreamPunch Ultra

Page 1: ...ecommendations and Pre requisites 2 2 Unpacking 2 3 Configurations 2 4 Sheet guides installation 3 5 Docking Bracket Installation 4 6 Cable connections 5 7 Leveling Height Adjustment 9 8 Final Steps 10 Part No 7715807 Rev No E1 Issue Date April 2020 ACCO Brands Inc Four Corporate Drive Lake Zurich IL 60047 www acco com ...

Page 2: ...nstallation of the StreamPunch Ultra MP Inspect for any concealed damage to the unit If there is evidence of concealed shipping damage contact the shipping carrier immediately Remove all shipping tape from doors and levers 3 Configurations StreamPunch Ultra can be installed with the below printer finisher configurations Product name Project name Peripheral Pro C5300 Charis C3 pro SR5110 SR5120 SK5...

Page 3: ...lling the StreamPunch Ultra MP directly downstream to a printer that utilizes a decurl unit the Entrance guides need not be installed 4 2 Exit side guides Depending on the downstream device choose the appropriate Exit guide from the Installation kit Install the appropriate Exit guide with the supplied M4 8mm long round tipped screws 2 Nos Straight exit guide Angled exit guide SR5050 SR5060 SR4080 ...

Page 4: ... bracket marked R on the right side facing you as you look at the exit side of the upstream device Install the bracket marked L on the left side facing you Both brackets should be oriented with the arrow facing up If there is already a docking bracket on the upstream device it needs to be removed as it will be used in the next step Before the system can be docked correctly the paper guide on the f...

Page 5: ...ear cover and plug the supplied communication cable to connector as shown below see section 3 for which communication cable to use i CN109 when connecting to a SR5050 SR5060 SR5070 and SR5080 Finisher ii CN550 when connecting to a SK5040 stacker iii CN144 when connecting to a SR4080 or SR4110 finisher CN550 is located near the left top corner of the Stacker s control board CN109 is located on the ...

Page 6: ...so it doesn t fall as you remove the M4 X 8 Screws 8 from the Rear Cover 4 Grasp the Rear Cover by the handle and remove the Rear Cover Check the communication board If it has a jumper move the jumper and the AC power cable to the positions shown in the table on the next page If there is no jumper position on the board no change is necessary and the rear cover can be replaced MAIN BOARD COMMUNICAT...

Page 7: ...stallation Manual 7 Punch Finisher Jumper AC cable Jumper position AC power cable position StreamPunch Ultra MP SR4080 or SR4110 finisher Victoria AC OUT StreamPunch Ultra SR5050 SR5060 SR5070 SR5080 SK50 series Columbia AC OUT SW ...

Page 8: ...port of StreamPunch Ultra MP in the rear side of the machine c Replace the finisher rear cover and make sure the finisher cable is plugged in Ensure that the communication cables are not pinched anywhere d Connect the supplied AC power cable to StreamPunch Ultra MP on the rear side lower left corner StreamPunch Ultra MP has a power switch on the front of the machine Ensure this is turned on ...

Page 9: ... printer with a decurler installed then the documentation supplied with the decurler should be referred to set the decurler exit height After setting the height check the exit guide of the StreamPunch Ultra MP is set as shown below for the various finisher types Finisher Reference Height X Stacker Reference Height Y SR5050 SR5060 SR4080 SR4110 SR4140 SR5110 SR5120 SR5040 3mm SK5040 2 5mm 7 2 Adjus...

Page 10: ... www tscweb net US or https www my ricoh com EU The GBC service data portal that also contains the latest firmware can be accessed from the QR code below 8 2 Enabling the Punch Icon If the punch icon shown below for the Stream Punch Ultra MP option does not appear on the operation panel follow the procedure below a Shut down the printer b Turn OFF of the main power switch located inside the front ...

Page 11: ...Test Functional test the StreamPunch Ultra MP system a Check to ensure that the paper chip tray is securely in place b Check to ensure that a die set is installed properly and that any extra die sets are securely stored in the die storage area c Run a small test job in Bypass mode Check to ensure that the job is not punched and bypasses properly d Run a small job with punch enabled Check the punch...

Reviews: