background image

P18

CASH

®

 Magnum XL

SAFE OPERATING 

INSTRUCTIONS

SECTION 7

©

3.1

   With the tool facing away from you, place the breech 


cap atop the barrel and screw the breech cap clockwise 


until securely fastened
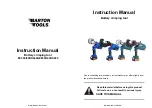
3.2 

With the tool facing away from you, pull the firing pin 


pull upwards until there is a “CLICK”, the tool is now 


cocked and ready to fire. (See Fig. 7.07)

NOTE

4

  Do not point the tool at yourself or any other persons

4

  Keep your fingers clear of and away from the trigger when loading the cartridge

4

  Do not place the tool down when it is cocked and ready to fire

4

  If the shot is aborted – before depressing the trigger, unscrew the cap and remove the cartridge to make safe

3

MAKE READY

FOR FIRING

4

FIRE

FIRING PIN PULL

4.1

   Position the muzzle tip into the correct position on the 


target animal’s head, when it touches, you should 


instantaneously fire the tool by pulling the trigger to 


stun the animal

NOTE

4

  Refer to Section 5 – Effective Stunning and Cartridge 


Selection for the correct angle and positon for the target animal

4

  Do not attempt to FIRE if the animal is moving its head

4

  The muzzle application must be smooth and accurate and the 


tool fired the instant it is in position on the target area of the head

Fig. 7.07

©2016 Accles & Shelvoke

RECOMMENDED 

STUNNING POSITION

Fig. 7.08

©2016 Accles & Shelvoke

Summary of Contents for CASH Magnum XL

Page 1: ...s Accles Shelvoke Ltd Unit 5A Maybrook Road Maybrook Business Park Minworth Sutton Coldfield B76 1AL Website www acclesandshelvoke co uk Email info acclesandshelvoke co uk Telephone 44 0 121 313 3564...

Page 2: ...AND DIAGRAM 26 12 WARRANTY AND RECYCLING 27 DECLARATION OF CONFORMITY CERTIFICATE 28 DISCLAIMER This instruction manual is correct at the time of printing However because our policy is one of constan...

Page 3: ...an set the tool in stop fire mode In this mode the firing pin is prevented from striking the cartridge thus preventing firing of the tool rendering it safe Please refer to section 7 for further detail...

Page 4: ...ted load paper sheets and plasticine The A weighted sound pressure level and A weighted sound power level have been calculated and are hence valid at the maximum number of driving processes in one sec...

Page 5: ...artridge showing the maximum grains GNS that should be used THE MAXIMUM GRAINS GNS AND SERIAL NUMBER OF THE TOOL CAN BE FOUND ENGRAVED ON THE BARREL OF THE STUNNER FIRING PIN PULL TRIGGER Depress to f...

Page 6: ...thdrawal of feed or water f Are prevented from avoidable interaction with other animals that could harm their welfare In addition 4 Avoid excessive light and noise at the area to keep animal stress to...

Page 7: ...imal collapses 4 No rhythmic breathing 4 Fixed glazed expression in the eyes 4 No corneal reflex 4 Relaxed jaw 4 Tongue hanging loose THE EFFECTIVENESS OF THE STUN MUST BE VERIFIED BEFORE THE ANIMAL I...

Page 8: ...K Shearer Iowa State University Fig 5 01 Fig 5 02 SUGGESTED TOOLS AND CARTRIDGES 25 RANGE CASH MAGNUM XL 5657 FOR CALVES N S FOR LIGHT ANIMALS N S FOR MEDIUM ANIMALS N S FOR HEAVY ANIMALS BULLS N S FO...

Page 9: ...CARTRIDGES 25 RANGE CASH MAGNUM XL 5657 FOR PIGLETS BELOW 5KG N S FOR WEANERS GROWERS N S FOR MARKET PIGS N S FOR HEAVY ANIMALS BLACK FOR VERY SOWS BOARS GREEN FOR EXCEPTIONALLY HEAVY ANIMALS RED N S...

Page 10: ...the E or C head marks be used in stunners manufactured by Accles Shelvoke It follows therefore that no liability whatsoever can be accepted for any claim including injury should any other brand of ca...

Page 11: ...ANGE BLACK GREEN RED 25 5657 CASH Magnum XL N S N S N S N S YES YES YES To order your 25 calibre cartridges please select the appropriate part number from the table below PART NUMBERS FOR 25 CARTRIDGE...

Page 12: ...ers have been published following years of experience These figures may only be used when quoted with the associated notes Accles Shelvoke will not accept responsibility for the reliability of these f...

Page 13: ...RTABLE AND ALWAYS POINTING AWAY FROM THE OPERATOR FIRING OF THE BOLT TOWARD BODY PARTS MAY PENETRATE THE BODY AND MAY LEAD TO SEVERE AND IRREVERSIBLE DAMAGE POSSIBLY LEADING TO FATALITY 4 NEVER MODIFY...

Page 14: ...medium level of risk which if not avoided may result in recoverable injury 4 DO NOT FIRE THE BOLT INTO HARD BRITTLE OR IMPENETRABLE MATERIALS AS THE BOLT MAY FRAGMENT AND POSE A DANGER OF FLYING PARTI...

Page 15: ...LACE HELPING TO MINIMISE ANY RISK DUE TO TIREDNESS OR FATIGUE GOOD PRACTISE 4 THE CLEANING AND MAINTENANCE SCHEDULE DETAILED IN THIS MANUAL SHOULD BE ADHERED TO TO ENSURE THE TOOL OPERATES SAFELY AND...

Page 16: ...TRIDGES BETWEEN SITES THIS TOOL HAS BEEN SUPPLIED TO YOU WITH THE INTENTION OF SINGLE SITE USE SUPPLIED WITHOUT A LOCKABLE STORAGE CONTAINER SHOULD THERE BE A NEED TO TRANSPORT THIS TOOL AND LIVE CART...

Page 17: ...FOOT OF THE TOOL USER 2 1 Push bolt back into the barrel using the domed end of the pull See Fig 7 05 2 2 Before inserting the cartridge into the chamber of the breech ensure that the bolt is fully re...

Page 18: ...ire 4 If the shot is aborted before depressing the trigger unscrew the cap and remove the cartridge to make safe 3 MAKE READY FOR FIRING 4 FIRE FIRING PIN PULL 4 1 Position the muzzle tip into the cor...

Page 19: ...emove safely 4 Do not use a sharp implement to remove stuck cartridges as this may damage the breech or extractor IF THE CARTRIDGE HAS MISFIRED NOT FIRED PUT THE TOOL DOWN IMMEDIATELY AND WAIT FOR 30...

Page 20: ...kly in accordance with the cleaning stated in this instruction manual 4 Part replacement details part number and description date replacement maintenance took place 4 Stun Check record Univeral Stun C...

Page 21: ...h a rag soaked in young s 303 fluid and followed with the steel brush end of cleaning tool 4 Wipe the barrel and breech out with a clean rag 5 Remove the buffers from bolt and wire wheel or brush carb...

Page 22: ...5A if fitted using a wrench on the flats Pull firing pin assembly out of breech cap which will also release trigger and trigger spring Inspect firing pin Item 16 for rounded edges from trigger contact...

Page 23: ...n Section 8 Cleaning and General Maintenance Replace immediately Check and remove if present Check type of cartridge against product code of stunner and animals being stunned by referring to Section 5...

Page 24: ...PIN DOES NOT STRIKE THE HEAD If no indent is visible on the cartridge head strip down the tool and check the condition and operation of parts 4 Worn or damaged firing pin Item 16 replace pin 4 Worn or...

Page 25: ...he lower edge of the safety cap outer this will ensure that the 3 start thread commences location in the correct position so that when screwed together clockwise the cut out on safety cap outer aligns...

Page 26: ...n 1 5649 8 Small O Ring 1 5627 9 Trigger Spring 1 5628 10 Firing Pin Spring 1 5755 11 Pull 1 5702 12 Safety Cap Inner 1 5693 13 Safety O Ring 1 5695 14 Safety Cap Outer 1 5692 15 Safety Stop Pin 1 303...

Page 27: ...life it needs to be disposed of in a responsible manner Most of the materials from which the Accles Shelvoke range of stunning tools is manufactured can be recycled These materials must be correctly s...

Page 28: ...at the time of killing The Gun Barrel Proof Act 1978 The following standards have been used EN ISO 12100 2010 Notified body who carried out the EC type examination or Full Quality Assurance Name Addre...

Reviews: