WVD100
Product Manual
WVD100, Rev 2.5E
Page 4
EZ
Loop
Quick Start
5. Activate & Test Sensor:
Activate and test the sensor next to the AP100 and antenna
before installing the sensor to insure the sensor is working
correctly. To activate the sensor:
1. Place the Sensor on the ground so it is close to the antenna and has a
clear line of sight. Do not move the Sensor once it is Active.
2. Program the Sensor Active on the AP100:
a. Select PROGRAM, press Enter
b. Select SENSOR, press Enter
c. Select ACTIVE, press Enter
d. Select the Sensor to activate, press Enter
e. Select ACTIVE, press Enter
f. Hold the Enter button to exit programming
3. Without moving the sensor, test the sensor:
a. Place the sensor near the antenna to ensure good communication.
b. Do Not Move The Sensor or it will cause a locked on detect.
c. Place an object such as a magnetized screwdriver, cell phone or
piece of metal right next to the sensor. The Sensor should detect.
d. Remove the object. The Sensor should drop detect.
6. Select Sensor Location:
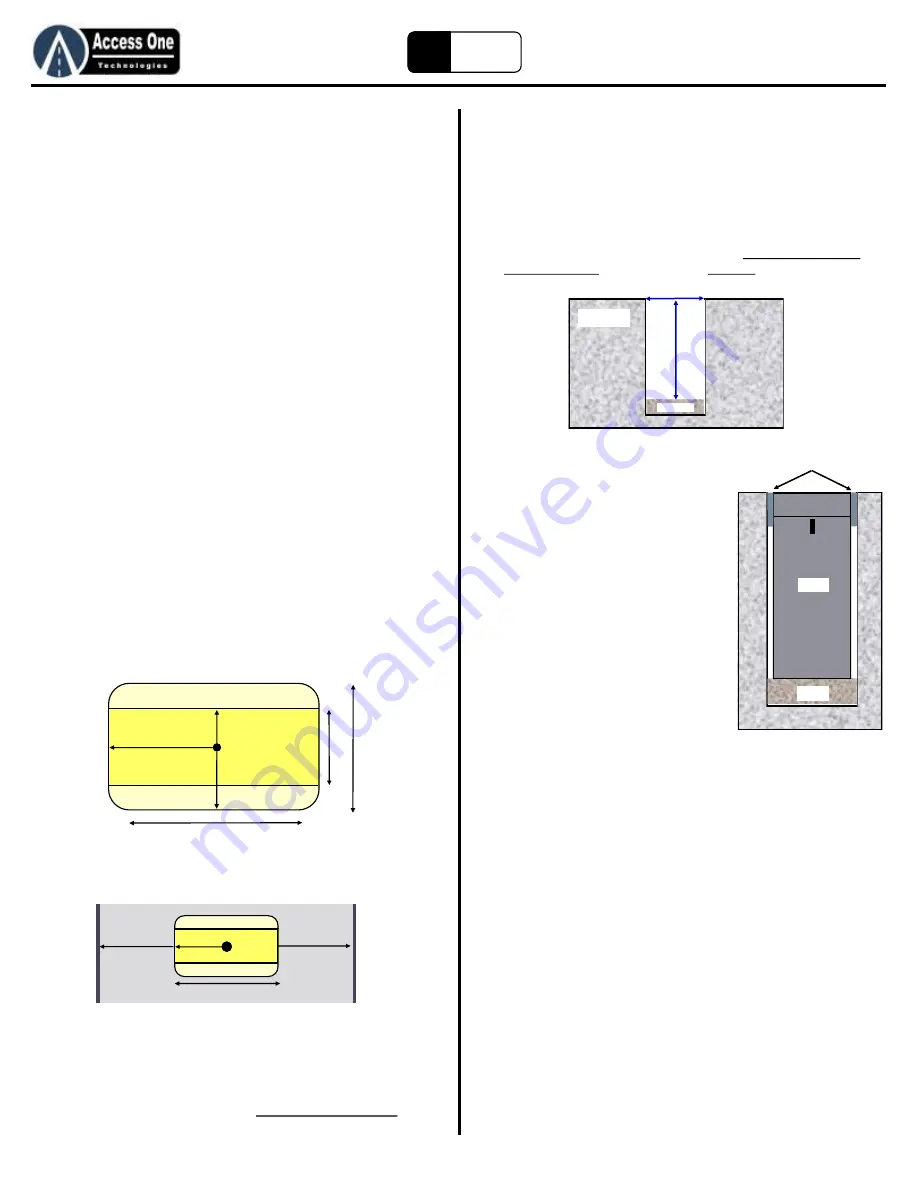
Detection range is similar to a rectangular bubble around the
sensor. Average detection distance from the sensor is
approximately 8ft wide x 4ft deep x 3-4ft high. In some occasions
the distance may be less and in some occasions the distance may
more. A simple above ground test can help define the distance.
To layout a standard gate application:
1. Place the sensor in the center of the traffic lane.
2. Determine if one or multiple sensors will be needed for full detection
across a wide traffic lane.
3. When a sensor is placed on the side of the driveway, make sure it
reaches far enough into the lane to detect a vehicle.
4. Place the sensor far enough away from the gate so the moving gate
does not activate the sensor. Usually 8-10 feet from the gate.
Quick Start
7. Drill Sensor Hole:
To prepare the Sensor hole for installation:
1. Drill a 2” wide hole 5” deep. (Tip: Use a Dry Diamond Core Bit to core
drill the hole)
2. If the hole is more than 5” deep, add sand to make the sensor flush
with the top of the
driveway.
8. Install Sensor:
To install the Sensor in the driveway:
1. Close the Sensor housing tightly making
sure the top has sealed against the O-
rings.
2. Place the sensor in the hole with the line
on the housing facing toward the
gate and traffic lane.
3. Secure the housing in the driveway with a
sealant. The Sensor needs to be secured
so that it does not turn when a vehicle
drives over it.
9. Reset Sensor Active:
If a Sensor is Active and then moved, it will detect and lock on
detect until it is reset. It will automatically reset after 14 minutes
or it can be reset by making it Active again. To reset the Sensor:
1. Program the Sensor Active on the AP100:
a. Select PROGRAM, press Enter
b. Select SENSOR, press Enter
c. Select ACTIVE, press Enter
d. Select the Sensor to activate, press Enter
e. Select ACTIVE, press Enter
f. Wait for the AP100 to go to LEARN
g. Hold the Enter button to exit programming
2. Wait up to 2 minutes for the sensor to reset:
a. When the Sensor is reset, it will drop detect and the relay should
turn off.
3. If the sensor gets moved when sealing it, simply reset it again.
IMPORTANT: Read the entire manual for complete and
proper safety, installation and programming instructions.
6-8 feet Side to Side
3-4 feet
2-
3 f
ee
t
1-
2 f
t
Expanded Area
Expanded Area
Initial
Detection
Area
2-
4 f
ee
t
4-
6 f
ee
t
5 feet
5 feet
or less
3 - 4
feet
6 - 8 feet detection
Sand
Driveway
5”
D
ee
p
2” Wide
Sand
Sensor
Sealant
Summary of Contents for WVD100
Page 24: ...www AccessOneTechnologies com...


