background image


7

3.7. Connecting Devices to the P37B................................................................................ 24


3.7.1. Connecting USB .................................................................................................................24


3.7.2. Connecting a Serial Device.................................................................................................26


3.7.3. Connection to a LAN ..........................................................................................................26


3.7.4. Connecting Headphones and a Microphone........................................................................27


Chapter FOUR

..........................................................................................................28


4.1. Getting Connected...................................................................................................... 28


4.2. Installing Microsoft ActiveSync................................................................................ 28


4.2.1. Connecting to Your Computer ............................................................................................28


4.3. Connecting GPS ......................................................................................................... 30


4.4. Connecting WWAN ................................................................................................... 32


Chapter FIVE

............................................................................................................34


5.1. Advance Settings ........................................................................................................ 34


5.2. Checking the Battery Status...................................................................................... 34


5.3. Optimizing Battery Life............................................................................................. 34


5.3.1. Changing the Automatic Power Settings ............................................................................34


5.3.2. Adjusting Backlight Settings...............................................................................................35


5.4. Performing a System Reset ....................................................................................... 36


5.5. Changing the Screen Resolution ............................................................................... 37


5.6. Rotate Screen.............................................................................................................. 38


Summary of Contents for P37B

Page 1: ...P P3 37 7B B R Ru ug gg ge ed d P PD DA A U Us se er r M Ma an nu ua al l Version V3 2 ACA Digital Oct 2009...

Page 2: ...l applications These applications include those found by military as well as industrial users The P37B has been designed to comply with the relevant requirements of MIL_STD 810F MIL STD 461F and IP67...

Page 3: ...ital device pursuant to Part 15 of the FCC Rules These limits are designed to provide reasonable protection against harmful interference in a residential installation This equipment generates uses and...

Page 4: ...nts with very different temperature and or humidity ranges condensation may form on or within the P37B To avoid damaging the P37B allow sufficient time for the moisture to evaporate before using the P...

Page 5: ...cified range could damage the batteries and shorten their charging life cycle Storage and safety notice Although charged Lithium Ion batteries may be left unused for several months their capacity may...

Page 6: ...ng the P37B 15 2 2 1 Installing the battery 15 2 2 2 Charging the Battery 17 2 2 3 Charging the Battery with the Adapter Charger 17 2 3 Powering up for the First Time 18 2 4 Calibrating the touch scre...

Page 7: ...ted 28 4 2 Installing Microsoft ActiveSync 28 4 2 1 Connecting to Your Computer 28 4 3 Connecting GPS 30 4 4 Connecting WWAN 32 Chapter FIVE 34 5 1 Advance Settings 34 5 2 Checking the Battery Status...

Page 8: ...uch screen keypad WWAN communication capability and handsfree ability Currently available option include GPS To minimize the Total Cost of Ownership the P37B is sealed to meet IP67 standards and compl...

Page 9: ...le with antenna built in optional Status Indicator Power LED two color LED x1 at right side LED on the upper side for lighting usage One LED for GPRS wireless connection at left side Two USB type A co...

Page 10: ...cle charger with 12V cable option 1 1 2 Package Contents The standard P37B includes the following items 1 P37B PDA unit 2 power cord Adapter 3 battery 4 stylus string 5 Hand strap 6 USB connecting cab...

Page 11: ...te in the P37B interface Function Keys Programmable keypad interface for controlling the P37B Power button If the device is off press this button to turn it on When the unit is on press this button fo...

Page 12: ...es or headphones for use in noisy environments Microphone Plug Enables the recording of voice using an external microphone USB mini type B port USB mini type B port client Micro SD Slot Accommodates M...

Page 13: ...nt cover to place or remove battery 1 2 4 Left View Item Description RS 232 Serial Port Connects using a mini 9 way D type connector for this port for serial communications USB type A port Connects to...

Page 14: ...or use with the touch screen Battery Compartment Houses the removable and rechargeable battery pack 1 2 6 Top View Item Description 15pin connector Slot Additional functionality can be provided by usi...

Page 15: ...ly DO NOT disassemble crush puncture short external contacts or dispose the battery pack in fire or water DO NOT attempt to open or service the battery pack Dispose of used batteries according to loca...

Page 16: ...ON Amber flashing with Green light Amber light 1 Remove the battery compartment cover 2 Align the battery contacts with the contacts in the compartment and place the battery in the compartment as show...

Page 17: ...sing the power adaptor NOTE When the battery power is below 10 the P37B will enter suspend mode 2 2 3 Charging the Battery with the Adapter Charger 1 Open the side door on the right bottom of the P37B...

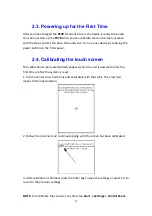
Page 18: ...g the touch screen The calibration screen automatically appears when the unit is powered on for the first time or after the system is reset 1 Tap the center cross hair firmly and accurately with the s...

Page 19: ...ap the arrows next to the month to select the correct month 4 Select a field in the time box and tap the arrows next to the time to change the value of the field 5 Tap the drop down arrow next to Time...

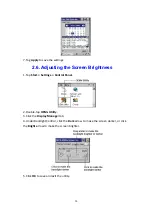
Page 20: ...tness 1 Tap Start Settings Control Panel 2 Double tap OEMs Utility 3 Click the Display Manager tab 4 Under Backlight Control click the Dark arrow to make the screen darker or click the Bright arrow to...

Page 21: ...th the Keypad The operating system has an onscreen keyboard that enables you to enter alphanumeric characters with the stylus Press the input panel icon in the system tray to view the input panel menu...

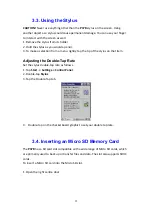
Page 22: ...tip of the stylus on that item Adjusting the Double Tap Rate Set the stylus double tap rate as follows 1 Tap Start Settings Control Panel 2 Double tap Stylus 3 Tap the Double Tap tab 4 Double tap on t...

Page 23: ...flush with the slot 4 Close and lock the door 3 5 Removing a Storage Card 1 Open the right centre door 2 Press the card in and release The card pops out 3 Remove the card from the slot 4 Close and loc...

Page 24: ...d 3 7 Connecting Devices to the P37B This section describes how to connect devices to the P37B Connection can be made directly to the P37B or using the cradle 3 7 1 Connecting USB The P37B can accommo...

Page 25: ...thly check the orientation and try again Connecting a MINI USB Type B The illustration below shows how to connect a mini USB type B cable to the P37B The connector is keyed to only go in one way If it...

Page 26: ...Connecting a Serial Device Connect a serial device to the P37B to perform serial communications Please see below illustration 3 7 3 Connection to a LAN The P37B is connected using a RJ 45 connector S...

Page 27: ...27 3 7 4 Connecting Headphones and a Microphone The P37B utilizes an external microphone and speaker A headset and microphone can be used in noisy environments See the illustration above...

Page 28: ...e a previous version of the Microsoft ActiveSync installed in your computer uninstall it first before installing the latest version of Microsoft ActiveSync 4 2 1 Connecting to Your Computer 1 After Ac...

Page 29: ...munication settings 5 Follow the onscreen instructions 6 When the configuration process is complete the ActiveSync window appears 7 Synchronization will be initialized and will take place if you ve ch...

Page 30: ...nto Deskonchip1 to save and double tag to install VisualGPS as follow instruction Copy visualGPSceinstall CAB to P37B Desktop and execute visualGPSceinstall CAB on desktop Follow these instructions to...

Page 31: ...N GPS to start the GPS 4 When GPS is active click GPS status to display the satellite status 5 Allow approximately 60 seconds very first time for GPS longitude and latitude display Note GPS display ap...

Page 32: ...transmission only 1 From START PROGRAM Utility PwrCtrl and chose GPRS ON 2 Chose Start Settings Control Panel Network and Dial up connections 3 Tap Make New Connection Dial Up Connection HSDPA Siemen...

Page 33: ...ick Control Panel then Network and Dial upConncetions 7 Click Dial Properties and Dialing Patterns Then place G into each blank as follow 8 Connection is successful when the Status screen displays Con...

Page 34: ...tteries NOTE It is necessary to charge the battery when the battery charge reaches below 13 If the battery does not accept a charge contact Technical Support 5 3 Optimizing Battery Life You can extend...

Page 35: ...he LCD is touched Switch state to Suspend P37B enters suspend mode when there is no user input or system activity after the selected timeout Time out values range from Never and 4 5 10 30 minutes 5 3...

Page 36: ...e to get a fresh start similar to rebooting a computer This will restart your device and adjust memory allocation All records and entries are retained after a reset Unsaved data in open programs may i...

Page 37: ...37 5 5 Changing the Screen Resolution It may be necessary to change the screen resolution from VGA to QVGA or from QVGA to VGA 1 Start PROGRAM Utilizes DispSet 2 Wait for the P37B Re start...

Page 38: ...38 5 6 Rotate Screen It may be necessary to rotate the screen display from standard throught either 90 180 or 270 degrees 1 Start PROGRAM Utilizes DispSet 2 Select the angle of rotation...

Reviews: