background image


25 

English 

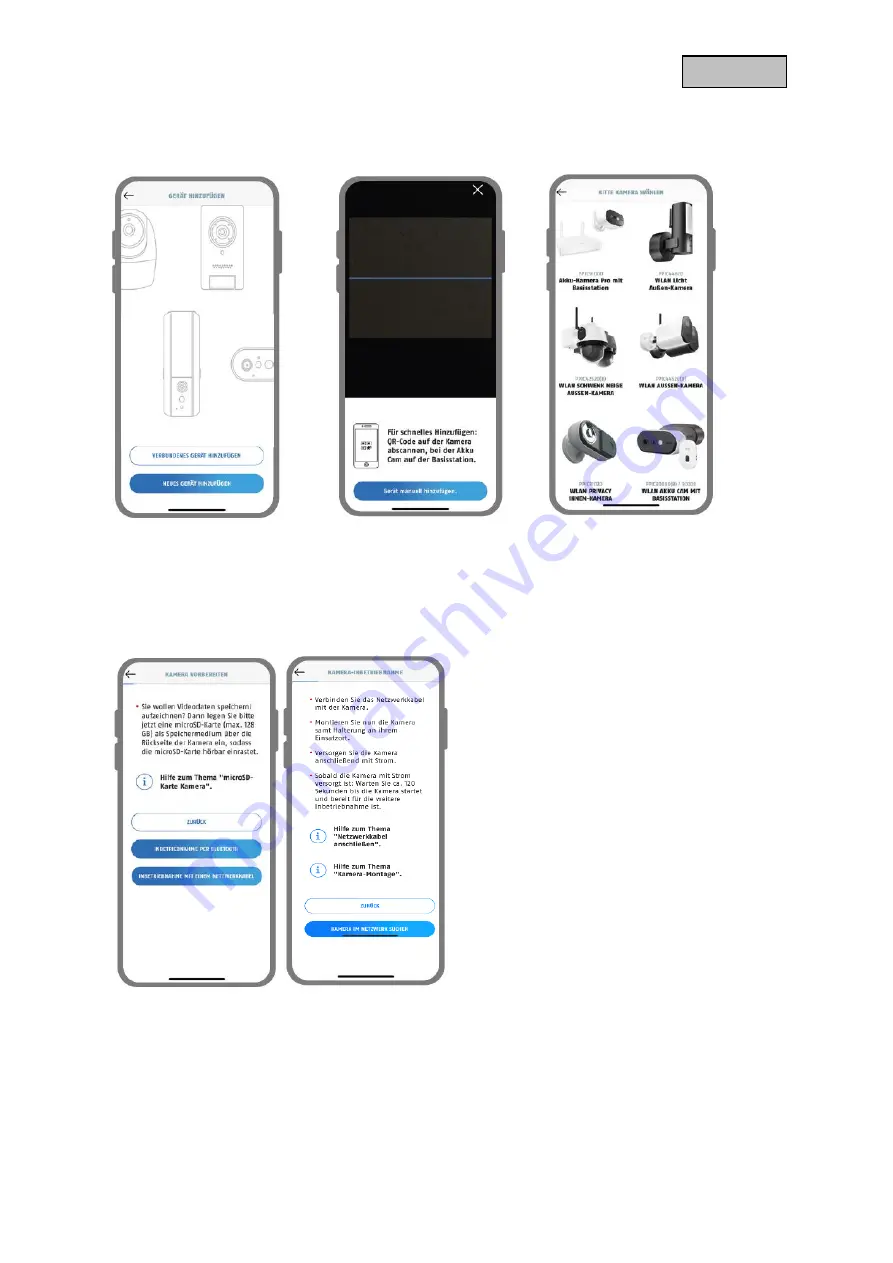
9.3.2. Setup via network cable (optional) 


      1 


                      2   


                     3   


1. 

Launch the App2Cam Plus and select "Add new camera" to start the setup process.


2. 

Option 1: Scan the QR code; located in the camera foot.


3. 

Option 2: Tap the "Add camera manually" button and then select your camera model from the list. 


      4 


         5   


4. 

Select "setup via LAN". 

5. 

Now connect the network cable and supply the camera with power.  Now supply the camera with 
power, if not already done, and wait 2 minutes until the status LED of the camera (behind lower 
cover) flashes 2x short and 1x long. Click on "Search camera in network". 


Summary of Contents for PPIC46520

Page 1: ...Instruction manual Important notes and FAQs about this product and other products can be found on the website http www abus com Version 1 0 Original operating instructions in German language Keep for...

Page 2: ...claration of Conformity is available at the following web addresses www abus com product PPIC46520 To maintain this condition and to ensure safe operation you as the user must observe these operating...

Page 3: ...ver if you notice any omissions or inaccuracies please notify us in writing at the above address ABUS Security Center GmbH assumes no liability for technical and typographical errors and reserves the...

Page 4: ...app 20 9 3 Set up camera 21 9 3 1 Bluetooth setup 21 9 3 2 Setup via network cable optional 25 9 3 3 Add cameras already set up 28 9 4 App2Cam Plus Overview 29 9 4 1 Camera overview 30 9 4 2 Recording...

Page 5: ...ngs 47 9 8 11 Siren settings 49 9 8 12 Light control 50 9 8 13 Memory settings 51 9 8 14 Notification settings 52 9 8 15 Devices settings 53 9 8 16 Device information 55 10 Update firmware 56 10 1 Upd...

Page 6: ...elivery 1 2 3 4 5 6 7 8 9 10 PPIC46520 Wi Fi Light Outdoor Camera 1 Camera foot 2 Antenna 3 Drilling template 4 Information 5 Mounting material 6 Reset tool 7 microSD card preinstalled 8 Allen key 9 U...

Page 7: ...7 English 2 Description of the hardware...

Page 8: ...8 English...

Page 9: ...9 English...

Page 10: ...should not be pointed directly at a light source or at the sun During the installation of the camera you have the option to access the following installation instructions via the help in the app 3 1 T...

Page 11: ...emplate mark the position of the required drill holes drill the holes and insert the dowels Three small openings are indicated on the back of the camera base for the three wires of the power cable tha...

Page 12: ...for the wire Then correctly connect the power cable of the camera via the black plug to the corresponding connector in the camera foot Note The connector is locked in the correct position to prevent a...

Page 13: ...gain if the start up via app has already been carried out If you have not already done so Start the initial setup via app now Optional Connection to a LAN network To connect the camera with a network...

Page 14: ...To adjust the exact viewing direction of the camera Slightly loosen the locking screw in the middle of the bracket using the Allen key and the two screws on the bracket to pan and or tilt the camera T...

Page 15: ...within optimal range of the router The camera can only be accessed if there is a sufficient Wi Fi signal to the router For installations in larger objects a Wi Fi repeater is recommended to optimize...

Page 16: ...be seen by the camera and displayed on the live image but it does not trigger an exposure Intelligent Object Detection works reliably over the following range motion detection may occur outside these...

Page 17: ...uman animal car during a detection of objects Thus you have the possibility that objects for example do not trigger at all or with a lower priority Please note that the object detection depends on the...

Page 18: ...efore there is always a residual risk that an object is incorrectly classified For example objects that look similar to the outline of a person can be detected as a person An example could be a flag t...

Page 19: ...of view of the camera see also section 7 1 The installation height of the camera should be chosen between 2 and 3 meters 2 The object height in the selected image section must be between 1 16 and 1 2...

Page 20: ...on Bluetooth of the mobile device must be activated Network integration can only be performed in conjunction with the App2Cam Plus Only the following special characters are possible when entering the...

Page 21: ...start the setup process 2 Option 1 Scan the QR code located in the camera foot 3 Option 2 Tap the Add camera manually button and then select your camera model from the list Note For optimal startup th...

Page 22: ...already done so Activate Bluetooth in the settings of your mobile device Then tap on Next 6 Now supply the camera with power if not already done and wait 2 minutes until the status LED of the camera b...

Page 23: ...ed in the packaging Alternatively in the camera foot below the QR code Then tap on Next 8 Select your home network Wi Fi in which you want to operate the camera permanently Then tap on Next 9 Enter th...

Page 24: ...est firmware Note For the best possible camera experience we recommend that you always operate the camera with the latest firmware You can find the current firmware version and available updates under...

Page 25: ...ra foot 3 Option 2 Tap the Add camera manually button and then select your camera model from the list 4 5 4 Select setup via LAN 5 Now connect the network cable and supply the camera with power Now su...

Page 26: ...he camera foot below the QR code Then tap on Next 7 Assign a camera name 8 Now assign a security code or admin password These must not be identical Then tap on Next Note For optimal startup the locati...

Page 27: ...updates under Camera settings Device settings Search firmware update setup via the app is now complete The app now shows the camera overview with a first preview image of the security camera Tap the...

Page 28: ...following options scan the QR code located in the camera footer or search for the camera on the network using the Camera Search button or enter the DID of the camera manually Enter the security code a...

Page 29: ...screenshots and icons shown were taken from the iOS app There may be slight differences to the Android app in the labeling arrangement or functionality This is described in the respective points or me...

Page 30: ...Add camera Camera activated motion detection active Activation of the 4 fold view Connection update Updating the connections to the cameras 9 4 2 Recording menu Delete displayed recordings Camera sele...

Page 31: ...id only Enable disable hardware decoding For Android the use of hardware decoding is available Some Android devices have special hardware features that optimize the decoding of video streams For older...

Page 32: ...available in the live view depending on the camera model The functions are additionally available in landscape mode Click on the preview image of the camera to access the live view Tap the gear icon...

Page 33: ...ions Here you set the light intensity The Auto function controls the light behavior depending on the Motion alarm function In addition the light comes on when it is dark on site and you are watching t...

Page 34: ...relay server for a short time so that your end device can obtain the data from the server This causes a delay in the stream N 1 Number of simultaneous camera accesses Low Normal Good Display of the c...

Page 35: ...start and end time click on the date selection for this For this filter the app will show you all recorded events in this time In the temporal overview the frequency of the triggers is displayed for...

Page 36: ...36 English 9 6 2 Recording menu functions Delete displayed recordings Camera selection Select period Display of the bar chart Filter Note During a recording the recordings cannot be accessed...

Page 37: ...er time until the event can be played Note When playing back events the event is automatically downloaded to your end device We therefore recommend that you mainly operate the playback via Wi Fi to ke...

Page 38: ...ed in red in the recording list You have the possibility to share the file by clicking on the Share icon Note The downloaded data is stored differently on the iOS and Android operating systems iOS The...

Page 39: ...curity password and is intended to help you allow other people to see the live view and notifications of the camera but deny the advanced settings 9 8 2 Login data You can manually change the camera s...

Page 40: ...d In the camera settings you have the option to delete the camera from your app please note that it will only be deleted from the app and will not be reset Note The arrangement of the individual point...

Page 41: ...ideo image Multiple selection is possible Mark detected object When activated detected objects are marked with colored frames Intelligent object recognition Thanks to a built in AI controller the came...

Page 42: ...persons vehicles or animals You can activate up to 3 regions and place and customize them individually via drag and drop By default the entire image area is selected Please observe the notes under poi...

Page 43: ...ion enable disable for the start time Save by clicking Done For the end time press the plus symbol again Now enter the end time the schedule name and the repetition Please select the contrast to the p...

Page 44: ...lace and customize them individually using drag and drop The drawn area is made unrecognizable in black and is therefore not visible in the live image or in the recording Click the check mark in the u...

Page 45: ...ange admin password The admin password grants access to the camera settings and enables disables the camera recordings During the installation you assign your own admin password If you forget your adm...

Page 46: ...your in house Wi Fi password Make sure that the signal strength is sufficient to avoid transmission problems Enter the password and confirm with OK To prevent access by strangers protect your network...

Page 47: ...lution for the live view At a lower resolution you can get a smoother image when accessing externally but less image detail is available The value set here has no effect on the recording which is alwa...

Page 48: ...amera it is recommended to set the intensity to a lower level to avoid reflections in the image but this will reduce the range of the LEDs Timestamp Change the position of the timestamp by briefly hol...

Page 49: ...ttings Siren settings Make the siren settings here The changes in the settings are only applied after leaving the menu Volume Change the volume of the integrated siren here Duration Change the duratio...

Page 50: ...an set a fixed period for the control of the lighting During this time the lighting is permanently on and does not activate in case of an event outside this period Triggered by event Set Light Control...

Page 51: ...is full no more recordings are saved Enabled If this function is activated the oldest recordings are overwritten with newer ones as soon as the SD card is full 3 7 30 cycle The data on the SD card is...

Page 52: ...e that only the language of PUSH notifications will be changed The language setting for the app remains and must be changed in the smartphone E mail notification e mail E mail settings The email setti...

Page 53: ...t com Save the settings by pressing OK When leaving the advanced settings press Confirm Only then will the e mail settings be applied We recommend using googlemail to send emails You can find instruct...

Page 54: ...or firmware update now By selecting the menu item Check for firmware updates now you can search for current firmware updates Please note that a microSD card is required for this The firmware update is...

Page 55: ...55 English 9 8 16 Device information Device information The device information tells you the current firmware version of the camera the total available memory and the free memory on the SD card...

Page 56: ...s time 10 1 Update via server Option 1 The camera checks for new firmware on the firmware server for the camera at 6 hour intervals Insert a microSD card into your camera so that it can download the f...

Page 57: ...then save it to the SD card this can take up to 5 minutes exit the camera settings for this After the camera has downloaded the firmware the next time you enter the advanced settings a notice will ap...

Page 58: ...the camera and other Wi Fi devices Possible interfering factors can be thick brick walls exterior walls glass water pipes and metal 2 Remove dirt from the camera This can have a negative effect on the...

Page 59: ...and or can be accessed via a graphical user interface You may acquire rights of use to the extent regulated therein directly from the rights holders The Open Source Licenses take precedence over all...

Reviews: