


PROBOIL.2X user & installation guide v1e-2
31
2.2.3
Install the filter
The filter is supplied within the tap package and should be installed after the tap or dispenser.
Again, the instructions for installing the filter vary by tap model so you should refer to these separately now.
Always try to leave a little excess length (apx. 200mm) on each of the ¼” blue hoses coming to and from the filter
cartridge, it can always be shorted later, the excess length will make it easier for your customer to remove the filter
cartridge from its clip when changing it.
Don’t locate the filter cartridge above any electrical appliance or socket, when the filter is exchanged some of the
water contained inside it may fall on it.
install the filter in a location that is easily accessible for your customer to reach into the cabinet and exchange it,
avoid the rear of the cabinet if possible.
Always write the installation date on the filter label in permanent pen (and leave the label on view) it will help
your customer as a visual reminder to exchange the filter on schedule.
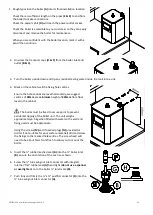
Install the filter as near vertical as possible (never horizontally) as small angle is not problematic if space or
access is limited within the cabinet.
Always ensure the input and output from the filter to and from the tap and boiler
respect the direction of flow
marked on the filter.
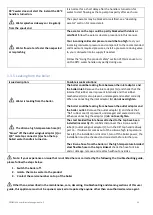
It is normal for new filters to lose a small amount of loose carbon when first used and will dissipate with flushing,
whilst harmless to consume if the carbon particles are not flushed prior to connection to the boiler they make partly
block the boiler and reduce the flow rate.
You must flush the filter for at least 2 litres with cold water or until the
water become clear (without black carbon particles) into a bucket or similar before connecting the filter output to the
boiler inlet.