background image

The third is 

Full Screen Preview

 mode, where the preview of the whole page is 

displayed on the screen.

Full  Screen


Preview

  or 

Picture-in-Picture


Preview

  may  be  separately  disabled  in 

the 

Preview Window tab 

of the

 Settings dialog

. Click 

Application 

and go down to 

Settings

.  The 

Settings  dialog

  will  appear.  Select  the 

Preview  Window

  tab.  In  the 

Show Preview Window

 area, select the preview window type that you want to enable 

(you can select either or both).

When the camera is on, only 

Full Screen Preview

 can be displayed, unless the 

Enable 

real time zoom

 checkbox in the 

Preview

 tab of the 

Settings dialog

 is checked.

To  show/hide the  preview  window  or alternate  between  small  and  full  screen  preview 
windows see below:

By keyboard

:  P ress 

V

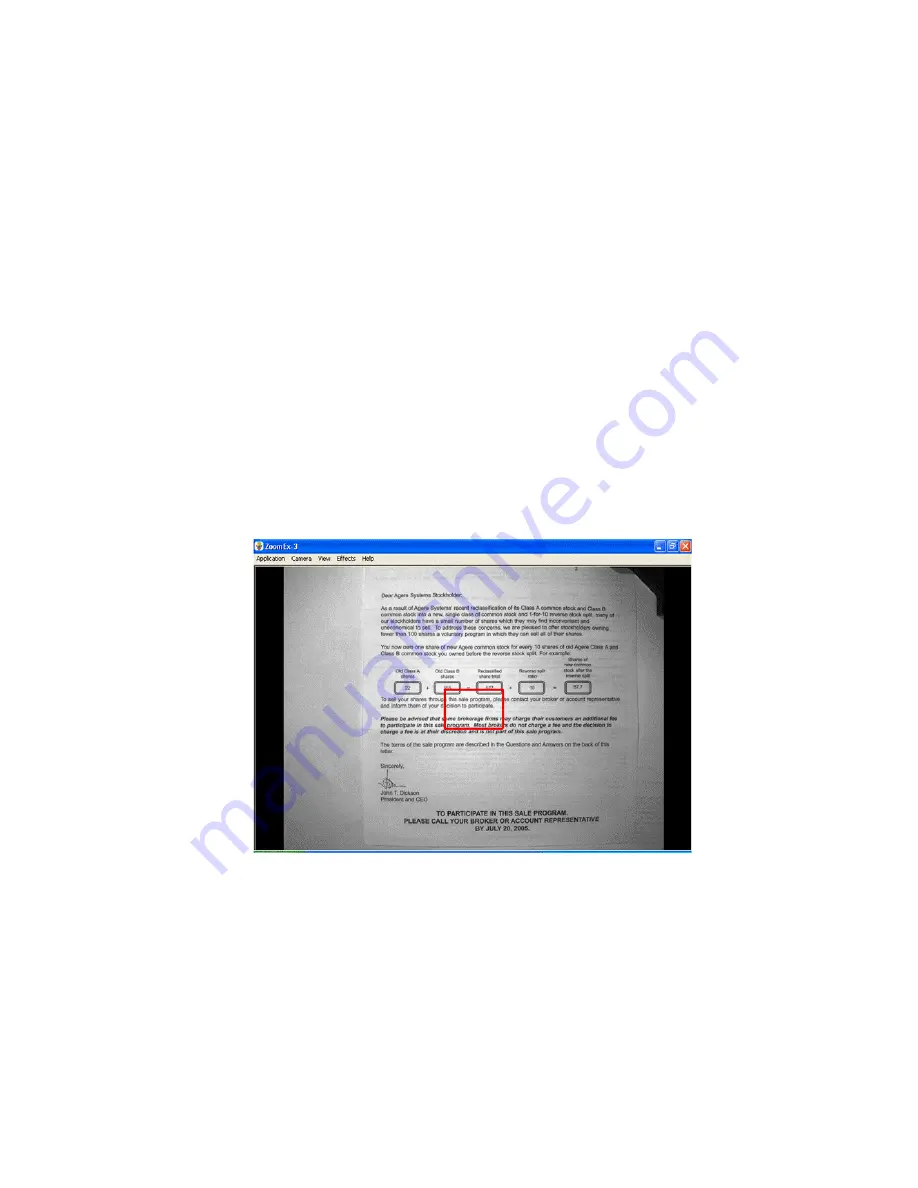
 key. The image below shows the 

Full Screen Preview

 window 

enabled. The red focus rectangle is positioned in the center. You can move the red focus 
rectangle  around  to  where  you  want  to start reading.  The thickness  and  color  of  the 
focus rectangle can be changed via settings dialog. Once you have moved the red focus 
rectangle to the desired location, you can either dismiss the preview window (

V

), or go 

directly to 

Formatted

 mode (

F

). The displayed magnified text will start from the portion 

of the document highlighted by the red focus rectangle. The focus rectangle disappears. 

To move the red focus rectangle around the document:

By keyboard

: Use the keyboard arrows to move the rectangle around. (Make sure the 

X-Y table is checked under the 

General 

tab in 

Settings

).

By  mouse

:   Left-click  the  document   and   the  red  focus  rectangle  will  jump  to   that 

location.

You  can  customize  how  the  focus   rectangle  will  look.  On  the  main  menu,  click 

Application  

and  go  down  to 

Settings

.  The 

Settings  dialog

  will  appear.  Select  the 

Preview Window

 tab. You can select the focus rectangle color (red, blue or green) and 

border (thin, medium or thick). Changes made to the preview window do not take effect 

15

Summary of Contents for Zoom-Ex

Page 1: ...Zoom Ex Zoom Office Training Guide and User Manual For Mac OS X VERSIONS 10 5 AND 10 6 Release 4 2 1 Revision date February 25 2011 20 Main Street Unit G2 Acton MA 01720 800 681 5909 Patent Pending 1 ...

Page 2: ...phics 7 Following the text on the screen while listening 7 Changing the Voice Settings 7 Changing the Language 8 Working in Magnification CCTV Mode 8 Working in Formatted Text Mode 9 Different Formatted Modes for following text on the screen 10 Other Formatted Mode options 10 Working in Formatted Text Mode without speech output 10 Navigate the formatted document in full screen formatted mode 11 Sw...

Page 3: ...ing 16 Changing the brightness setting 16 Creating and Managing Books 16 Creating a Book 16 Choose how to scan a Book 17 Scanning modes 17 Adding pages to a new Book 18 More tips on saving a Book 18 Reading a saved Book 19 Managing Books 20 Adding additional pages to an existing Book 20 Deleting pages in an existing Book 20 Deleting a Book 21 Closing a Book 22 Saving a Book as text 22 Saving a Boo...

Page 4: ...x camera and Zoom Ex displays it on a computer screen instantaneously There are no buttons on the device everything can be done using either a keyboard or a mouse Zoom Ex allows navigating the text for reading off the screen without moving the page responds to commands instantly and supports text formatting for easy reading Zoom Ex reads text in your choice of language aloud with sophisticated nat...

Page 5: ...itch slowly from scanning to Magnification mode and back again wait to hear the announcement Reading mode Magnification mode Place a document under the Zoom Ex camera and make sure that the camera is in scanning mode 1 To have the document under the camera read to you press E 2 To see your document in Formatted Text mode press F 3 To see your document magnified in Formatted Text mode press to incr...

Page 6: ...a section If the page has a picture in the middle of the page then the text above the picture is the first section and the text below the picture is the second section The key combination Shift E will describe the page layout such as How many words are on the page How many sections are on the page What percentage of the page is text How many columns and headers if any To read from the beginning of...

Page 7: ...o be seen on the screen You can move the image on the screen to view a picture graph etc and listen to the voice reading the description of the picture at the same time If there is only one picture on the page move the picture to the center of the screen magnify the picture see Working in Magnification CCTV Mode and click the E key Following the text on the screen while listening If you want to fo...

Page 8: ...d over to the Voice tab there are two other options that you can modify The first is OCR Language OCR Language is the language of the document that you are putting under the Zoom Ex camera By default the OCR Language is English The second is Application Language which is the language of the application including text menus and dialog boxes By default the Application Language is English Working in ...

Page 9: ... the user can navigate the screen in CCTV mode with arrow keys Use the Up and Down arrow keys to scroll up and down in both the CCTV and formatted mode If this box is unchecked the arrow keys can be used for reading functions as described in the section Notebook Laptop keystrokes for reading functions Default value for this setting is unchecked Working in Formatted Text Mode Formatted Text mode se...

Page 10: ...ility to change the size of the font seen on the screen by pressing to increase the size of the font and to decrease the size of the font You can also change the speed at which the words are being spoken by pressing Shift Q to increase it or Shift Z to decrease it Other Formatted Mode options You also have the option to turn on off the Display separation lines between paragraphs as well as True Fo...

Page 11: ...ation CCTV mode from Formatted mode press the S key in order to adjust sharpness Note 2 After switching to Magnification CCTV mode from Formatted mode the camera remains off and the whole page is in the computer memory Originally when you switch from Magnification CCTV mode to Formatted Text mode Zoom Ex will take a snapshot of the page and shut the camera off in order to format the text Once you ...

Page 12: ...for your document and click the Save button The image will be saved in the default directory Users Username Documents ZoomOffice images You can also select another directory in which to save the document You can save images while in CCTV or Formatted mode To view a previously saved image Go to Application and down to Load Image A Load Image dialog box will appear Select the image and click Open Th...

Page 13: ...can save the document as an Audio file Once the page has finished being read or you have stopped the reading go to Application menu select Save Audio then press Enter A Save Audio dialog box will appear Type in the name for your document and click the Save button The document will be saved in the default directory Users Username Documents ZoomOffice Audio You can also select another directory in w...

Page 14: ...ions are black on white inverted white on black green on black yellow on black yellow on blue white on blue Rotating the view of an object To rotate a document in the Magnification CCTV mode press R on your keyboard The view rotates 90 degrees at a time The preview window allows you to navigate your document and will assist you in deciding where you want to start reading the magnified text You do ...

Page 15: ... You can move the red focus rectangle around to where you want to start reading The thickness and color of the focus rectangle can be changed via settings dialog Once you have moved the red focus rectangle to the desired location you can either dismiss the preview window V or go directly to Formatted mode F The displayed magnified text will start from the portion of the document highlighted by the...

Page 16: ...nd Managing Books A Book is an electronic copy of a book that you can create using the Zoom Ex camera You can view saved books at any computer where a Zoom Ex device may not be present but Zoom Office software is installed While reading a Book you can use all the same document browsing magnification and formatting capabilities that are available for viewing documents with Zoom Ex You can also list...

Page 17: ...eview window V you can save both pages at once While using this option the book orientation is important Always put the book in landscape format and align the edges of the book with the Zoom Ex base When you scan two pages at once both pages will be saved with their respective numbers When you are reading saved pages you will be able to view each page separately If the Book failed to separate two ...

Page 18: ...nds you will hear the shutter sound as the page is been scanned and saved c Turn the page again keep the page flat and in a few seconds you will hear the same sound d Continue turning pages until you have all the pages you want to be scanned and saved e When you are done or need a break click the Stop Auto Mode button and remove the book from under the camera f When you are completely finished sav...

Page 19: ...pear showing the books in the default folder Users Username Documents ZoomOffice Books If you want to open a book that was saved in another folder use the Browse button to select the desired folder The location of the selected folder will be displayed in the Book location field The list of books in this folder will be displayed on the screen Note Select the folder that contains all of your books a...

Page 20: ... or Previous To avoid this use TAB to move the cursor Managing Books Adding additional pages to an existing Book To add additional pages to an existing book 1 Open the book of interest by going to the Book menu and down to Open Book 2 Once the Read Mode bar appears go to the Book menu and select Add Pages 3 The Add Pages Book bar will appear 4 Place the page you want to scan under the camera set i...

Page 21: ... will automatically move to the next page or to the previous page if the deleted page was the last page of the document Deleting a Book In order to delete a book 1 Go to the Book menu and click on Delete Book 2 The Delete Book dialog box will appear Select the book that you wish to delete and click the Delete button You cannot delete an open book 21 ...

Page 22: ...k as Text The file is saved in the folder Users Username Documents ZoomOffice Texts Depending on the power of your computer it will take approximately 3 to 6 seconds to save each page For 200 pages the process may take 10 to 20 minutes If the Status box is checked under General Settings Zoom Ex will tell you the current page number Saving a Book as MP3 files Under the book menu click on Save curre...

Page 23: ...r the New Name for the book 4 Click the Save button Zoom Office Quick Reference Guide 4 2 1 Speech Output Control Keystrokes Increase voice speed Shift Q Decrease voice speed Shift Z Hear page description Shift E Hear current control Shift Stop speaking current control Control Zoom Book Keyboard Command Keys Add page A while creating a new book Next page N Previous page P Zoom Ex Visual Keyboard C...

Page 24: ...ck Image Saved CTRL L Turn LED On Off Home Go to the first line of the page in reformatted mode CTRL S Save current image When Running Line Auto Scrolling Mode is Enabled Speed adjustment Keystrokes for Reading Functions To Scan and Start reading E Stop Eye Pal Camera Space Pause Resume reading X Reading by word Next Control Right Current Control I Previous Control Left Reading by character Next R...

Page 25: ...Reading by sentence Next Down Previous Up Reading by section Next Control Down Previous Control Up 25 ...

Page 26: ...Service Information Please feel free to contact us regarding any questions or concerns you may have ABiSee Inc 20 Main Street Acton MA 01720 Phone 978 635 0202 Toll free 800 681 5909 Fax 253 595 3623 E mail info abisee com ...

Reviews: