IB 6.2.7.7-3
1
0
designed for special application, and an
appropriate supplemental maintenance program
has been developed. These maintenance
instructions only cover circuit breakers used under
the standard service conditions.
At the selected maintenance period, the following
maintenance, tests and adjustments (if necessary)
should be made:
Insulation Cleaning
WARNING
If the circuit breaker has been energized, or it is
unsure if the circuit breaker has ever been
energized, the mid-band ring (on vacuum
interrupters so equipped) must first be discharged
before any work is performed on or near the
interrupters. A grounding stick must be used to
discharge the ring by fastening the ground cable of
the stick to a known ground, and touching the
grounding tip of the stick to each mid-band ring.
Any dirt, dust or grease should be removed from
the surfaces of the entire current carrying structure
and vacuum interrupter. Wiping the surface with a
clean, lint-free cloth is normally sufficient. If there
is heavy grease, alcohol should be used.
DC Millivolt Drop Test / Micro-ohm Test
During maintenance periods, the condition of the
breaker current circuit can easily be determined by
performing a Millivolt Drop Test or a Micro-ohm
test. This test should be performed regardless of
whether the circuit breaker had interrupted low or
high currents, or has minimum operations.
NOTE: The values for resistance, given in Table
A3, are for new breakers. It is normal and
acceptable for a used breaker to have resistance
values as much as 100% greater than these
values.
Refer to Table A3 in the Appendix for the Millivolt
drop and Resistance values for the circuit
breakers covered, from lead to lead. If the
Primary Disconnects (a.k.a., Tulips) are to be
included in the test path, a 2.000" ± 0.005"
diameter smooth (62rms) copper conductor must
be inserted into the open end of each Primary
Disconnect to achieve the proper contact
pressure.
Contact Wear and Contact Pressure
(Contact Wipe)
The amount of contact wear can be determined by
measuring what is referred to as Contact Wipe (or
overtravel). This can be accomplished by closing
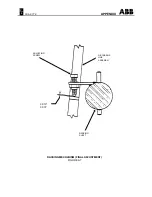
the breaker and carefully measuring the gap
between the Nut and the Trunion Block of the
Contact Spring Assembly. See Figure A9 in the
Appendix.
WARNING
Keep hands clear of all moving parts. Serious
injuries can result if a person comes in contact with
breaker parts when the breaker is being opened or
closed, or closing springs are being charged or
discharged. Use extension tools for manipulating
breaker parts.
This adjustment is initially set at the factory to a
range of 0.093 - 0.101 (2.4mm – 2.6mm). As the
breaker sees service and the contacts start to
erode, this value will decrease. Asymmetrical and
single phase interruption will cause contact
erosion and wipe deterioration to occur differently
for all three poles. Once the Wipe has decreased
to 0.031" and it is determined that the breaker is
operating properly, the interrupter assembly will
need replacement. The measurement is made as
follows:
1. Close the breaker and measure between the
Nut and Spring Base. See Figure A9.
2. The gap should be in the range shown in
Table A3.
3. When the Contact Wipe is less than 0.031”,
and it has been determined that the breaker
closes fully, and there is not a mechanical
problem than the Interrupter should be
replaced due to contact erosion.
Contact Gap
Upon opening the breaker, the resulting gap
between the vacuum interrupter contacts is
referred to as Contact Gap. This gap is also the
distance the contacts travel upon closing. This
can range from a minimum of 0.310 " (7.9mm) on
a new breaker, to a maximum of 0.540" (13.5mm)


