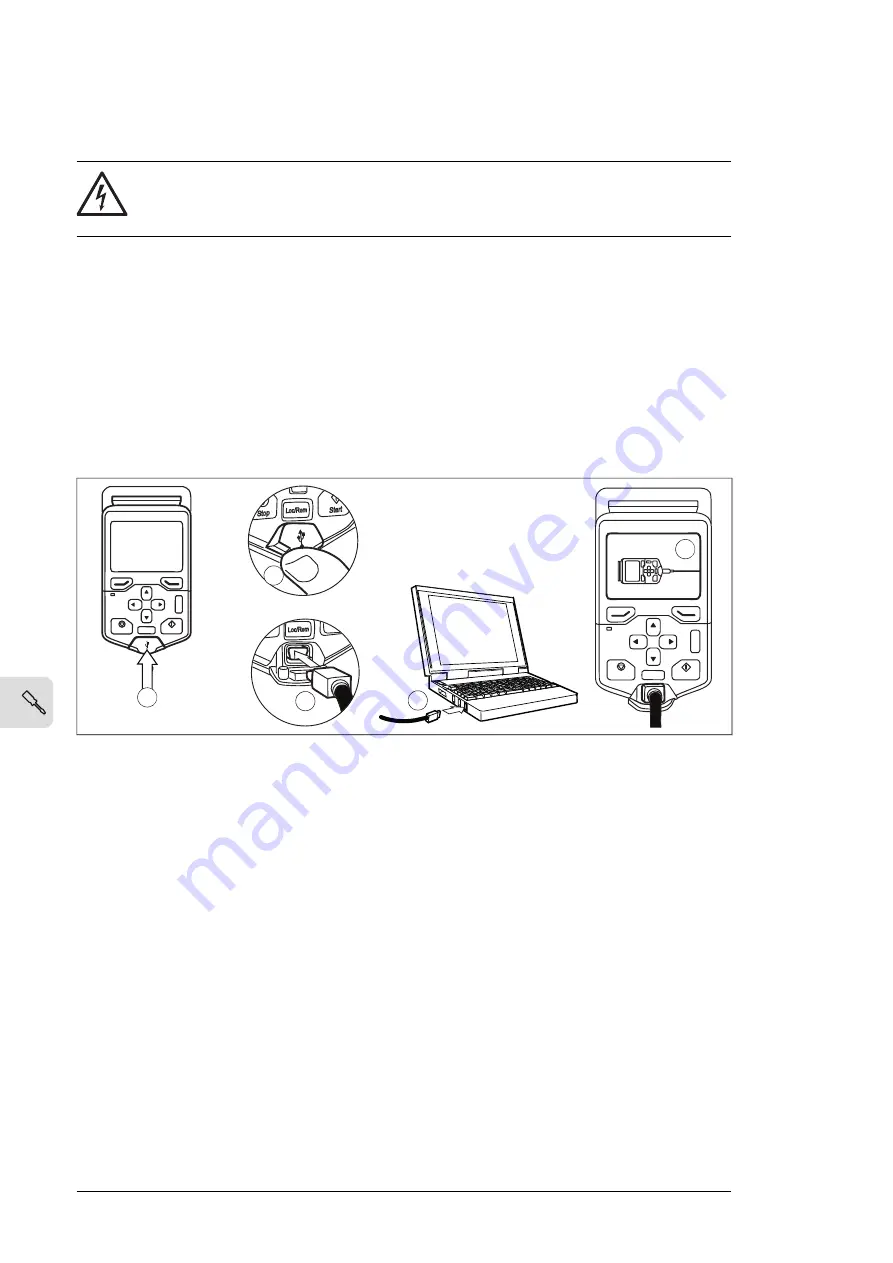
Connecting a PC
WARNING!
Do not connect the PC directly to the control panel connector of the control unit
as this can cause damage.
A PC (with eg, the Drive composer PC tool) can be connected as follows:
1.
Connect an ACx-AP-x control panel to the unit either
•
by inserting the control panel into the panel holder or platform, or
•
by using an Ethernet (eg, Cat 5e) networking cable.
2.
Remove the USB connector cover on the front of the control panel.
3.
Connect an USB cable (Type A to Type Mini-B) between the USB connector on the
control panel (3a) and a free USB port on the PC (3b).
4.
The panel will display an indication whenever the connection is active.
5.
See the documentation of the PC tool for setup instructions.
?
Start
Stop
Loc/Rem
?
Start
Stop
Loc/Rem
USB connected
3a
4
3b
2
2
Panel bus (Control of several units from one control panel)
One control panel (or PC) can be used to control several drives (or inverter units, supply
units etc.) by constructing a panel bus. This is done by daisy-chaining the panel connections
of the drives. Some drives have the necessary (twin) panel connectors in the control panel
holder; those that do not require the installation of an FDPI-02 module (available separately).
For further information, see the hardware description and
FDPI-02 diagnostics and panel
interface user’s manual
(3AUA0000113618 [English]).
The maximum allowed length of the cable chain is 100 m (328 ft).
1.
Connect the panel to one drive using an Ethernet (for example Cat 5e) cable.
•
Use Menu - Settings - Edit texts - Drive to give a descriptive name to the drive
•
Use parameter
49.01*
to assign the drive with a unique node ID number
•
Set other parameters in group 49* if necessary
•
Use parameter
49.06*
to validate any changes.
*The parameter group is 149 with supply (line-side), brake or DC/DC converter units.
Repeat the above for each drive.
2.
With the panel connected to one unit, link the units using Ethernet cables.
98 Electrical installation
Summary of Contents for ACS880-07LC
Page 1: ... ABB INDUSTRIAL DRIVES ACS880 07LC drives Hardware manual ...
Page 2: ......
Page 4: ......
Page 12: ...16 Resistor braking Further information 12 Table of contents ...
Page 22: ...22 ...
Page 63: ...Mechanical installation 63 10 ...
Page 64: ...64 ...
Page 91: ...a b c 4 a 8 b 16 18 PE PE 10 13 12 Electrical installation 91 11 ...
Page 100: ...With FDPI 02 modules OPEN TERMIN ATED 1 1 2 2 OPEN TERMINATED 3 100 Electrical installation ...
Page 104: ...104 ...
Page 118: ...118 ...
Page 124: ...124 ...
Page 138: ...8 9 138 Maintenance ...
Page 139: ...11 12 12 6 10 Maintenance 139 ...
Page 150: ...150 ...
Page 160: ...160 ...
Page 183: ...Technical data 183 ...
Page 184: ...184 Technical data ...
Page 189: ... Dimension drawing examples ACS880 07LC 0850A 7 Dimensions 189 ...
Page 190: ...ACS880 07LC 1660A 7 6 pulse 190 Dimensions ...
Page 191: ...ACS880 07LC 1660A 7 A004 12 pulse Dimensions 191 ...
Page 192: ...ACS880 07LC 3260A 7 192 Dimensions ...
Page 195: ... 600 mm with main breaker double busbar bottom cable entry Dimensions 195 ...
Page 197: ...Inverter module cubicle with two R8i modules bottom cable exit Dimensions 197 ...
Page 198: ...Inverter module cubicle with three R8i modules bottom cable exit 198 Dimensions ...
Page 199: ...Brake chopper cubicle Dimensions 199 ...
Page 200: ...200 ...
Page 216: ... Declaration of conformity 216 The Safe torque off function ...
Page 217: ...The Safe torque off function 217 ...
Page 218: ...218 ...
Page 220: ...220 ...


