24 OI/266/HART-EN Rev. M
| 2600T Series Pressure transmitters
5 Mounting
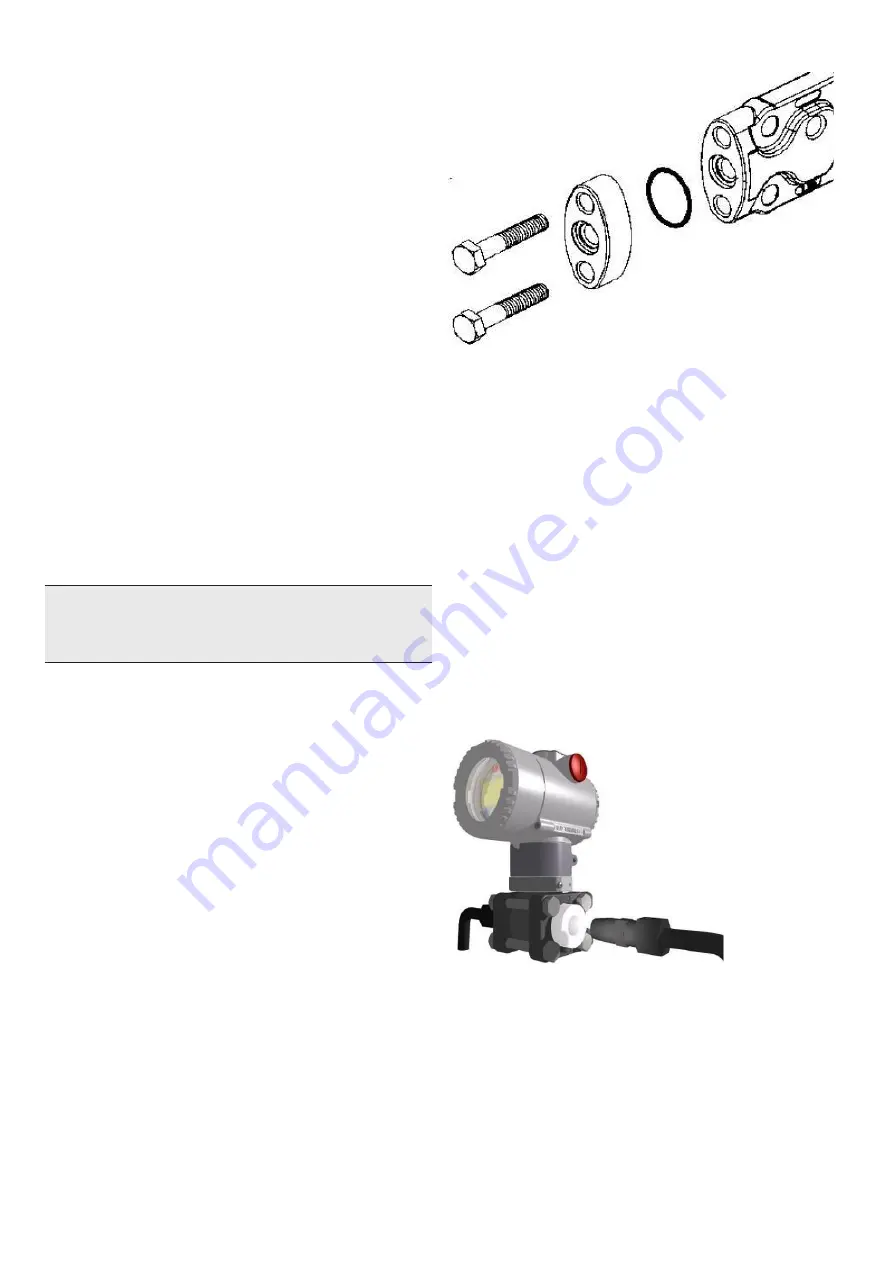
Figure 30: Kynar insert
Figure 29: Adapter
5.11 Process connections considerations
266 differential pressure transmitter process connections on
the transmitter flange are 1/4 - 18 NPT, with a centers distance
of 54mm (2.13in) between the connections. The process
connections on the transmitter flange are on centers to allow
direct mounting to a three-valve or five-valve manifold.
Flange adapter unions with 1/2 - 14 NPT connections are
available as an option. Rotate one or both of the flange
adapters to attain connection centers of 51mm (2.01in), 54mm
(2.13in) or 57mm (2.24in).
To install adapters, perform the following procedure:
1. Position the adapters with the O-ring in place.
2. Bolt the adapters to the transmitter using the bolts
supplied.
3. Tighten the bolts to a torque value of 25Nm (stainless
steel bolts) or 15Nm (for Stainless steel NACE bolts).
Deviations for models 266Mxx, 266Rxx and for PTFE O-rings:
pretightening hand-tight. Pretightening to 10 Nm. Final
tightening to 50 Nm.
For model 266PSx, 266VSx and 266RSx, it is only possible to
have one adapter, with low pressure side flange without
process connection and drain/vent valve.
For high static model (266DSH.x.H) tighten the bolts to a
torque value of 40 Nm (regardless of the material of the bolts
used). In case of PTFE O-rings, pretightening to 10Nm and final
tightening to 50 Nm.
Important.
For 266MST with MWP 60MPa/600bar/8700psi
(order-code A) the maximum allowable pressure for directly
flanged-on shut-off devices (manifolds) and other directly flanged
elements is limited to 41,3MPa (413 bar/5988,5 psi).
5.12 Kynar inserts connection
When connecting Pressure transmitters equipped with kynar
inserts tighten the bolts to 15 Nm max.
5.13 Screw torques for models 266MSx and 266RSx
with Kynar inserts
The following procedures apply to process flange screws and
nuts:
Pretightening to 2 Nm (working crosswise).
Pretightening to 10 Nm (working crosswise) and then tightening
by a tightening angle of 180°, working in two stages of 90° for
each screw, and working crosswise.
Summary of Contents for 266 HART Series
Page 42: ...42 OI 266 HART EN Rev M 2600T Series Pressure transmitters 8 Operation 8 13 3 Device Set up...
Page 43: ...2600T Series Pressure transmitters OI 266 HART EN Rev M 43 8 Operation...
Page 44: ...44 OI 266 HART EN Rev M 2600T Series Pressure transmitters 8 Operation...
Page 45: ...2600T Series Pressure transmitters OI 266 HART EN Rev M 45 8 Operation...
Page 46: ...46 OI 266 HART EN Rev M 2600T Series Pressure transmitters 8 Operation 8 13 4 Display...
Page 47: ...2600T Series Pressure transmitters OI 266 HART EN Rev M 47 8 Operation...
Page 48: ...48 OI 266 HART EN Rev M 2600T Series Pressure transmitters 8 Operation...
Page 50: ...50 OI 266 HART EN Rev M 2600T Series Pressure transmitters 8 Operation 8 13 6 Calibrate...
Page 51: ...2600T Series Pressure transmitters OI 266 HART EN Rev M 51 8 Operation 8 13 7 Totalizer...
Page 52: ...52 OI 266 HART EN Rev M 2600T Series Pressure transmitters 8 Operation...
Page 53: ...2600T Series Pressure transmitters OI 266 HART EN Rev M 53 8 Operation...
Page 54: ...54 OI 266 HART EN Rev M 2600T Series Pressure transmitters 8 Operation 8 13 8 Diagnostics...
Page 55: ...2600T Series Pressure transmitters OI 266 HART EN Rev M 55 8 Operation 8 13 9 Device Info...
Page 56: ...56 OI 266 HART EN Rev M 2600T Series Pressure transmitters 8 Operation 8 13 10 Communication...
Page 71: ...2600T Series Pressure transmitters OI 266 HART EN Rev M 71...
Page 72: ...72 OI 266 HART EN Rev M 2600T Series Pressure transmitters...
Page 74: ...74 OI 266 HART EN Rev M 2600T Series Pressure transmitters Intentionally blank...
Page 75: ...2600T Series Pressure transmitters OI 266 HART EN Rev M 75 Intentionally blank...


