21
for your operation, tighten the hex
screw.
THE AUXILIARY HANDLE
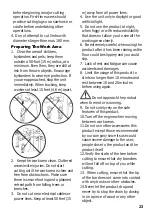
Place the auxiliary handle to telescopic
tube, adjust to desired position and
tighten the screw (A) by Allen key set (B)
firmly.
STARTING AND
STOPPING
Before Starting The Unit
1. Replace parts that are cracked,
chipped, or damaged in any way. Do
not operate the unit with loose,
damaged parts or improperly adjusted.
2. Before start up, remove the security
blade protector from the blade.
3. Check that the moving parts of the
product are not in contact with any
object.
4. Make sure the cable extension not
caught in branches or other obstacles
and not in the working area. The cable
and any extensions must always be
behind the product and the end user.
5. Fill the sawchain oil tank. Refer to
“Adding Sawchain Oil”
6. Connect the power cord to an
appropriate extension cord.
Starting
To help prevent the motor from starting
accidentally, the trigger switch and
locking switch must both be engaged to
start the unit.
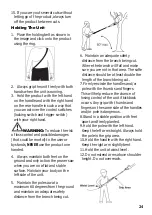
1. Push the locking switch forward, then
squeeze and hold the trigger switch to
start the unit.
2. Release the locking switch.
Stopping
Release the trigger switch and wait for
all moving parts to come to a complete
stop.
NOTE:
Upon release of the trigger
switch, the locking switch will reset to
the locked position
Checkpoints After Starting
The Product
CAUTION:
Pay attention to
loosening or overheating of the parts. If
any abnomal, immediately stop the
product and check it carefully. In case of
mechanical failure. Have the product
repaired in the technical service center
before operating again. Do not use the
product if it is damaged or improperly
adjusted.
WARNING:
Never operate the
unit without the guide bar and saw
chain properly installed. Make sure the
bar-retaining nuts are tight and the
guide bar cover is securely assembled.


