background image


5


Choosing the best location


For best results:


the base should be the only item 
plugged into the wall outlet

the antenna should be fully extended

the base should be centrally located, 
away from electrical equipment such 
as computers, refrigerators, 
fluorescent lights, stereos, etc.

locate the base on an upper floor

the handset should be kept as close to 
normal room temperature as possible


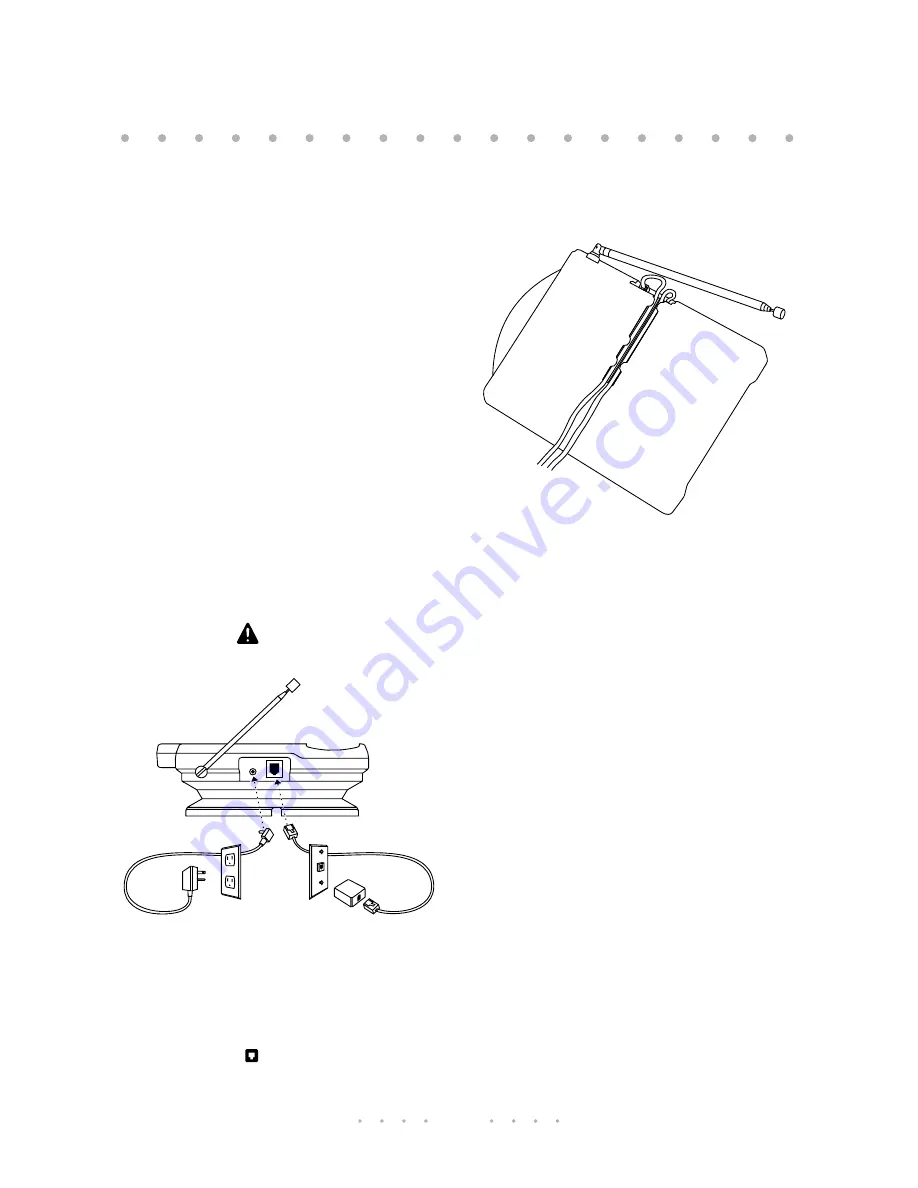
Connecting the telephone


Caution: 


For eye safety, do not 

extend the antenna until installation 
is complete.


1. Plug the AC adaptor into a 120 V AC 

outlet and insert the small plug into the 

DC 12 V jack 

 on the back of the base 

(see page 31).


Note:


The AC outlet should not be 
controlled by a switch or 
connected to a power bar.

2. Plug one end of the telephone cord into 

a telephone wall jack and the other end 

into the jack 

 on the back of the 

base.

3. To keep the cords from being pulled out, 

route the cords in the channel under the 
base.


Installation

Summary of Contents for Maestro 4625 Owner's

Page 1: ...Owner s Manual Sarah Joy DIAL CHNGE BLANCHARD JOHN DIAL CHNGE M stro4625...

Page 2: ...r mode 9 Changing the battery 10 Range of operation 10 Making basic calls 11 Using the handset 11 Putting a call on hold 11 Using display keys to access features 11 Using the speakerphone 12 Calling o...

Page 3: ...Other dialing methods 18 Redial List 18 Using the Call Timer 18 Making an intercom call 19 Call Waiting and 3 Way Calling 19 Using the Directory 20 Dialing in the Directory 20 Viewing the Directory 20...

Page 4: ...of everyone who called up to 30 entries and allows you to easily return their call Intercom allows you to call the base from outside a room or ring the handset so that you can find it Redial key remem...

Page 5: ...are included in the box Keep the box for future use If any part is missing contact the location where you obtained the phone Handset Power adaptor Quick Reference Card Base Stand Line cord Battery pa...

Page 6: ...interference page 13 Handset volume control changes the loudness of the caller s voice page 14 s lets you store numbers and names in the Directory page 20 d lets you delete list items or individual c...

Page 7: ...n the base page 25 The Base light lets you know the handset is in use there is an incoming call or someone is on hold page 25 Message light shows you that you have a message waiting for you at your te...

Page 8: ...room temperature as possible Connecting the telephone Caution For eye safety do not extend the antenna until installation is complete 1 Plug the AC adaptor into a 120 V AC outlet and insert the small...

Page 9: ...on the base as shown below 3 Slide the stand into the locked position 4 Continue routing the cords in the channels on the stand 5 Place the phone on a desk 6 Pull the base antenna vertical and extend...

Page 10: ...ws in the wall 3 Plug the line cord into the wall jack Line up the screws on the wall mount plate with the openings in the stand and slide the phone down until the mounting screws hold firmly 4 Contin...

Page 11: ...s idle display message will appear from now on unless other messages take priority you re using the handset or the handset is sleeping see Battery saver mode page 9 You can press the key under NEXT to...

Page 12: ...outside in the heat or cold the Battery level indicator may not display accurately To ensure a fully charged battery charge the handset for at least 5 hours Battery life may be affected by continued...

Page 13: ...ft 5 Slide the battery into the compartment 6 Replace the cover of the battery compartment 7 Charge the new battery as described on page 8 Range of operation The actual operating range of your M stro...

Page 14: ...ber 1 Press t 2 Dial the number 3 Press e to hang up or put the handset on the base Putting a call on hold The hold feature keeps your caller on the line so you can talk privately to someone in the ro...

Page 15: ...ween the base and the handset So if you originally answered the call on the base you can transfer it to the handset and later back to the base again 1 Make or answer a call on the handset or the base...

Page 16: ...t codes of 6 digits in length Note When the message Sorry Try again won t disappear try recharging the battery 1 Place the handset on the base 2 On the base press and hold i while also pressing I on t...

Page 17: ...inger and the base speaker It can be set anywhere between Off low volume and high volume Setting the area code You can enter one area code so that incoming local calls appear in the Callers List witho...

Page 18: ...he Directory it s simple to retrieve it Note You must subscribe to Caller ID service in order for the calls to register with the Callers List The Callers List holds up to 30 calls and is accessed usin...

Page 19: ...heading press c 2 Use the and keys to move between callers 3 Use the and keys to move between name number and time and date information 4 To leave the Callers List at any time press c or e The illustr...

Page 20: ...ways press the and keys 5 Press the DONE display key You see the updated number 6 Press the DIAL display key or t Copying a number to the Directory 1 Press c 2 Use the and keys to find the caller 3 If...

Page 21: ...1 Press r 2 Press or the MORE display key to move to the number you wish to dial 3 Press t or the DIAL display key to dial that number Note To delete a number in the Redial List press r press d then...

Page 22: ...dset 1 Whenyouhearthehandsetorbasering and you see the Intercom light flashing press i or I On the handset the display also indicates Paging You Meanwhile if a call comes in just press t Note If you c...

Page 23: ...to find the number you wish to dial 3 Press the DIAL display key or t The following illustration shows how the arrow keys move you to different screens in the Directory Viewing the Directory 1 To see...
Page 24: ...n the display 4 If you entered a name press the DONE display key Entering names 1 Press the key with the desired letter repeatedly until that letter appears on the display The letters are printed on t...

Page 25: ...key once name has been entered 1 Press D 2 Use or to find the name that you wish to change 3 While the name is on the display press the CHNGE display key The cursor appears under the first character...

Page 26: ...ully charged Indicates battery is 2 3 full Indicates battery is 1 3 full Battery charging Displayed when Quick charge is active Callers XX items LOG CODE Callers List information XX is the number of c...

Page 27: ...efore you lose the call If you were making changesintheDirectory or Callers List when you went out of range those changesarelostafter30 seconds Paging Base You on the handset are calling the base Pagi...

Page 28: ...been added to the Callers List since you last checked it Press c to access the list 555 1440 DIAL EDIT Callers List information Press the DIAL display key to call or press the EDIT display key to edi...

Page 29: ...a switched outlet Make sure the base is the only item plugged into the power outlet Do not use a power bar Reset the phone by changing the security code see page 13 You cannot get a call through You...

Page 30: ...range but you haven t moved The base may have lost power Check that the power adaptor is plugged in If you experience a power failure you will lose your call after 30 seconds There may be radio interf...

Page 31: ...o radio and television reception These telephones have been tested and found to comply with the limits for a Class B digital device in accordance with the specifications in Part 15 of the FCC rules Wh...

Page 32: ...lephone line must comply with these FCC rules Use only an FCC standard RJ11W RJ14W or RJ11C RJ14C network interface jack and FCC compliant line cord and plug to connect this telephone to the telephone...

Page 33: ...or SPRINT MCI is a trademark of MCI SPRINT is a trademark of United Telecommunications Ringer Equivalence Number The FCC Registration label on bottom of telephone includes a Ringer Equivalence Number...

Page 34: ...on when installing or modifying telephone lines The exclamation point within an equilateral triangle is intended to alert the user to the presence of important operating and maintenance servicing inst...

Page 35: ...Call timer 18 Call Waiting 19 Callers bumped 15 24 Callers key 3 16 Callers light 4 25 Callers List Copying to Directory 17 Deleting items 17 Description 15 17 23 24 Dialing 17 Setting up 16 Calls An...

Page 36: ...1 3 Language 8 13 27 Prompts table 23 24 Troubleshooting 27 Turning it on 8 9 Handset hanger tab 4 7 Hearing aid compatibility 29 Hints 26 Hold key 3 4 11 Holding calls 11 12 27 I Idle display message...

Page 37: ...Problems 26 Security code 13 Sorry Try again 24 Spanish language 8 13 27 Speakerphone 12 Mute 12 Stand 2 Attaching 6 7 Subscribed services 19 T Talk key 3 11 15 17 18 19 20 Talk Mute key 4 Talk Mute l...

Page 38: ...M stro is a trademark of Northern Telecom P0844030 01 Printed in Malaysia...

Reviews: