background image

M

M


480i SIP IP Phone User Guide 

Aastra - 2711-001 


21 

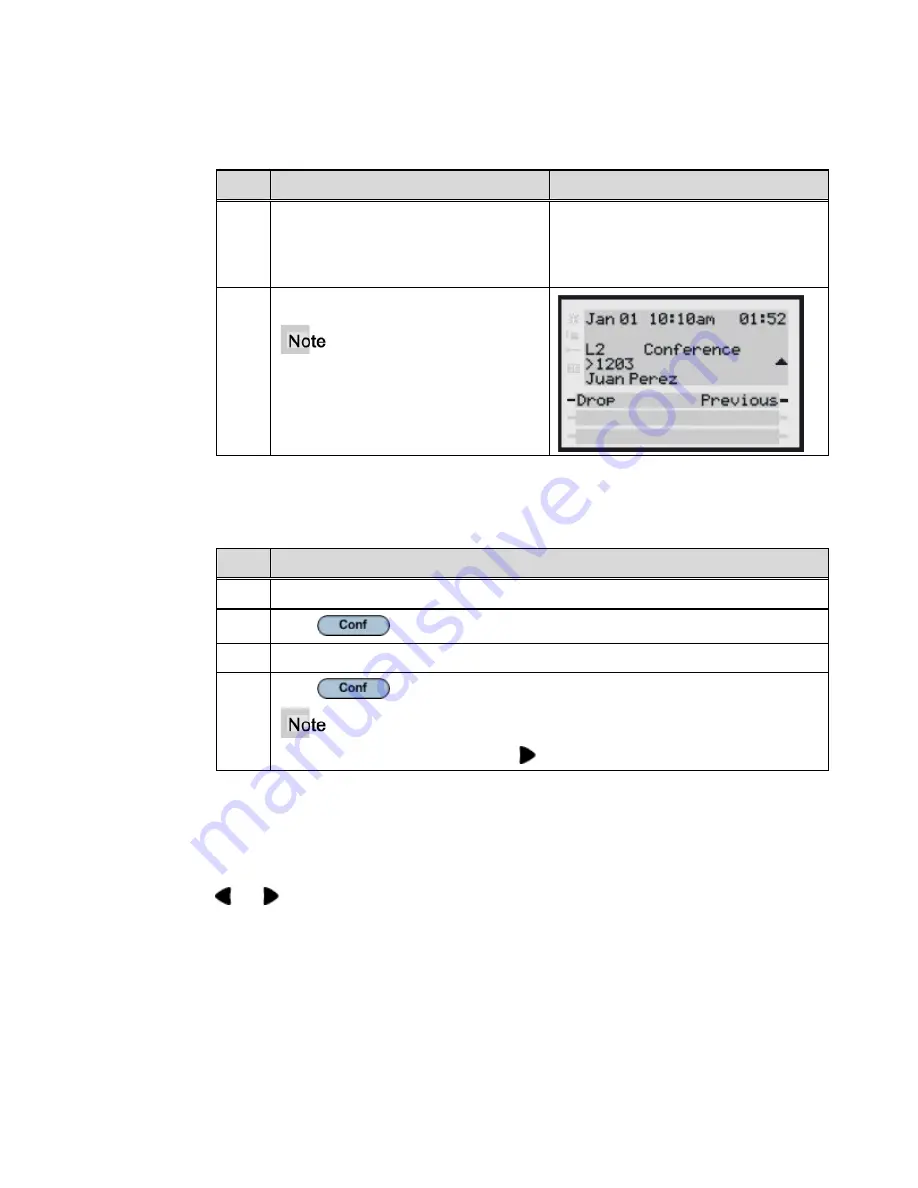
Release a Conferenced Party 


Step 

Action 

Result 

1.


Use the navigational keys to navigate 
to the desired party’s call appearance 
screen or press the 

Next


and 

Previous 

softkeys (if visible). 


2.


 Press 

the 

Drop


softkey. 


If you disconnect from the conference, 
the other two parties will also 
disconnect.


Conference Two Previously Connected Calls 


Step 

Action 

1.


Begin with active calls on two different lines. 

2.


Press 

3.


Press the line key of the call you wish to conference with. 

4.


Press 

 again. The two lines link into a conference call.


When a name is displayed, pressing 

 drops the displayed party from the call. 


Pick up Calls 

If you are juggling multiple calls, you can scroll through call information by pressing the 


and 


navigation keys. If you wish to connect to an incoming call or re-connect to a 

call you placed on hold, press the line/call appearance button for the call or press the 

Pickup


softkey.


Summary of Contents for 480I SIP IP PHONE

Page 1: ......

Page 2: ...M M Proprietary and Contents Section ii Aastra 2711 001 ...

Page 3: ...also send email to techpubs aastraintecom com What to Expect when Contacting Company Technical Publications will email responses to customers within seven business days of the contact Note that product support is not available through this email address For product support contact the Aastra Intecom Customer Service Center CSC at 1 800 729 1872 Aastra Intecom may use or distribute review comments ...

Page 4: ...ms are confidential and proprietary and are protected as such by copyright law as unpublished works and by international treaties to the fullest extent under the applicable law of the jurisdiction of the Customer In addition these confidential and proprietary programs are works conforming to the requirements of Section 401 of title 17 of the United States Code Customer shall not disclose to any th...

Page 5: ...under this warranty the provisions of this warranty shall apply to the repaired or replaced telephone set until the expiration of ninety 90 days from the date of pick up or the date of shipment to you of the repaired or replacement set or until the end of the original warranty period whichever is later Proof of the original purchase date is to be provided with all telephone sets returned for warra...

Page 6: ...M M Proprietary and Contents Section vi Aastra 2711 001 ...

Page 7: ...t iv Product Liability iv Software License Agreement iv Limited Warranty v Exclusions v Warranty Repair Service v About This Publication xi Overview xi Audience xi Publications xi Organization xi Terms and Definitions xii References xii Chapter 1 Introduction 1 Overview 1 The 480i Telephone 1 Phone Features 1 General Requirements 2 Chapter 2 Getting Started 3 Getting Started 3 Installation and Set...

Page 8: ...ons 7 Keys 7 Hard keys 7 Softkeys 7 Idle State Softkey Display 7 Custom Softkeys 8 Softkeys as Line Call Appearances 8 Softkeys Customized as Speed Dials 9 Softkeys Customized as Do not Disturb 10 Connected State 10 Multiple Line and Call Appearances 10 Chapter 4 Call Handling 13 Place Calls 13 Live DialPad Option Dialing 14 Pre Dial a Number 14 Use the Handsfree Speakerphone 14 Use a Headset 15 A...

Page 9: ...d Transfer 19 Transfer to another Extension 19 Conference 20 Create the Conference 20 Release a Conferenced Party 21 Conference Two Previously Connected Calls 21 Pick up Calls 21 End a Call 22 Chapter 5 Additional Features 23 Services 23 Callers List 23 Use the Callers List 23 Dial from the Callers List 24 Save an Entry to your Directory 24 Missed Calls Indicator 24 Access Missed Calls 24 Delete E...

Page 10: ...al a Displayed Entry 29 Save an Entry to your Speed Dial List 30 Exit the Directory 30 Voicemail 30 Voice Mail Display 30 The Envelope Icon 30 Use Voicemail 31 Redial List 31 Hot Redial 31 Redial from the Redial List 31 Delete an Entry in the Redial List 32 Other Redial Features 32 Call Forward 33 Activate Call Forward All 33 Call Forward Busy No Answer 33 Cancel Call Forward 33 Chapter 6 Troubles...

Page 11: ...s included with the telephone Aastra SIP 480i IP Phone User Guide Explains the most commonly used features and functions for an end user Should be used with the Installation Guide Aastra SIP 480i 480i CT 9112i 9133i IP Phone Administration Guide Provides procedures for setting up the 480i phone up on the network and contains advanced configuration instructions for the 480i These procedures are at ...

Page 12: ...sion Initiation Protocol The protocol for VOIP and other text and multimedia sessions like instant messaging video online games and other services SIP Proxy SIP proxies are elements that route SIP requests to user agent servers and SIP responses back to user agent clients A request may traverse several proxies on its way to a UAS Each will make routing decisions modifying the request before forwar...

Page 13: ... and basic options list customization This guide is included in the box with your phone 271401 SIP IP Phone Administrator Guide for 480i 480i CT 9133i Explains how to set the 480i phone up on the network and contains advanced configuration instructions for the 480i This is an administrator level guide ...

Page 14: ...M M About This Publication xiv Aastra 2711 001 ...

Page 15: ... features of a regular business set and more allowing you to make and receive calls transfer conference and more The 480i Telephone Phone Features A 3 5 x 2 25 backlit display Handset with 1 1 4 x 3 4 backlit display and a handset base 6 multi functional softkeys as default or customized settings 4 line call appearance buttons with corresponding lights Up to 5 additional line call appearances as s...

Page 16: ...to a configuration server where you can store the firmware image and configuration files The configuration server must be able to accept connections anonymously The IP phone must be configured for a specific type of protocol to use TFTP is enabled by default You can configure the following protocols on the IP phone TFTP Trivial File Transfer Protocol FTP File Transfer Protocol HTTP Hypertext Trans...

Page 17: ...in your phone and every time you restart your phone The first screen to display is the Aastra splash screen Phone Updates After displaying the Aastra splash screen the 480i checks settings and checks for new configuration and firmware updates on the configuration server If a new update is found the phone displays the update it is installing either Updating Config or New Firmware This may take a fe...

Page 18: ...to the wall jack The phone should automatically detect when it is reconnected and will display the Network Connected prompt for a few seconds However if changes have been made to your phone s network settings you may need to restart your phone For more information about connecting your phone see the Aastra 480i Installation Guide the section Connecting to the Network and to Power Check with your s...

Page 19: ...o restart the phone To cancel without restarting the phone press Cancel Language When you set the language to use on the phone all of the display screens menus services options etc display in that language Valid languages for the IP phones include English French and Spanish Default is English Set Language Step Action Result 1 Press the Options button The Options List opens Language is the first ch...

Page 20: ...m administrator Please contact your system or network administrator before adjusting any administrator level options For more information on these options administrators should refer to the Aastra SIP 480i 480i CT 9112i 9133i IP Phone Administration Guide Find Your Phone s IP Address Step Action Result 1 Press the Options button to open the Options list 2 Use to scroll down the list of options to ...

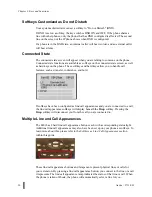
Page 21: ... side of the phone s display The softkey menus will change depending on the phone s state displaying relevant softkeys only Idle State Softkey Display The Idle State menu appears when your phone is not in use and displays the softkeys Your system administrator sets up the softkeys up through the configuration files for your phone The following image is of the Idle State screen with some example So...

Page 22: ...to function as line call appearance softkeys These line call appearance softkeys function in a similar manner to the 4 line call appearance hard keys and lights on your phone For details on the line call appearance hard keys and lights please refer to the section on Multiple Line and Call Appearances in Chapter 3 of this guide Line call appearance Softkeys appear on the phone s display as shown in...

Page 23: ...d etc all softkeys disappear except softkeys that have been set up as line call appearances and any context dependent Softkeys required for the active state such as the Drop softkey in the connected state Typically context dependent softkeys appear in the top left position and all line call appearance softkeys appear in the remaining positions In some situations such as during a conference call th...

Page 24: ...dle call features such as transfer conference and hold If softkeys have been configured as line call appearances and you are connected to a call the line call appearance softkeys will display beneath the Drop softkey Pressing the Drop softkey will disconnect you from the call you are connected to Multiple Line and Call Appearances The 480i has 4 hard line call appearance buttons each with a corres...

Page 25: ...an one call you can use the left and right navigation buttons and to scroll left and right to the different call information Icons and will appear if there is call information either left right or both sides of the current information you are viewing The display will show what line the call information is referring to L1 L2 L3 etc the Caller ID information name and number if available the call sta...

Page 26: ...M M Chapter 3 Keys and Functions 12 Aastra 2711 001 ...

Page 27: ...unable to make calls within certain area codes check with your system administrator for any toll restrictions placed on your extension that may restrict your access to long distance area codes or dialing prefixes You can place a call using one of the following methods Step Action 1 Lift the handset the phone will automatically select the next open line call appearance 2 Enter the number 3 Press th...

Page 28: ...mber before you dial and use the Backspace softkey to correct any errors Use the Handsfree Speakerphone The handsfree feature allows you to speak to someone without using the handset or headset Your phone must be in either the speaker or speaker headset audio mode For more information on how to set this audio option in your phone see the section Customizing Your Phone in the Aastra 480i Installati...

Page 29: ...r to purchase a compatible headset Customers should read and observe all safety recommendations contained in headset operating guides when using any headset Advanced Volume Controls for the Headset Microphone On the 480i there are 3 options for the headset microphone volume To change this volume Step Action 1 Press the Options button to open the Options List 2 Use to scroll down the list of option...

Page 30: ...ial tone or an incoming call will be received on either the headset or the speakerphone 3 Press the Drop softkey or the key to end the call Mute Press the button to mute handset headset or handsfree operation The speaker light will flash slowly and the text Mute will appear on the screen You will still be able to hear the caller but they will not hear you Press the Mute button again to toggle Mute...

Page 31: ... Lift the handset Headset Operation 1 Press the button Handset Operation 1 Lift the handset When you answer the call the screen will change to the Connected State menu If you cannot answer the call depending on the setting at the system the caller will be re directed accordingly i e to your voicemail box if your extension has been configured for this Call Handling When you are connected to a call ...

Page 32: ... will remain solid to indicate that you are still connected Automatic Hold When you must handle multiple calls you do not have to press the button to go from one call to the next The phone will automatically put your current call on hold when you press a new line call appearance button Retrieve a Held Call If you have more than 1 call on hold you can scroll through the held call information by pre...

Page 33: ... the transfer To do this simply remain on the line until the receiving party answers the call After consulting with the receiving party you can either complete the transfer or go back to the original call Transfer to another Extension Step Action Result 1 Connect to the call you wish to transfer if not already connected 2 Press the button 3 Enter the extension number of the person you wish to tran...

Page 34: ...ess the button 3 Dial the number of the person you wish to add to the conference 4 Wait for the new party to answer You can consult with the new party first before adding them to the conference If you do not wish to add the new party to the conference press the button while connected to this new call This disconnects the new party leaving the original call on hold To go back to the original call p...

Page 35: ...y Connected Calls Step Action 1 Begin with active calls on two different lines 2 Press 3 Press the line key of the call you wish to conference with 4 Press again The two lines link into a conference call When a name is displayed pressing drops the displayed party from the call Pick up Calls If you are juggling multiple calls you can scroll through call information by pressing the and navigation ke...

Page 36: ...nce button for the new incoming call will automatically place the connected call on hold and answer the new call End a Call Step Action 1 Connect to the call if not already connected 2 Press the button Or Press the Drop softkey Or If connected through the handset you can also place the handset back on hook to end the call ...

Page 37: ...ceived by the phone You can view scroll and delete line items in the Callers List from the IP phone You can also directly dial from a displayed line item in the Callers List Use the Callers List Step Action 1 Press on the phone to display the Services menu 2 Use and to scroll to the Callers List entry 3 Press Or Press the Select softkey to open the Callers List 4 Use the and to scroll through the ...

Page 38: ...ls indicator that increments the number of missed calls to the phone The number of calls that have not been answered increment on the phone s idle screen as number New Calls As the number of unanswered calls increments the phone numbers associated with the calls are stored in the Callers List The user can access the Callers List and clear the call from the list Once the user accesses the Callers L...

Page 39: ...he Callers List Step Action Result 1 Press You access the Services list 2 Press to go to Callers List 3 Press Select or You are in the Callers List Delete all entries 1 Press the DeleteList softkey at the Callers List header 2 Press the DeleteList softkey again to confirm Delete only one entry 1 Use or to select the entry you want to delete 2 Press the Delete softkey 3 Press the Delete softkey aga...

Page 40: ...r The quick search feature in the Directory works only when the Directory is first accessed You can view add change and delete entries to from the Directory using the IP phone UI You can also directly dial a number from the Directory Server to IP Phone Download Your system administrator can populate your IP phone Directory with server directory files Contact your system administrator for more deta...

Page 41: ...the and to scroll through the entries in the Directory to find the entry that you want to use Delete Entries in the Directory Step Action Result 1 Press You access the Directory The Directory is usually the first choice in the list 2 Press Select or You are in the Directory To delete only one entry 1 From inside the Directory Use or to select the entry you want to delete 2 Press the Delete softkey...

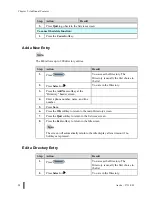
Page 42: ...he Directory 3 Press the Add New softkey at the Directory header screen 4 Enter a phone number name and line number 5 Press Save 6 Press the OK softkey to return to the main Directory screen 7 Press the Quit softkey to return to the Services screen 8 Press the Exit softkey to return to the Idle screen The screen will automatically return to the idle display after a timeout if no Softkeys are press...

Page 43: ...ng 5 Use or to scroll through the information to access the line that will be changed 6 Make the desired changes 7 Press Save 8 Press the OK softkey to return to the main Directory screen 9 Press the Quit softkey to return to the Services screen Dial a Displayed Entry Step Action 1 Press 2 Press Select or 3 Use or to find the entry to dial 4 Lift the handset Or Press the key Or Press a line key Or...

Page 44: ...ine where you want to save the number from the Directory 5 Press the Select softkey The screen shows that the line position in the speed dial list has been updated with the new number 6 Press Exit You return to the main screen Exit the Directory Step Action 1 Press the Quit softkey Voicemail The Voicemail is a softkey on the idle screen that provides access to the voicemail system Voice Mail Displ...

Page 45: ...ot redial where the last number dialed is dialed again Use the and to choose the number to redial Hot Redial Step Action Result 1 Lift the handset 2 Press the key The last number that you dialed displays on the screen and is automatically dialed again Redial from the Redial List Step Action Result 1 While onhook Press the key The Redial list displays the first entry 2 Use or to find the entry that...

Page 46: ...es in the list Either the selected entry or all entries are deleted Other Redial Features Step Action Result View Details of an entry 1 Press the key The Redial list displays the first entry 2 Use or to find the entry that you wish to look at 3 Press the Details softkey The specifics of that entry are displayed Copy an entry to your directory 1 Press the key The Redial list displays the first entr...

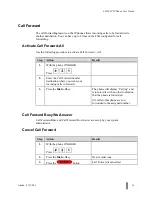
Page 47: ...HOOK Press 2 Enter the Call Forward number destination where you want your incoming calls to forward 3 Press the Dial softkey The phone will display Calling and return to idle with no other indication that the phone is forwarded All calls to this phone are now forwarded to the assigned number Call Forward Busy No Answer Call Forward Busy and Call Forward No Answer are set up by your system adminis...

Page 48: ...M M Chapter 5 Additional Features 34 Aastra 2711 001 ...

Page 49: ...e speakerphone and the headset by pressing See the section Customizing your phone in the 480i Installation Guide for instructions on how to change the Set Audio option Why can t I get a dial tone Check for any loose connections and that the phone has been installed properly For installation instructions please refer to the Installation and Setup section in the Aastra 480i Installation Guide provid...

Page 50: ...5 Re enter the new user password 6 Press Enter to save the new password A message Password Changed displays on the screen Why does my phone display Bad Encrypted Config The IP phone displays Bad Encrypted Config because encrypted configuration files are enabled but the decryption process has failed Report this error to your system administrator Why does my phone display the No Service message The ...

Page 51: ...M M 480i SIP IP Phone User Guide Aastra 2711 001 37 Problem Possible Solution s 6 Press Restart to start the phone 7 To cancel without restarting the phone press Cancel ...

Page 52: ...M M Chapter 6 Troubleshooting 38 Aastra 2711 001 ...

Page 53: ...ne 35 directory 26 add new entry 28 download 26 exit 30 limitations 26 use 27 E envelope icon 30 H handset 35 handsfree speakerphone 14 hard keys 7 headset 15 place and receive calls 16 headset microphone 15 hold place on hold 17 retrieve 18 I idle 9 idle state display 7 IP address 36 L lamp appearance 11 live dialPad 14 M message waiting 35 missed calls access 24 missed calls indicator 24 multipl...

Page 54: ...o not disturb 10 speed dial 9 softkeys 7 custom 8 softkeys as line call appearances 8 speakerphone 14 35 T transfer 19 announced 19 blind 19 consultation 19 U user password 36 V visual message waiting 35 voicemail 30 31 use 31 voicemail display 30 volume controls 15 ...

Reviews: