background image

English 

- 15 -   

AD-6121A 

8.2. 

Connecting to a Personal Computer 

8.2.1. 

Connection procedure 

 
The below is an example of connecting the scale to a Windows-based personal computer. 
 

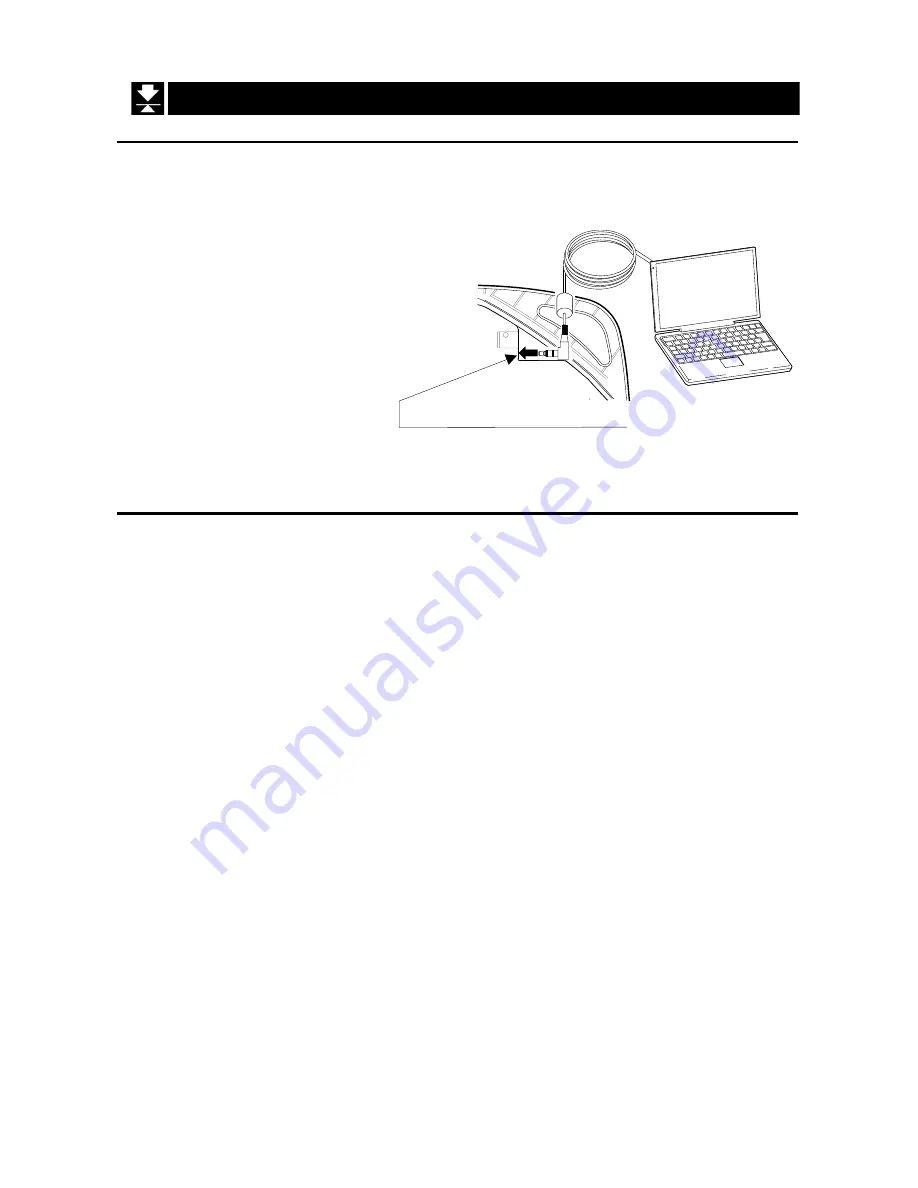
1  Insert the optional RS-232C 

cable (AX-KO2238) into the 
LINE (External output 
terminal) jack located on the 
bottom of the scale. 


2  Insert the D-Sub 9-pin 

connector of the RS-232C 
cable to the RS-232C port 
(COM1 port) located on the 
personal computer. 


8.2.2. 

Communication example 

 
The below is an example of communication with a Windows-based personal computer. 
 

1  Make a connection between the scale and the personal computer as described above. 
 
2  Select [Start], [Program], [Accessories] and [Hyper Terminal]. 

If Hyper Terminal is not installed, install it using [Add Remove Programs]. 

 
3  Double-click the Hyper Terminal icon to start Hyper Terminal. 

Click [Cancel] when a guide to the modem installation appears. 

 
4  A new window opens. Give it a proper name and click [OK]. 
 
5  The settings window appears. Select [Direct to COM1] for connection method and 

click [OK]. 

 
6  Set the port on the COM1 properties window and click [OK]. 

Baud rate 

:  2400 bps 

Data bits   

:  7 bits 

Parity 

:  1 bit, Even, Odd 

Stop bit 

:  1 bit 

Flow control  :  Hardware 


7  Press the ON/OFF switch to turn the scale on. 


8  The data is output as described in "

8.1.3 Output timing

" and displayed on the 

personal computer. 

Optional RS-232C cable 
AX-KO2238 

Personal computer 

External output terminal LINE 

Summary of Contents for AD-6121A

Page 1: ...AD 6121A 1WMPD4001528...

Page 2: ...n death or serious injury CAUTION A potentially hazardous situation which if not avoided may result in minor or moderate injury This is a hazard alert mark This manual is subject to change without not...

Page 3: ...7 2 Calibration Using the Calibration Weight 10 7 3 Adjusting the Gravitational Acceleration 13 8 DATA COMMUNICATION 14 8 1 RS 232C Serial Interface 14 8 1 1 Interface specifications 14 8 1 2 Data for...

Page 4: ...tions 1 2 1 Installation Place the scale in a flat floor free from vibrations and drafts The floor should be solid enough to support the weight of the scale and the person being weighed Place the scal...

Page 5: ...hile the person being weighed is on the scale Scale Displays the weight without holding it Suitable to the weighing with a tare The displaying direction can be changed The display is equipped with the...

Page 6: ...ch ON OFF switch Display direction switch Mode selection switch Weighing surface 4 PART NAMES AND ACCESSORIES Accessories AC adapter Instruction manual Note The shape of the adapter plug may differ fr...

Page 7: ...ale holds the displayed weight Personal Holds the weight when it becomes stable and displays the value for about 5 seconds after the person being weighed steps off the scale Used when the person being...

Page 8: ...the ON OFF switch is turned off and then turned on again 5 BEFORE USE 5 1 Preparation Procedure 1 Use the accessory AC adapter or four type AA alkaline batteries 2 Place the scale on a solid floor an...

Page 9: ...body wash the body part under running water immediately When the Low battery mark appears replace the batteries with four new type AA batteries Please note that the Low battery mark does not appear w...

Page 10: ...acklight turns on 3 Press the ZERO switch If the displayed value is not zero press the ZERO switch 4 Step on the scale gently and read the weight The scale displays the weight When the value is stable...

Page 11: ...switch 3 Place the tare on the scale gently Place a tare item of 3 kg or more on the scale When the value is stable the Stable mark turns on 4 Press the ZERO switch The tare mark turns on and the disp...

Page 12: ...n the CAL and ZERO switches press and hold the ON OFF switch for about 2 seconds All of the display segments turn on Release the switches after about 2 seconds 2 While all the display segments are on...

Page 13: ...tch is pressed the number increases by 1 When the Display direction switch is set to each time the ZERO switch is pressed the number decreases by 1 Note The gravity values for various locations are li...

Page 14: ...o point data 17 With C 12 on the display press the ON OFF switch The display indicates CAL1 18 Place a 150 kg weighing capacity weight on the scale and wait for the Stable mark to turn on 19 Press the...

Page 15: ...CAL switch 3 times The display indicates 9798 which means the gravitational acceleration setting of the installation site is 9 798 m s2 If the CAL switch is not pressed 3 times within about 5 seconds...

Page 16: ...bit Even Odd Stop bit 1 bit Code ASCII Terminator CR LF CR 0Dh LF 0Ah 8 1 2 Data format Space 20h Carriage return CR 0Dh Line feed LF 0Ah 8 1 3 Output timing Mode selection switch Output timing Perso...

Page 17: ...s described above 2 Select Start Program Accessories and Hyper Terminal If Hyper Terminal is not installed install it using Add Remove Programs 3 Double click the Hyper Terminal icon to start Hyper Te...

Page 18: ...eezed or rung out so that it is not dripping wet Do not use organic solvents such as thinner benzine and methanol to clean the scale Do not use a disinfectant that contains chlorine to clean the scale...

Page 19: ...ed Check that nothing is touching the scale The switches do not function The display does not change even when the switches are pressed Disconnect the AC adapter and connect it again Then turn the pow...

Page 20: ...on can be changed Operating temperature range humidity 5 C to 35 C 85 RH or less No condensation Power supply AC adapter or four type AA batteries Not included Battery life Approx 1000 weighing operat...

Page 21: ...m s2 Los Angeles 9 796 m s2 Stockholm 9 818 m s2 Buenos Aires 9 797 m s2 Madrid 9 800 m s2 Sydney 9 797 m s2 Calcutta 9 788 m s2 Manila 9 784 m s2 Taichung 9 789 m s2 Cape Town 9 796 m s2 Melbourne 9...

Page 22: ...3 Fax 1 408 263 0119 A D INSTRUMENTS LTD UK Office Authorized Representative Established in the European Community Unit 24 26 Blacklands Way Abingdon Business Park Abingdon Oxfordshire OX14 1DY United...

Reviews: