EMB-Q87B
2-2
DC_PWR2
DISPLAYPORT3
DISPLAYPORT2
DISPLAYPORT1
USB3_12
USB3_56
LAN1
LAN2
AUDIO
ALC
887
Intel
I210AT
Intel PHY
I217LM
CLRTC
17.0cm(6.7in)
17.0cm(6.7in)
SATA6G_4
SATA6G_3 SATA6G_2 SATA6G_1
F_PANEL
DIS_ME
PCIE_SET
CHASSIS
USB1112 USB78
USB56
CPU_FAN
CHA_FAN
COM2
COM1
USB2
USB3
LGA1150
DDR3 DIMM_B1 (64bit, 204-pin module)
DDR3 DIMM_A1 (64bit, 204-pin module)
COM1
_VSET
DIO
BATTERY1
SB_PWR
VS_PWR
MINICARD1
MINICARD2
SATA_PWR
KBMS
SPI_1
Intel
®
Q87
Super
I/O
19
12
AAFP
17
6
5
1
3
2
4
13
14
7
8
9
10
11
15
7
16
1
18
15
20
21
2.2
Motherboard layout
Place this side
towards the rear
of the chassis
NOTE:
Place four screws into the holes indicated by circles to secure the
motherboard to the chassis.
CAUTION!
Do not overtighten the screws! Doing so can damage the
motherboard.
Summary of Contents for EMB-Q87B
Page 1: ...Industrial Motherboard EMB Q87B ...
Page 12: ...EMB Q87B 2 4 2 3 Screw size 2 3 1 Component side ...
Page 13: ...2 5 Chapter 2 Motherboard information 2 3 2 Solder side ...
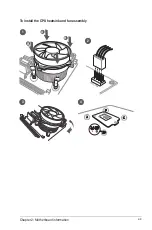
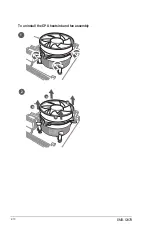
Page 18: ...EMB Q87B 2 10 A B B A To uninstall the CPU heatsink and fan assembly 2 1 ...
Page 30: ...EMB Q87B 2 22 ...
Page 42: ...3 12 EMB Q87B ...


