background image

ii

E9749

First Edition

November 2014

Copyright Notice

This document is copyrighted, 2014. All rights are reserved. The original 

manufacturer reserves the right to make improvements to the products described 

in this manual at any time without notice.

No part of this manual may be reproduced, copied, translated, or transmitted 

in any form or by any means without the prior written permission of the original 

manufacturer. Information provided in this manual is intended to be accurate and 

reliable. However, the original manufacturer assumes no responsibility for its use, 

or for any infringements upon the rights of third parties that may result from its use.
The material in this document is for product information only and is subject to 

change without notice. While reasonable efforts have been made in the preparation 

of this document to assure its accuracy, the original manufacturer assumes no 

liabilities resulting from errors or omissions in this document, or from the use of the 

information contained herein.

The original manufacturer reserves the right to make changes in the product 

design without notice to its users.

Acknowledgments

All other products’ name or trademarks are properties of their respective owners.

• 

AMI is a trademark of American Megatrends Inc.

• 

Intel

®

, Core™ are trademarks of Intel® Corporation.

• 

Microsoft Windows

®

 is a registered trademark of Microsoft Corp.

• 

IBM, PC/AT, PS/2, and VGA are trademarks of International Business 

Machines Corporation.

The original manufacturer reserves the right to make changes in the product 

design without notice to its users.

All other product names or trademarks are properties of their respective owners.

Summary of Contents for EMB-Q87B

Page 1: ...Industrial Motherboard EMB Q87B ...

Page 2: ...ubject to change without notice While reasonable efforts have been made in the preparation of this document to assure its accuracy the original manufacturer assumes no liabilities resulting from errors or omissions in this document or from the use of the information contained herein The original manufacturer reserves the right to make changes in the product design without notice to its users Ackno...

Page 3: ... fan assembly installation 2 8 2 5 System memory 2 11 2 6 Jumpers 2 12 2 7 Onboard LEDs 2 14 2 8 Connectors 2 15 2 8 1 Rear panel connectors 2 15 2 8 2 Internal connectors 2 16 Chapter 3 BIOS setup 3 1 BIOS setup program 3 1 3 1 1 BIOS menu screen 3 2 3 1 2 Menu bar 3 2 3 2 Main menu 3 3 3 2 1 System Time xx xx xx 3 3 3 2 2 System Date Day xx xx xxxx 3 3 3 3 Advanced menu 3 4 3 3 1 S5 RTC Wake Set...

Page 4: ... USB Configuration 3 7 3 3 10 NCT6791D Super IO Configuration 3 7 3 3 11 NCT6791D HW Monitor 3 7 3 4 Chipset 3 8 3 4 1 System Agent SA Configuration 3 8 3 4 2 PCH IO Configuration 3 8 3 5 Boot menu 3 9 3 6 Security menu 3 10 3 7 Save Exit menu 3 11 Appendix Notices A 1 ...

Page 5: ...f any of the above items is damaged or missing contact your distributor or sales representative immediately 1 2 Features Intel socket 1150 for Intel Haswell 22nm processors up to 65W SO DIMM x 2 Max 16GB DDR3 1333 1600MHz DIMMs Non ECC Flat type SATA 6 0 Gb s x 4 USB 3 0 x 4 USB 2 0 x 8 COM x 2 Full Half size Mini Card mSATA 6 0Gb s x 1 Half size Mini Card PCIe USB x 1 EuP ErP compliance Chapter 1...

Page 6: ...10AT Giga LAN Audio Realtek ALC887 2ch audio codec TPM Infineon SLB9655 Expansion Slots 1 x Full Half size Mini Card PCIe or mSATA select by jumper default mSATA 6 0Gb s 1 x Half size Mini Card PCIe or mSATA select by jumper default PCIe USB BIOS 128Mbit Flash ROM AMI BIOS H W Monitor Temperature Monitor on CPU Chassis Voltage Monitor on Vcore 5V 12V Fan Monitor on CPU Chassis WatchDog Timer 1 255...

Page 7: ... mid board 1 x RS 232 supports 5V 12V RI option at mid board PS 2 Port 1 x keyboard mouse with PS 2 for wafer header DIO 8 bit Digital I O Input Output programmable FAN 1 x 4 pin CPU fan connector 1 x 4 pin chassis fan connector ENVIRONMENT POWER ME Battery Lithium battery Power Requirement 12V 15 24V wide range voltage input 4 pin internal power connector NOTE Please use a fixed voltage power sup...

Page 8: ...2 1 x 6 pin 2x3 PS 2 keyboard and mouse connector 1 x Digital I O header 1 x 4 pin 2x2 internal power connector 1 x 4 pin CPU fan connector 1 x 4 pin chassis fan connector 1 x System panel connector 1 x Front panel audio connector AAFP 1 x Chassis intrusion jumper 1 x CLRTC Clear CMOS jumper 1 x COM1 Ring 5V 12V selection jumper 1 x Intel ME jumper 1 x Battery connector 1 x SATA power connector 1 ...

Page 9: ...ed wrist strap or touch a safely grounded object or a metal object such as the power supply case to avoid damaging them due to static electricity Hold components by the edges to avoid touching the ICs on them Whenever you uninstall any component place it on a grounded antistatic pad or in the bag that came with the component Before you install or remove any component always remove the AC power by ...

Page 10: ...3 LGA1150 DDR3 DIMM_B1 64bit 204 pin module DDR3 DIMM_A1 64bit 204 pin module COM1 _VSET DIO BATTERY1 SB_PWR VS_PWR MINICARD1 MINICARD2 SATA_PWR KBMS SPI_1 Intel Q87 Super I O 19 12 AAFP 17 6 5 1 3 2 4 13 14 7 8 9 10 11 15 7 16 1 18 15 20 21 2 2 Motherboard layout Place this side towards the rear of the chassis NOTE Place four screws into the holes indicated by circles to secure the motherboard to...

Page 11: ...7 8 Standby power LED SB_PWR VS_PWR 2 14 9 Digital I O connector 10 pin DIO 2 18 10 System panel connector 10 1 pin F_PANEL 2 19 11 Chassis intrusion connector 4 1 pin CHASSIS 2 18 12 Clear RTC RAM 3 pin CLRTC 2 12 13 Intel LGA1150 CPU socket 2 6 14 Intel ME jumper 3 pin DIS_ME 2 13 15 SO DIMM slots 2 11 16 USB 2 0 connectors 4 pin USB2 USB3 10 pin USB56 USB78 USB1112 2 21 17 Front panel audio con...

Page 12: ...EMB Q87B 2 4 2 3 Screw size 2 3 1 Component side ...

Page 13: ...2 5 Chapter 2 Motherboard information 2 3 2 Solder side ...

Page 14: ...nents Keep the cap after installing the motherboard The manufacturer will process Return Merchandise Authorization RMA requests only if the motherboard comes with the cap on the LGA1150 socket The product warranty does not cover damage to the socket contacts resulting from incorrect CPU installation removal or misplacement loss incorrect removal of the PnP cap 2 4 Central Processing Unit CPU The m...

Page 15: ...2 7 Chapter 2 Motherboard information 2 4 1 Installing the CPU 1 CAUTION The LGA1156 CPU is incompatible with the LGA1150 socket DO NOT install a LGA1156 CPU on the LGA1150 socket A B 2 3 ...

Page 16: ...EMB Q87B 2 8 4 5 2 4 2 CPU heatsink and fan assembly installation CAUTION Apply the Thermal Interface Material to the CPU heatsink and CPU before you install the heatsink and fan if necessary A B C ...

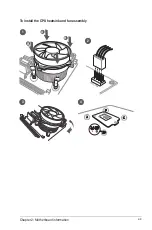
Page 17: ...2 9 Chapter 2 Motherboard information To install the CPU heatsink and fan assembly B A A B 1 2 3 4 ...

Page 18: ...EMB Q87B 2 10 A B B A To uninstall the CPU heatsink and fan assembly 2 1 ...

Page 19: ...ensions as a DDR2 DIMM but is notched differently to prevent installation on a DDR2 DIMM socket DDR3 modules are developed for better performance with less power consumption The figure below illustrates the location of the DDR3 DIMM sockets Installing a DIMM 3 To install a DIMM To remove a DIMM 3 Channel Sockets Channel A SO_DIMM_A1 Channel B SO_DIMM_B1 EMB Q87B 204 pin DDR3 SO DIMM sockets DIMM_A...

Page 20: ... power cord and turn ON the computer 4 Hold down the Del key during the boot process and enter BIOS setup to reenter data CAUTION Except when clearing the RTC RAM never remove the cap on CLRTC jumper default position Removing the cap will cause system boot failure NOTES If the steps above do not help remove the onboard battery and move the jumper again to clear the CMOS RTC RAM data After clearing...

Page 21: ...efault 5 6 2 2 3 ME Enable Default ME Disable DIS_ME 1 EMB Q87B Intel ME jumper EMB Q87B COM VSET jumper PIN 1 RI_VCC RI_VCC RI_VCC RI 5V 12V Com1_Vset 4 mSATA PCIe mode selection 6 pin PCIE_SET Setting Pins PCIE_SET for Mini card 1 mSATA 1 3 PCIe Default 3 5 PCIE_SET for Mini card 2 mSATA Default 2 4 PCIe 4 6 EMB Q87B Minicard mSATA PCIe mode selection 1 3 3 5 PCIe Default mSATA PCIE_SET for Mini...

Page 22: ...de or in soft off mode This is a reminder that you should shut down the system and unplug the power cable before removing or plugging in any motherboard component The illustration below shows the location of the onboard LED 2 7 Onboard LEDs VS_PWR ON Standby Power Powered Off OFF SB_PWR ON Main Power Main Power Off OFF EMB Q87B Onboard LEDs ...

Page 23: ... 0 devices to USB 3 0 ports for faster and better performance for your USB 3 0 devices 2 DisplayPort These ports connect a DisplayPort monitor or a home theater system 3 LAN RJ 45 ports These ports allow Gigabit connection to a Local Area Network LAN through a network hub Refer to the table below for the LAN port LED indications LAN port Speed LED Activity Link LED ACT LINK LED SPEED LED Status De...

Page 24: ...lug is designed to fit this connector in only one orientation Find the proper orientation and push down firmly until the connector completely fit EMB Q87B DC power connector PIN 1 DC_PWR2 DC_IN DC_IN GND GND EMB Q87B SATA power connector 5V GND GND 12V SATA_PWR PIN 1 3 Front panel audio connector 10 1 pin AAFP This connector is for a chassis mounted front panel audio I O module Connect one end of ...

Page 25: ...s to the fan connectors on the motherboard ensuring that the black wire of each cable matches the ground pin of the connector EMB Q87B Fan connectors CHA_FAN GND VCC SENSE PWM PWM SENSE VCC GND CPU_FAN PIN 1 PIN 1 NOTE The serial port cables are purchased separately 5 Serial port connectors 10 1 pin COM1 COM2 These connectors are for serial COM ports Connect the serial port cables to these connect...

Page 26: ... a jumper cap Remove the jumper caps only when you intend to use the chassis intrusion detection feature 8 Digital I O connector 10 pin DIO This connector includes 8 I O lines In Out programmable All of the Digital I O lines are programmable and each I O pin can be individually programmed to support various devices NOTE To configure the I O pins in BIOS go to the Advanced tab Dynamic Digital IO DI...

Page 27: ...Activity LED cable to this connector The IDE LED lights up or flashes when data is read from or written to the HDD ATX power button soft off button 2 pin PWR_BTN This 2 pin connector is for the system power button Reset button 2 pin RESET This 2 pin connector is for the chassis mounted reset button for system reboot without turning off the system power 10 PS 2 keyboard mouse connector 6 pin KBMS T...

Page 28: ...OTE The Minicard device is purchased separately EMB Q87B SATA 6 0Gb s connectors SATA6G_4 GND RSATA_RXP4 RSATA_RXN4 GND RSATA_TXN4 RSATA_TXP4 GND SATA6G_3 GND RSATA_RXP3 RSATA_RXN3 GND RSATA_TXN3 RSATA_TXP3 GND SATA6G_2 GND RSATA_RXP2 RSATA_RXN2 GND RSATA_TXN2 RSATA_TXP2 GND SATA6G_1 GND RSATA_RXP1 RSATA_RXN1 GND RSATA_TXN1 RSATA_TXP1 GND EMB Q87B Minicard connectors MINICARD2 MINICARD1 13 SPI fla...

Page 29: ...SB 2 0 ports Connect the USB cable to these connectors These USB connectors comply with USB 2 0 specification that supports up to 480 Mbps connection speed EMB Q87B USB2 0 connectors PIN 1 GND GND USB5_DP2 USB5_DN2 5V 5V USB12_DN1 USB12_DP1 GND GND USB1112 PIN 1 GND GND USB7_DP2 USB7_DN2 5V 5V USB8_DN1 USB8_DP1 GND GND USB78 PIN 1 GND GND USB5_DP2 USB5_DN2 5V 5V USB6_DN1 USB6_DP1 GND GND USB56 PIN...

Page 30: ...EMB Q87B 2 22 ...

Page 31: ... to turn the system off then back on Do this option only if you failed to enter BIOS Setup using the first two options NOTE Using the power button reset button or the Ctrl Alt Del keys to reboot a running operating system can cause damage to your data or system Always shut down the system properly from the operating system IMPORTANT The default BIOS settings for this motherboard apply to most work...

Page 32: ... arrow key on the keyboard until the desired item is highlighted General help Menu bar Configuration fields Menu items Version 2 15 1236 Copyright C 2012 American Megatrends Inc BIOS Information R1 1 EQ87BM11 11 06 2014 BIOS Vendor American Megatrends Core Version 4 6 5 4 Compliancy UEFI 2 3 1 PI 1 2 System Date Mon 01 19 2009 System Time 17 03 24 Access Level Administrator Set the Date Use Tab to...

Page 33: ...s you to set the system date Version 2 15 1236 Copyright C 2012 American Megatrends Inc BIOS Information R1 1 EQ87BM11 11 06 2014 BIOS Vendor American Megatrends Core Version 4 6 5 4 Compliancy UEFI 2 3 1 PI 1 2 System Date Mon 01 19 2009 System Time 17 03 24 Access Level Administrator Set the Date Use Tab to switch between Date elements Aptio Setup Utility Copyright C 2012 American Megatrends Inc...

Page 34: ...t Security Save Exit 3 3 1 S5 RTC Wake Settings This item allows you to enable the system to wake up from S5 state using an alert event Wake system with Fixed Time Disabled Allows you to enable or disable the system s wake on alert event When enabled the system wakes up on the specified time Configuration options Enabled Disabled Wake system with Dynamic Time Disabled Allows you to enable or disab...

Page 35: ...Device TCG EFI protocol and INT1A interface will not be available Configuration options Disable Enable 3 3 5 CPU Configuration The items in this menu show the CPU related information that the BIOS automatically detects Intel Virtualization Technology Enabled Enables or disables Intel Virtualization Technology Virtualization enhanced by Intel Virtualization Technology allows a platform to run multi...

Page 36: ...dom workloads by allowing the drive to internally optimize the order of commands RAID Set to RAID when you want to create a RAID configuration from the SATA hard disk drives 3 3 7 PCH FW Configuration Displays the Management Engine Technology parameters 3 3 8 AMT Configuration The items in this menu allow you to change the Intel Active Management Technology AMT feature Intel AMT Enabled Allow you ...

Page 37: ... If no USB device is detected the legacy USB support is disabled 3 3 10 NCT6791D Super IO Configuration The items in this menu allow you to configure the system super IO chip settings Serial Port 1 Port 2 Configuration Allow you to configure the Serial Port 1 Port 2 settings Serial Port Enabled Enables or disables the Serial COM port Configuration options Enabled Disabled Change Settings Auto Allo...

Page 38: ...on options Auto Disabled Enabled DVMT Pre Allocated 32M Allows you to select the amount of system memory allocated to DVMT 5 0 used by the Internal Graphics Device Configuration options 32M 64M 96M 128M 416M 448M 480M 512M 1024M DVMT Total Gfx Mem 256M Allows you to select the total amount of system memory allocated to DVMT 5 0 used by the Internal Graphics Device Configuration options 128M 256M M...

Page 39: ... Card slot 2 speed Configuration options Auto Gen1 Gen 2 Multi VerbTable Switch HD Audio Configuration options AC97 HD Audio 3 5 Boot menu The Boot menu items allow you to change the system boot options Boot Configuration Quiet Boot Enabled Enables or disables the Quiet Boot option Configuration options Enabled Disabled Launch I217LM PXE OpROM Disabled Controls the launch of I217LM Legacy PXE OpRO...

Page 40: ...box key in the current password then press Enter 3 From the Create New Password box key in a new password then press Enter 4 Confirm the password when prompted To clear the administrator password follow the same steps as in changing an administrator password but press Enter when prompted to create confirm the password After you clear the password the Administrator Password item on top of the scree...

Page 41: ...on allows you to reset your system without saving your changes When you select this option or if you press Esc a confirmation window appears Select Yes to discard changes and exit Restore Defaults This option allows you to load the default values for each of the parameters on the Setup menus When you select this option or if you press F3 a confirmation window appears Select Yes to load the default...

Page 42: ...3 12 EMB Q87B ...

Page 43: ...uipment off and on the user is encouraged to try to correct the interference by one or more of the following measures Reorient or relocate the receiving antenna Increase the separation between the equipment and receiver Connect the equipment to an outlet on a circuit different from that to which the receiver is connected Consult the dealer or an experienced radio TV technician for help WARNING The...

Page 44: ...財產造成嚴重損害的期限 部件名稱 有害物質或元素 鉛 Pb 汞 Hg 鎘 Cd 六 價 鉻 Cr VI 多 溴 聯 苯 PBB 多 溴 二 苯 醚 PBDE 印刷電路板及其 電子組件 外部信號連接頭 及線材 有毒有害物質或元素的名稱及含量說明標示 表示該有毒有害物質在該部件所有均質材料中的含量均在 SJ T 11363 2006 標准規定的限量要求以下 表示該有毒有害物質至少在該部件的某一均質材料中的含量超出 SJ T 11363 2006 標准規定的限量要求 然該部件仍符合歐盟指令 2002 95 EC 的規范 備註 此產品所標示之環保使用期限 係指在一般正常使用狀況下 ...

Reviews: