background image


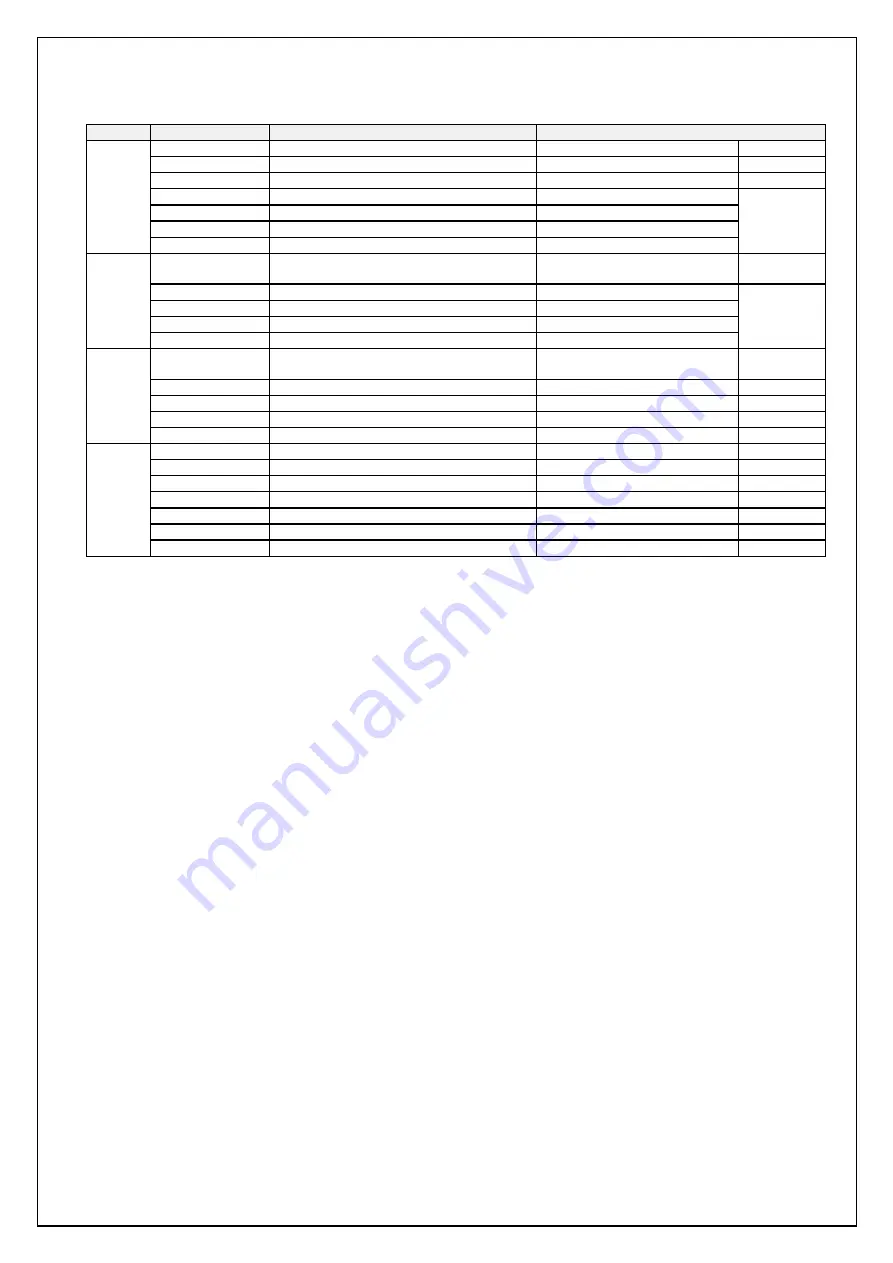
ITEM


Sub Menu


Description


Value


Picture 

Brightness 

Adjust the backlight level of screen 

50(0~100) 


Contrast 

Increase/ decrease picture contrast 

50(0~100) 


Sharpness 

Control the clarity of details of pictures  2(0 ~ 4) 


H Position 

Adjust picture horizontal position 

50(0~100) 


RGB 

ONLY 

V Position 

Adjust picture vertical position 

50(0~100) 

Clock 

Adjust picture width 

50(0~100) 

Phase 

Adjust picture focus quality 

30(0~100) 


Color 

Color  Status 

Management 

Select the color of picture mode 

User(User, Warm, Normal, 

C l) 


Red 

Adjust color of red rate 

50(0~100) 


RGB 

ONLY 

Green 

Adjust color of green rate 

50(0~100) 

Blue 

Adjust color of blue rate 

50(0~100) 

Auto Color 

Auto color calibration 

To Start 


OSD 

Language 

Select OSD menu language 

English(English,    Deutsh,    

Francais, Italiano, Espanol, 


H Position 

Adjust the OSD horizontal position 

50(0~100) 


V Position 

Adjust the OSD vertical  position 

50(0~100) 


Transparency 

Select the transparency of the OSD 

33 (0~100) 


OSD Time 

Adjust the OSD menu timeout 

10(3~30) 


SETUP 

Source 

Select the input signal Source 

RGB, DVI, AUTO 


Factory reset 

Reset to factory settings 

To Start 


Aspect 

On/ Off the fit to screen 

Off(On/Off) 


Backlight DIM 

On/ Off the backlight Dimming(PWM)  Off(On/Off) 


Set ID 

On/ Off the RS232 control 

Off(On/Off) 

Optional 

Volume 

Adjust the audio volume 

62(0~100) 

Optional 

Mute 

On/ Off the audio output 

Off(On/Off) 

Optional 

Summary of Contents for AOD/ATS 170

Page 1: ...55 Standard type also available as A1Touch Solution BV 31 0 45 574 81 90 31 0 45 574 81 91 Hogeweg 21 NL 6367 BA Voerendaal info A1TouchSolution nl The Netherlands www A1TouchSolution nl PCAP panelmou...

Page 2: ...s Manual 1 0 Connection to the computer 1 1 Installation 1 2 Features 1 3 Plug and play function 1 4 Safety Precaution 1 5 OSD On Screen Menu 1 6 OSD Menu 1 7 Specifications 1 8 Contents of the retai...

Page 3: ...Connection To the Computer 1 1 Installation Mount the unit in position as desired You can adjust the connection for your PC environment via I O panel of computer Plug the DC cord of the AC adapter to...

Page 4: ...fore operating your computer FOLLOW INSTRUCTIONS in this manual Please read and comprehend all using directives before use this machine Power Use the type of power indicated on the marking label Adapt...

Page 5: ...er No valid input Sleep mode Green Blinking No Signal UP Select next menu item Increase slider value Auto Configuration on no menu status DOWN Select previous menu item Decrease slider value Auto Conf...

Page 6: ...of green rate 50 0 100 Blue Adjust color of blue rate 50 0 100 Auto Color Auto color calibration To Start OSD Language Select OSD menu language English English Deutsh Francais Italiano Espanol H Posi...

Page 7: ...module Harddisk Sata SSD and SATA Harddisk possible Graphics Integrated Intel HD Graphics 500 12 EUs inside Up to 750MHz DirectX 12 Pixel Shader 5 0 Three graphics output options D Sub DVI D and HDMI...

Page 8: ...x M 2 Socket Key E supports type 2230 WiFi BT module 1 x COM Port Header 1 x TPM Header 1 x Chassis Intrusion and Speaker Header 1 x CPU Fan Connector 3 pin 1 x Chassis Fan Connector 3 pin 1 x 24 pin...

Page 9: ...ss than 85 gramm Projected Capacitive Standard glare Touchable with finger glove and pcap stylus 10 points touch activation force less than 1 gramm External protection Standard IP44 or IP65 or higher...

Page 10: ...d check the system s power cord AC adapter for proper connection Appear the No Input the Signal Check the connecting of the vga cable on I O panel computer and power on computer Appear the Input Not t...

Reviews: