background image

17

EConoMy ModE sEttInGs

daily operating Mode settings

ACTION

DISPLAY

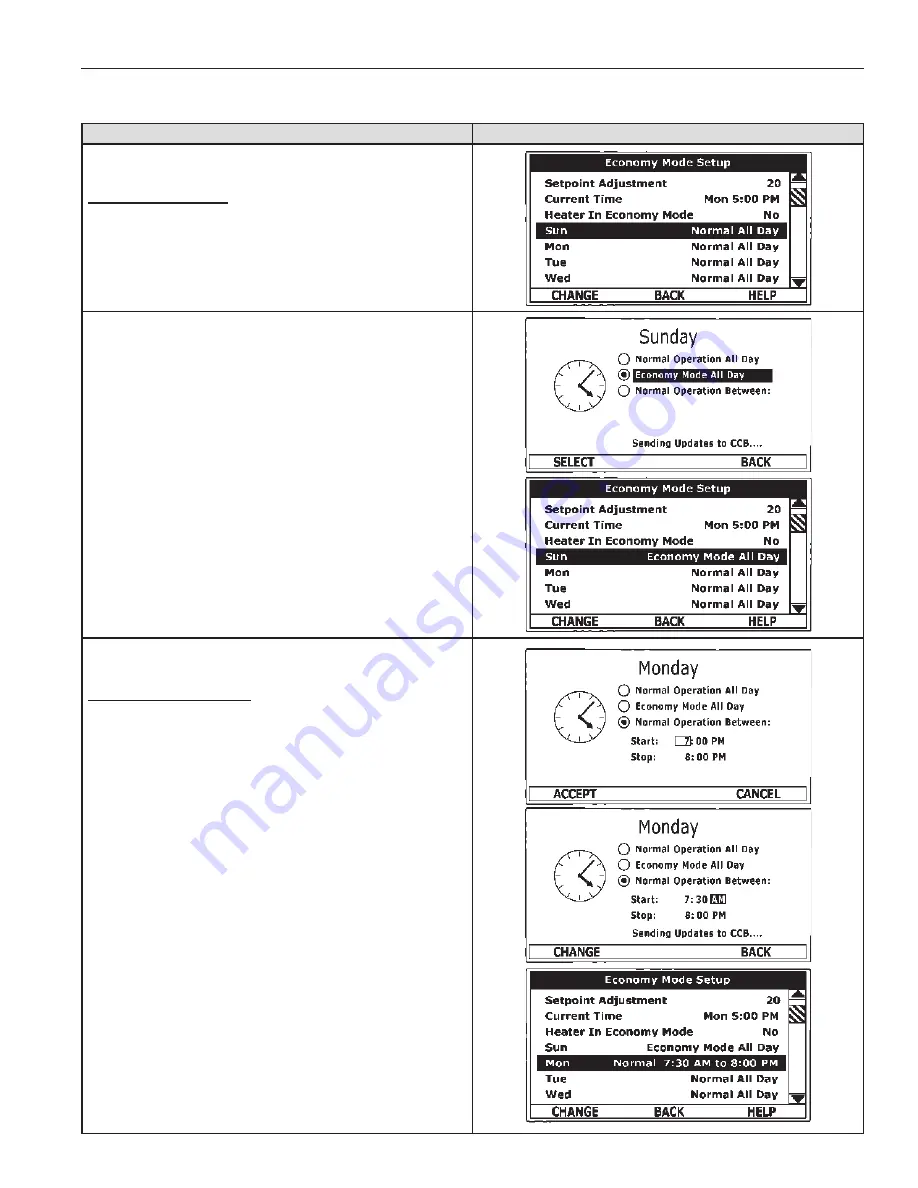
Economy Mode all day

:

From the Economy Mode Setup menu use the Up/Down buttons to 

select (highlight in black) the Daily sub menu for “Sun.” Press the 

Operational Button underneath “CHANGE” to enter this menu.

Use the Up/Down buttons to select (highlight in black) the “Economy 

Mode All Day” setting.

Press the Operational Button underneath “SELECT” to change from 

the factory default Normal Operation All Day setting to the Economy 

Mode All Day setting.

Press  the  Operational  Button  underneath  “BACK”  to  confirm  the 

new setting and update the control system. You will be returned to 

the Economy Mode Setup menu. The new setting should now be 

displayed for Sun.

normal operation Between

:

From  the  Economy  Mode  Setup  menu  Use  the  Up/Down  and 

CHANGE buttons to enter the Mon sub menu as described above.

Use the Up/Down buttons to select (highlight in black) the “Normal 

Operation  Between”  setting.  Press  the  Operational  Button 

underneath “SELECT” to change the operating mode for Monday to 

Normal Operation Between. Note that when this setting is selected 

Start and Stop time user settings appear on the display.

Use the Up/Down buttons to navigate between the Start and Stop 

time Hour, Minutes and AM/PM settings.

With each item selected press the Operational Button underneath 

“CHANGE” to activate the adjustment mode for each setting. Use 

the Up/Down buttons to change the value to the desired setting.

Press  the  Operational  Button  underneath  “ACCEPT”  to  enter  the 

new setting or “CANCEL” to discard the new setting and retain the 

previous setting.

Press the Operational Button underneath “BACK” when finished to 

confirm the new settings and update the control system. The display 

will return to the Economy Mode Setup menu with the new settings 

shown for Mon.

Summary of Contents for DHE200 THRU 10

Page 1: ...Manual place these instructions adjacent to heater and notify owner to keep for future reference COMMERCIAL ELECTRIC WATER HEATER MODELS DVE 150 THRU DVE 10000 DHE 200 THRU DVE 10000 UP TO 150KW A DI...

Page 2: ...about the type of hazard what can happen if you do not follow the safety message and how to avoid the risk of injury The California Safe Drinking Water and Toxic Enforcement Act requires the Governor...

Page 3: ...perly may also cause erratic control system operation on ELECTRONIC CONTROL models This water heater must be connected to a grounded metal permanent wiring system or an equipment grounding conductor m...

Page 4: ...DIAGRAMS Be sure to turn off power when working on or near the electrical system of the water heater Never touch electrical components with wet hands or when standing in water When replacing fuses al...

Page 5: ...ter circuits and includes wiring diagrams Control Circuits The water heater is equipped with an electronic control system The system includes a CCB Central Control Board circuit board an immersion tem...

Page 6: ...C1 C5 C4 C3 C2 C1 N GRN GRN BLK BLK X FMR ECO TEMP 120V BLK BLU RED RED RED RED SDI 24V X FMR PRIMARY FUSES X FMR 120V SEC SEC FUSE PILOT SWITCH BLK BLK JUMPER TO DISPLAY LWCO 5 4 3 2 1 FUSES CNTCTR...

Page 7: ...m Never allow small children to use a hot water tap or draw their own bath water Never leave a child or disabled person unattended in a bathtub or shower The water heater should be located in an area...

Page 8: ...irectly above each button on the LCD screen The function will change depending on what menu is currently displayed or what menu item is selected When no text appears on the LCD screen above an Operati...

Page 9: ...used the fault is corrected Power to the water heater must be cycled off and on to reset the control system Note cycling power will not reset the control system if the condition that caused the fault...

Page 10: ...peration total heating cycle time heating cycle count heating element s cycle count and on time along with UIM and CCB software revisions can be viewed in this menu Current Fault Alert Displays any cu...

Page 11: ...d with 3 heating elements with an Operating Set Point of 120 F and all Differential settings at 2 F the On Off sequencing of heating elements would be as follows ELEMENT NUMBER DIFFERENTIAL SETTING TU...

Page 12: ...eratures is not selected use the Up and Down buttons to select this menu item With the Operating Set Point selected highlighted in black in the Temperatures Menu press the Operational Button underneat...

Page 13: ...ontacts on the external control per all applicable building codes This is a switching circuit only DO NOT apply any external voltage or connect any load IE relay coil to either circuit Element On Disp...

Page 14: ...or not Daily Operating Mode Sun Mon Tue Wed Thu Fri Sat Seven daily sub menus are listed at the bottom of the Economy Mode Setup menu There are 3 Operating Modes in each sub menu Normal Operation All...

Page 15: ...ss the Operational Button underneath CHANGE to activate the adjustment mode for the Setpoint Adjustment value Use the Up Down buttons to change the Setpoint Adjustment to the desired value The Setpoin...

Page 16: ...s to ACCEPT CANCEL when the adjustment mode is activated and how the current setting is outlined rather than highlighted in black Press the Operational Button underneath ACCEPT to enter and confirm th...

Page 17: ...E buttons to enter the Mon sub menu as described above Use the Up Down buttons to select highlight in black the Normal Operation Between setting Press the Operational Button underneath SELECT to chang...

Page 18: ...ternal notification when current tank temperature drops below programmable Alarm SP Fault or Alert Used for external notification whenever a Fault or Alert condition is active Fault Used for notificat...

Page 19: ...menu displays non adjustable operational information The control system records and stores the last 9 Fault and Alert messages in chronological order in this menu The most recent will be at the top o...

Page 20: ...actory Defaults ACTION DISPLAY From the Main Menu use the Up Down buttons to select highlight in black the Restore Factory Defaults menu Press the Operational Button underneath SELECT The Restore Fact...

Page 21: ...e sounds are normal however the tank bottom and elements should be cleaned Refer to MAINTENANCE section of this manual for details 2 Some of the electrical components of the water heater make sounds w...

Page 22: ...A DIVISION OF A O SMITH CORPORATION RENTON WASHINGTON Technical Support 800 527 1953 Parts Department 800 433 2515 www hotwater com...

Reviews: