background image

17

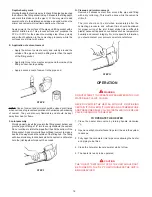
FOR YOUR SAFETY READ BEFORE LIGHTING

TO TURN OFF GAS TO APPLIANCE

OPERATING INSTRUCTIONS

5. This appliance is equipped with a device which

automatically lights the burner.
DO NOT TRY TO LIGHT THE BURNER BY HAND.

6. Wait five (5) minutes           to clear out any gas.

If you then smell gas,                  STOP! Follow "B"
in the safety information above on this label. If you
don't smell gas, go to the next step.

7. Turn on all electrical power to the appliance.

8. Set the ON/OFF switch on the control box to the

"ON" position.

9. Set the thermostat to the desired setting by first

pressing the COOLER 

 and HOTTER 

 buttons

together and holding for 1 second. Then press the
HOTTER 

  button.

10. WATER TEMPERATURE ADJUSTMENT 

 is

approximately 120°F.

CAUTION: Hotter water increases the risk
of scald injury. Consult the instruction
manual before changing temperature.

11. If the appliance will not operate, follow the instructions

"TO TURN OFF GAS TO THE APPLIANCE" and call
your technician or gas supplier.

WARNING: TURN OFF ALL ELECTRIC
POWER BEFORE SERVICING.

WARNING: 

   If you do not follow these instructions exactly, a fire or

explosion may result causing property damage, personal injury or loss
of life.

BEFORE OPERATING: ENTIRE SYSTEM MUST BE FILLED WITH WATER AND AIR PURGED FROM ALL LINES.

A. This appliance does not have a pilot.  It is equipped

with an ignition device which automatically lights the
burner.  Do NOT try to light the burner by hand.

B. BEFORE OPERATING smell all around the

appliance area for gas. Be sure to smell next to the
floor because some gas is heavier than air and will
settle on the floor.

WHAT TO DO IF YOU SMELL GAS:

Do not try to light any appliance.

Do not touch any electric switch;
do not use any phone in your building.

Immediately call your gas supplier from a neighbor’s
phone. Follow the gas supplier’s instructions.

If you cannot reach your gas supplier, call the fire
department.

C. Use only your hand to push in the gas control

buttons. Never use tools. If the control buttons will
not push in, don’t try to repair them, call a qualified
service technician. Force or attempted repair may
result in a fire or explosion.

D. Do not use this appliance if any part has been

under water. Immediately contact a qualified
installer or service agency to replace a flooded
water heater. Do not attempt to repair the unit. It
must be replaced!

1.

STOP! Read the safety information above

on this label.

2. Set the ON/OFF switch on the control box to the

"ON" position.

3. Set the thermostat to the lowest setting by first

pressing the COOLER 

 and HOTTER 

 buttons

together and holding for 1 second. Then press the
COOLER 

 button until the warm indicator light

appears.

4. Set the ON/OFF switch on the control box to the

"OFF" position.

1. Set the thermostat to the lowest setting by first

pressing the COOLER 

  and HOTTER 

buttons together and holding for 1 second. Then
press the COOLER 

  button until the warm

indicator light appears.

2. Set the ON/OFF switch on the control box to the

"OFF" position.

3. Turn off all electrical power to the appliance if service

is to be performed.

Summary of Contents for BTX-80

Page 1: ...TAINS INFORMATION RELATIVE TO YOUR SAFETY PLEASE READ THOROUGHLY BEFORE INSTALLING AND USING THIS APPLIANCE MODEL BTX 80 COMMERCIAL GAS WATER HEATER Glass Lined Tank Type Water Heater GET TO KNOW YOUR...

Page 2: ...0 50 189 Nat 4 00 0 99 120 60 5 All models Maximum Supply Pressure 14 inches W C 3 48kPa Minimum Supply Pressure Natural Gas 5 0 inches W C 1 24kPa Minimum Pressure must be maintained under both load...

Page 3: ...of part numbers and descriptions Standard hardware items may be purchased locally A VENT PIPE B ANODE C HOT WATER OUTLET D OUTLET 120 VAC F GAS SUPPLY G MAIN MANUAL GAS SHUT OFF VALVE H GROUND JOINT...

Page 4: ...suspected do not attempt to find the cause yourself Go to a neighbor s house leaving your doors open to ventilate the house then call your gas supplier or service agent Keep area clear until a servic...

Page 5: ...arance of 24 should be allowed for blower assembly service Adequate clearance for servicing this appliance should be considered before installation such as changing the anodes etc Minimum clearances f...

Page 6: ...or component s previously used with a non potable water heating appliance 4 When the system requires water for space heating at temperatures higher than required for domestic water purposes a temperi...

Page 7: ...er heater With main burner in operation paint pipe joints including flanges and control inlet and outlet with rich soap and water solution Bubbles indicate gas leak To stop leak tighten flange screws...

Page 8: ...pling or other restriction and must terminate near a suitable drain to prevent water damage during valve operation The discharge line shall be installed in a manner to allow complete drainage of both...

Page 9: ...ng PVC Materials should useASTM D 2564 Grade Cement CPVC Materials should use ASTM F 493 Grade Cement and ABS Materials should use ASTM D 2235 Grade Cement If the water heater is being installed as a...

Page 10: ...lued into the end of the elbow that will mount on the discharge boot INSTALLATION OF VENT SYSTEM Before beginning installation of piping system thoroughly read the section of this manual VENT PIPE PRE...

Page 11: ...AUTION LABEL ALL WIRES PRIOR TO DISCONNECTION WHEN SERVICING CONTROLS WIRING ERRORS CAN CAUSE IMPROPER AND DANGEROUS OPERATION VERIFY PROPER OPERATION AFTER SERVICING POWER VENT WIRING SCHEMATIC FIGUR...

Page 12: ...ION INSTALLATION OF VERTICAL VENT SYSTEM A proper flashing or BOOT should be used to seal the pipe where it exits the roof The total vent system should not exceed the equivalent feet of pipe as listed...

Page 13: ...ir tight to prevent any combustion gases escaping into the room If the plug is not securely tightened remove and reinstall using Teflon tape on the threads Once installed along with the rest of the ve...

Page 14: ...leaks will allow flue gas by products to disseminate into the room creating an unsafe environment and could cause illness asphyxiation and or even death FIGURE 12 Typical Installation for Vertical Ven...

Page 15: ...0 pipe Never use all purpose cements commercial glues and adhesives or ABS cement to join PVC or CPVC pipe and fittings SAFETY PRECAUTION PRIMERS AND CEMENTS ARE EXTREMELY FLAMMABLE AND MUST NOT BE ST...

Page 16: ...after it has hit the bottom of the fitting socket A good joint will have sufficient cement to make a bead all the way around the outside of the fitting hub The fitting will have a tendency to slide b...

Page 17: ...PERATING smell all around the appliance area for gas Be sure to smell next to the floor because some gas is heavier than air and will settle on the floor WHAT TO DO IF YOU SMELL GAS Do not try to ligh...

Page 18: ...E ACCESS It is recommended that lower water temperatures be used to avoid the risk of scalding It is further recommended in all cases that the water temperature be set for the lowest temperature which...

Page 19: ...k in operating condition SERVICE SHOULD BE PERFORMED ONLY BY A QUALIFIED SERVICE TECHNICIAN READ THE GENERAL SAFETY INFORMATION SECTION FIRST USERS OF THIS APPLIANCE SHOULD BE AWARE THAT GAS COMPONENT...

Page 20: ...r writing to us at A O Smith Water Products Company Service Department 500 Tennessee Waltz Parkway Ashland City TN 37015 1299 or going to our website at www hotwater com Please click on Contact us the...

Page 21: ...afety water heater service should be performed only by a qualified service technician Read the GENERAL SAFETY INFORMATION section first WARNING DO NOT BY PASS ANY CONTROLS TO MAKE HEATER OPERATE OPERA...

Page 22: ...cuit 1 Turn power to the water heater off for 10 seconds and then back on 2 Replace gas control valve Problem with the internal circuit 1 Turn power to the water heater off for 10 seconds and then bac...

Page 23: ...nless an effective method of controlling thermal expansion is also installed at the heater s and operational at all times The relief valve installed on the heater is not an acceptable method 4 SERVICE...

Page 24: ...24...

Reviews: