5Gstore EZ-62B Setup Manual Download Page 3


3. Via   the   mobile   app    -   select    

Add   Device    

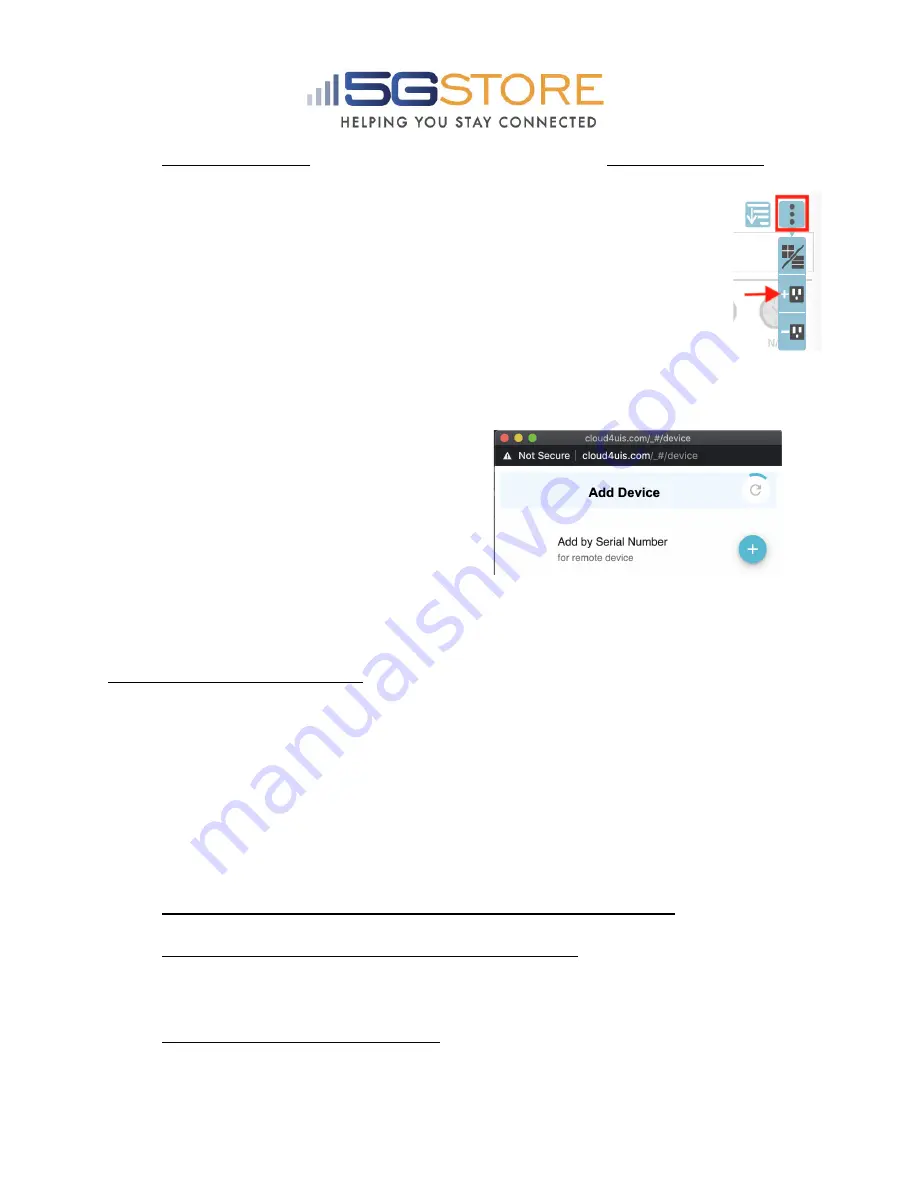
at   the   top   right;    Via   Cloud4UIS.com    -  

select   the    

3   vertical   dots   button  

  at   the   top,   then   the    

+Outlet   button 


a. If   you   are   connected   to   the   same   LAN   as   the   EZ-62B,   the  

cloud   will   automatically   detect   it   by   its   local   IP   address   and  
display   its   serial   number.   Click   the    

+  

  button   to   the   right   of   this  

to   continue  

b. If   you   are   on   location,   but   connected   to   a   different   LAN   than  

the   EZ-62B,   click   the    

+  

  button   next   to    

Add   by   Serial   Number 


to   continue.   The   next   screen   will   prompt   you   to    

unplug   the  

Ethernet   LAN   cable   from   EZ-62B   for   1   second   and   plug   it   back   in 

.  

This   will   enable    

Add   Mode    

(LEDs   will   flash   one   after   another)  

4. The   next   screen   will   prompt   you   to  

enter   the   Device’s   ID   (found   on   the  
bottom   of   your   EZ-62B).   Click    

Next  

5. You   should   now   see  

  Completion 

,  

which   indicates   your   device   has   been  
added.  

6. Click    

Done    

and   you   will   be   taken   back  

to   the   Device   List   page.  

7. You   may   now   click   on   your   EZ-62B   from   here   to   configure   settings 


Configuring   your   EZ-62B:  

This   can   be   done   3   different   ways:  

Section   1 

:   ezDevice   mobile   application  

Section   2 

:   Cloud4UIS   website   (i.e.   Cloud   Account)  

Section   3 

:   Local   web   administration   page   (must   be   connected   through   a   computer   on  

the   same   router   as   the   EZ-62B)  


NOTES:  


Saving   a   copy   OR   restoring   a   copy   of   your   configuration   settings    can   only   be  
done   via   the   Local   Web   Administration   page  

Each   EZ-62B   can   only   be   added   to   an   account   once .   If   you   need   to   change   that,  
you   will   need   to   remove   the   device   from   your   account   first   and   then   another   user  
will   be   able   to   add   -   OR   -   use   the    Share    feature   to   allow   other   users   to   manage  
the   device  

The   1st   user   who   adds   the   EZ-62B    to   their   account   becomes   the   device   ‘owner’  

Summary of Contents for EZ-62B

Page 1: ...ple devices from the same Cloud4UIS account including EZ 22B UIS 522B and UIS 622B Device owner can share device s with other Cloud4UIS users OR transfer device ownership to other Cloud4UIS users Add device via the serial number when not connected to the same LAN Locating your Device ID Serial Number Both the Device ID and Serial Number can be found on the bottom of your EZ 62B LED Indicators LED ...

Page 2: ...and reset the outlet upon loss of connection If you wish to monitor the connection of your EZ 62B remotely and or would like to reconfigure the settings including manual control for a LAN device proceed to the Cloud4UIS cloud service setup Adding EZ 62B to Cloud Service With an Internet connection the EZ 62B can be controlled at any time from anywhere in the world using the website Cloud4UIS com a...

Page 3: ...our EZ 62B Click Next 5 You should now see Completion which indicates your device has been added 6 Click Done and you will be taken back to the Device List page 7 You may now click on your EZ 62B from here to configure settings Configuring your EZ 62B This can be done 3 different ways Section 1 ezDevice mobile application Section 2 Cloud4UIS website i e Cloud Account Section 3 Local web administra...

Page 4: ...onfiguration Menu 1 Network a Name applies to Hostname below Name for your EZ 62B b DHCP Enabled by default When disabled you can enter a manual IP Address Mask subnet and Gateway If using the DHCP address we recommend you also set a DHCP reservation on your router When setting a manual address we recommend using something outside the DHCP range of your router c DNS Mode Enabled by default When Di...

Page 5: ...e the EZ 62B will take after a reset is triggered before the outlet is powered back on Default is 3 seconds d No of Resets This is the number of times the outlet will automatically reset when a time out is detected Configurable from 1x 10x or infinite i Example with 5x If connectivity is not restored after the 5th reset the outlet will stop resetting after this 5th attempt The EZ 62B will sit idle...

Page 6: ...lace 4 Ping Address a Ping Site If desired enter a specific web address OR a local device s IP address b Mode Select between Ping or HTTP Ping is default setting 5 Time a Time Server The server used to verify the time Default is pool ntp org b Update Interval How frequently the system verifies the time Default is 1 day c Time Zone Select your zone d DST Enable or Disable Daylight Saving Time You w...

Page 7: ...right when complete Cloud Configuration Menu 1 Network a Name Change the name of your EZ 62B b DHCP Enabled by default Shown disabled here When disabled you can use the IP it obtains via DHCP or enter something else If using the DHCP address we recommend you also set a DHCP reservation on your router When setting a static address we recommend using something outside the DHCP range of your router c...

Page 8: ...le from 1x 10x or infinite i Example with 5x If connectivity is not restored after the 5th reset the outlet will stop resetting after this 5th attempt The EZ 62B will sit idly until the connection is restored Default is 1x e Reset Only This setting disables the Turn OFF button This is recommended when plugging a modem or router into the outlet f Ping Interval Set interval after a successful ping t...

Page 9: ...ate the IP address of your EZ 62B using the following a For Windows Download the Windows Utility program at https 3gstore com ipswitchupdates b For Mac Download LanScan at https itunes apple com us app lanscan id472226235 mt 12 3 Click Lan your Scan to find IP addresses on your network Locate the one with vendor listed as Mega System Technologies 4 Open a web browser and enter the IP address liste...

Page 10: ...efault When turned OFF you can use the IP it obtains via DHCP or enter something else If using the DHCP address we recommend you also set a DHCP reservation on your router When setting a static address we recommend using something outside the DHCP range of your router d DNS Mode Set to Auto Acquire by default If setting the DHCP to OFF you MUST also manually fill in DNS Servers Otherwise with DHCP...

Page 11: ...ill wait 5 minutes once the website IP address cannot be pinged After it resets power to the outlet it will wait another 5 minutes before pinging the website IP address c Power On Delay This is the time the EZ 62B will take after a reset is triggered before the outlet is powered back on e g Reset is triggered outlet turns off 3 seconds later outlet is turned back on Default is 3 seconds d No of Re...

Page 12: ...he outlet f Time between pings Set interval after a successful ping to 5 15 30 or 60 seconds If connection times out the ping interval is fixed at 5 seconds by default g Cloud Allows EZ 62B to be added to the Cloud Service Set to Enable by default h Username For logging into the WebUI admin is the Default i Password Confirm Password This is the admin password for log in Password is the last 6 char...

Page 13: ... a later time you must set one schedule to turn it OFF and another to turn it back ON Otherwise use the Reset action a Select the day s you want the action to take place b Set the Hour and Minute you want the action to occur This is done in 24 hour format c Select the outlet action ON OFF RESET ...

Page 14: ...ific web address OR a local device s IP address 7 Time Set the proper Time Zone based on your location and adjust the Time between updates Time Server and or apply Daylight Saving Time if needed 8 Save Restore This is where the user can manually restart the Switch reset settings to factory default save their current settings and restore settings from a previously saved file ...

Page 15: ...will need to manually enter the Device s IP address a Write down device LAN IP for recovery a All settings will reset to default Go to device s LAN interface to save settings b Device will reboot after upgrade c Red light flashes while loading upgrading then goes solid before the sequence below occurs d LED sequence during firmware update Internet Auto Reset LEDs will blink e Device clicks and reb...

Reviews: