background image

OPERATION

•  When operating the unit, be sure to be in a safe location off the road 

  and away from traffic.

•  Unpack the unit and inspect for damage. Completely unwrap the  

  power cord.

•  Make sure that vehicle engine is running and place the unit on a dry  

  level surface.

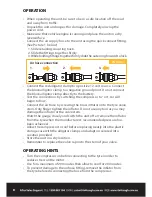
•  Connect the air supply hose to the unit using the quick connect fitting.

  (See Picture 1. below)

    1. Slide retaining snap ring back.

    2. Slide the fittings together firmly.

     3. While holding fittings together firmly slide the outer ring forward to lock.

•  Connect the red alligator clamp to a positive 12 volt source. Connect  

  the black alligator clamp to a negative ground point. Do not connect  

  the black alligator clamp directly to the battery.

•  Test the connections by switching the compressor to “on”. Air will  

  begin to flow.

•  Connect the air hose by screwing the brass inflator onto the tyre valve  

  stem. Only finger tighten the inflator. Do not use any tool as you may  

  damage the inflator or the valve stem.

•  Watch the gauge closely and switch the unit off or remove the inflator  

  from the tyre when the manufacturer’s recommended pressure has  

  been achieved. 

•  Allow the compressor to cool before replacing neatly into the plastic  

  storage case with the alligator clamps and adaptors secured into  

  cavaties provided. 

•  Store the unit in a dry location.

•  Remember to replace the valve cap onto the stem of your valve.

Air hose connection

1.

2.

3.

Picture 1.

OPERATING HINTS

•  Turn the compressor on before connecting to the tyre in order to  

  reduce stress on the motor.

•  Use for a maximum of 20 minutes then allow to cool for 20 minutes.

•  To prevent damage to the air hose fitting, remove the inflator from  

  the tyre before disconnecting the hose from the compressor.

8

Summary of Contents for 150L

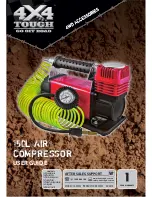
Page 1: ...RRANTY AFTER SALES SUPPORT MODEL 15 39553 PRODUCT CODE 39553 08 2015 W 2 AUS 1300 883 104 1xAircompressor 1xInflationline 1xPlasticstoragecase 1xTyredeflator 1xPackofadaptornozzles 1xUserguide 1xWarrantycard www 4x4tough com au sales 4x4tough com au ...

Page 2: ...FEATURES 5 OPERATING WARNING 6 WARNING 6 BEFORE FIRST USE 7 OVERHEATING PROTECTION CIRCUIT 7 HARD MOUNTING 7 OPERATION 8 OPERATING HINTS 8 TROUBLESHOOTING 9 MAINTENANCE AND CLEANING 9 CAUTION 9 SPECIFICATIONS 9 TYRE DEFLATOR INSTRUCTIONS 10 NOTES 11 CONTENTS ...

Page 3: ...t the consumer has under the Competition and Consumer Act 2010 and similar state and territory laws Our goods come with guarantees that cannot be excluded under the Australian Consumer Law You are entitled to a replacement or refund for a major failure and for compensation for any other reasonably foreseeable loss or damage You are also entitled to have the goods repaired or replaced if the goods ...

Page 4: ... to sending the product for repair Youshouldalsobeawarethatratherthanrepairinggoods wemayreplacethemwith refurbishedgoodsofthesametypeoruserefurbishedpartsintherepairprocess Please be assured though refurbished parts or replacements are only used where they meet ALDI s stringent quality specifications If at any time you feel your repair is being handled unsatisfactorily you may escalate your compl...

Page 5: ...ATURES Vented carry handle 12 Volt motor Air filter cap Fibre washer Filter Machine tooled carbon steel cylinder Self cooling aluminium cylinder head Precision balanced high compression piston Sand tray 5 ...

Page 6: ...hot during operation Allow to cool before storing RISK OF BURSTING Use only accessories rated for 90psi Always follow tyre manufacturer s recommended inflation instructions In most cases they can be located on the side wall of the tyre If you are unsure contact the manufacturer DO NOT MODIFY Never drill modify or attempt to repair the unit There are no user serviceable parts inside SAFE HANDLING N...

Page 7: ...t and need to resume inflation remove the inflator tip from the tyre valve start the unit and reattach with the unit running Allow the compressor to cool and place neatly in the carry bag with the clips securely fastened to the loops on the carry bag To prevent damage to the unit during storage repack in the original colour box Store the unit in a dry location Remember to replace the valve cover o...

Page 8: ... will begin to flow Connect the air hose by screwing the brass inflator onto the tyre valve stem Only finger tighten the inflator Do not use any tool as you may damage the inflator or the valve stem Watch the gauge closely and switch the unit off or remove the inflator from the tyre when the manufacturer s recommended pressure has been achieved Allow the compressor to cool before replacing neatly ...

Page 9: ...TION 1 Check the battery condition Low voltage can trip the circuit breaker or trigger the protection feature 2 Check the circuit breaker reset if necessary 3 The unit is equipped with an automatic protection device In the event the unit reaches an unsafe operating temperature a protection circuit will cut power to prevent damage to the unit If the protection circuit activates immediately disconne...

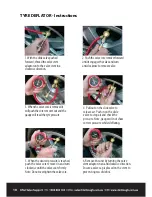
Page 10: ... firmly Note Donotovertightenthevalvecore 1 Withtheslidevalvepushed forward threadthevalvestem adaptorontothevalvestemina clockwisedirection 2 Pushthevalvecoreremoverforward untilitengagesthevalveandturn anti clockwisetoremovevalve 4 Pull out on the slide valve to release air Push in on the slide valve to stop air and check the pressure Note gauge will not show correct pressure whilst deflating 3 ...

Page 11: ...NOTES 11 ...

Page 12: ...12 4x4 TOUGH GO OFF ROAD is a trademark of Natural Product Solutions Pty Ltd Unit 3 60 Box Road Taren Point NSW 222 9 Phone 1300 883104 www 4x4tough com au sales 4x4tough com au ...

Reviews: