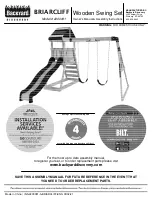
"WARNING: ONLY FOR DOMESTIC OUTDOOR USE
To guarantee safety. Please give special attention to the
assembly, safety, and care instructions detailed
in this document."
"Warning: The anchors must be placed under the
ground in order to reduce tipping hazards"
"Warning: Maximum
fall heights is 170 cm
Warning: Not suitable for children under 36 months"
I
NSTALLATION INSTRUCTIONS
Keep for future reference.
Warning: Outdoor domestic use only
INSTALLATION INSTRUCTIONS
Please follow the assembly instructions exactly as
given
1) This product must be assembled by an adult.
2) Keep a copy of the installation manual for future
reference.
3)This can be especially useful for identifying parts if
required there is an after-sales service.
4) EN 71-8, chapter 4.6 requires a minimum distance of
5)40 cm between the ground and a two-person swing and
a minimum swing 35 cm distance between the ground
and the swings. These distances are important for safe use.
After assembling the playground, check these distances. In
the event of non-compliance, do not hesitate to contact
our after-sales service.
4) We recommend that the swing set is not facing towards
the sun.
5) Before you start, check that any parts are not missing, if
any it turns out that some part is missing, please contact
our department after-sales service.
6) Please dispose of the packaging carefully.
7) Do not let children play with the packaging.
SA
F
ETY INSTRUCTIONS
1)
This product must not be used by children under 36
months life. It is only suitable for children aged 3 to 14 o
maximum weight 50 kg. It may only be used under
supervision an adult.
2)
As this product contains small parts that could be
swallowed, keep them away from children under 36
months.
3)
This product is intended for private use only in home and
may not be used in parks and public gardens, in schools,
campsites, hotels, public places leisure, etc.
4)
The swing set should be placed on a flat surface within 2
meters of all other structures or obstacle (walls, fences,
trees, washing lines or electric cables, etc.) which could
injure you.
5) This product should not be placed on a hard surface such
as such as concrete, asphalt or other similar hard surfaces.
We recommend mounting on grass or other soft surfaces.
6)
This swing set must be firmly attached to the ground. IN
to do so, follow the instructions. The product you need only
use when the fixing concrete is dry.
7) Anchorage must be checked regularly, including the hooks
and the fixings.
8) Please dispose of the packaging carefully.
9) Do not let children play with the packaging.
to avoid
swallowing small accessories by the child.
FIXING TO THE SUBSTRATE
1) Assemble the swing set and place it in the desired place.
2) Locate and mark the position of the sealing legs.
3) Check the dimensions in the drawing and correct if
necessary.
4) Mark a square with dimensions of 350x350 mm under the
four legs and dig a hole 350 mm deep.
5) These holes should be filled with concrete in accordance
with the rectangle diagram, the top of the concrete should not
exceed the ground level.
6)
Place the feet in the concrete in the designated place (see
point 2). Make sure the drilled end of the legs is above the level
concrete.
7)
After embedding the concrete, screw the feet into the legs.
8)
Before using the swing, make sure that the concrete is
completely dry.
9)
Cover the concrete with earth, we strongly recommend
periodic use
checking the anchorage.
MAINTENANCE
1) The surfaces of all parts should be checked at least
once a month, especially for devices such as hooks on
overhead beam, if devices and hooks show 10% wear in
to the original thickness, then they should be replaced with such
the same devices as those delivered in the original version.
2) Check all nuts and bolts for tightness and tighten as needed.
3) Check all covers for screws and sharp edges and replace if
necessary.
4
) Toys can fold or be dangerous if not done regularly checked.
5
) All parts with constant friction should be lubricated
suitable lubricant.
6
) The substrate on which the product is placed should be
inspected regularly.
7
) All items, such as stones or other items, that could cause
injury in the event of a fall should be removed. It is
recommended to hide the device in winter, when not in use, to
avoid deterioration due to bad weather conditions.
8
) If the customer makes any changes to toy, should be made in
accordance with the manufacturer's instructions.
9
) Rust areas and piping parts should be sand blasted and
where the need to repaint lead-free.
1
0
) Check the swing seats, chains, ropes and other fastenings for
signs of wear.
SA
F
ETY
1) Security checks should only be carried out in for this product.
These checks should include, as appropriate necessary, remove
sharp edges, replace missing screw co
v
ers and tightening of nuts
and bolts. These checks should be carried out in order to avoid
danger or kit breakage swing as a result of normal wear and tear.
2) The swing set must be used under adult super
v
ision. Keep any
additional items they may ha
v
e useful for subse
f
uent
maintenance or ser
v
ice.
3) While the child is playing with the d
ef
ice, other children should
not run in the area of movement of the elements so that they are
not hit.
ATTENTION! DANGER O
F
F
ALL!