Pg. 4
www.3xlogic.com | 877 3xLOGIC | [email protected]
Quick Start-
Adding a Camera to VIGIL Server
vi.
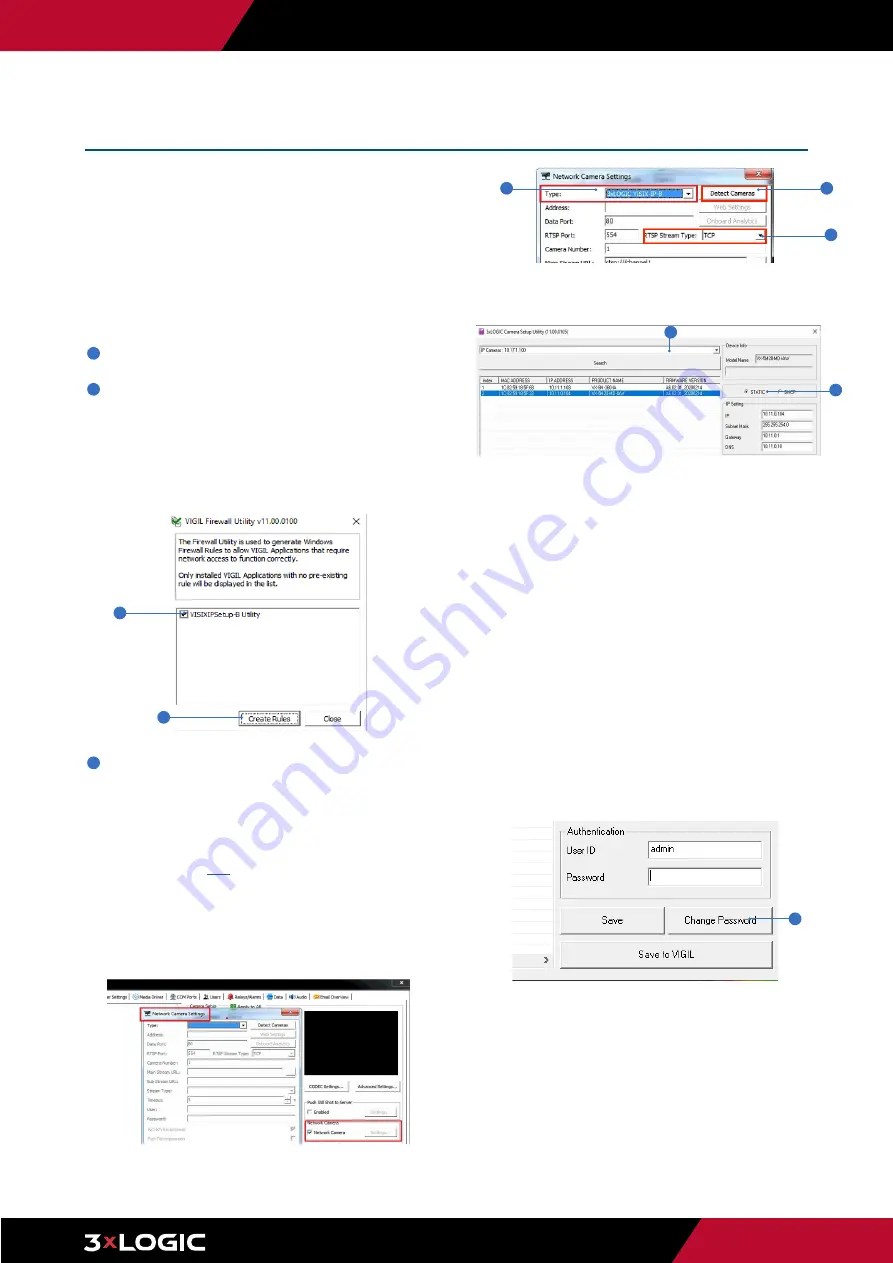
For VIGIL 11 series systems, click the Detect Cameras button to start the
3xLOGIC Camera Setup Utility-B. For Pre 11 systems, launch the utility
from Start>Program Files> VIGIL > VISIXIPUtility-B.exe.
vii. When the utility deploys, select the desired network adapter (i.e IP
Cameras in the above example) from the available drop-down menu and
click Search. A list of detected cameras will be displayed. The utility will
list IP and product info for each device. Select a camera from the list to
edit camera settings.
viii. The default IP mode for GEN IIII VISIX models is DHCP. If necessary,
choose STATIC to edit the camera's IP, gateway, and DNS. Click Save
(located bottom right of utility) after making any IP settings changes.
ix.
Before proceeding further, the camera’s administrative password must
be changed from its default to ensure your camera’s data is secure.
VIGIL Server cannot stream video from the camera if the password is not
changed. This is to ensure best security practices. Password setup can be
performed from the utility or in the camera’s browser UI. Choose one of
the following options:
WARNING:
*IMPORTANT*
VIGIL Server cannot stream video from the camera
if the admin password is not changed. This is to ensure best security practices.
Always change default device credentials.
a.
To change the password in the utility, select the camera,
enter in the default login credentials of admin/admin in the
Authentication section, click the Change Password button and
follow the on-screen prompts. When finished, skip to Step 10 of
this section.
b.
To change the password from the browser, see instructions in
"Browser Interface - Main Screen (Change Password)" section of
this guide.
x.
The process for finalizing the addition of a camera to Server varies
between v11 systems and pre-v11 systems. See 'a' below for instructions
on v11 series and newer systems. See 'b' below for instructions on saving
the camera to pre-v11 series VIGIL Servers.
Please follow the steps below to identify a
camera on your network and add the camera
to VIGIL Server. Please be certain to install
the latest available firmware for your camera
from https://www.3xlogic.com/resource/
software-download-center. Instructions on
firmware installation are available in section
"Setup - System Setup - Firmware Update".
1
Connect the IP Camera and PC to the configured network.
2
Before adding a camera to VIGIL Server, a firewall rule
must be created for new camera detection utility. This can
be easily performed using the VIGIL Firewall Utility:
i.
Open the Windows Start menu and navigate to Programs>VIGIL>Utilities
>Firewall Utility.
ii.
After the firewall utility launches, check the box for VSXIPSetup-B Utility.
iii. Click Create Rule(s).
iv. A firewall rule for the utility will be created.
3
Adding the Camera to VIGIL Server -After creating the
appropriate firewall rule, the camera can now be added to
VIGIL Server. To begin:
i.
Update the system to VIGIL Server v11.00.0100 or newer. If updating
to v11 series is not possible, alternative details are provided in the
applicable steps below.
ii.
Download the latest version of the 3xLOGIC Camera Detection Utility-B
(VISIXIPUtility-b.exe)
here
and install in on the VIGIL Server system.
Confirm a firewall rule for the utility has been created, as instructed in
the previous section.
iii. Launch VIGIL Server, open settings (right-click Server tray icon, click
Advanced Settings, login and the Camera Setup tab opens by default),
select an available camera channel from the available list and open the
Network Camera Settings form.
iv.
For v11 series systems, select 3xLOGIC VISIX-IP-B in the Type drop-down.
For pre-v11 series systems, select RTSP in the Type drop-down.
v.
Set the RTSP Stream Type as TCP
ii
i
a
vii
viii
vi
iv
v


