background image

Chapter 4. Day-to-Day Use of the 3ware Sidecar

34

3ware Sidecar Kit with the 9650SE-4LPME: Installation Guide

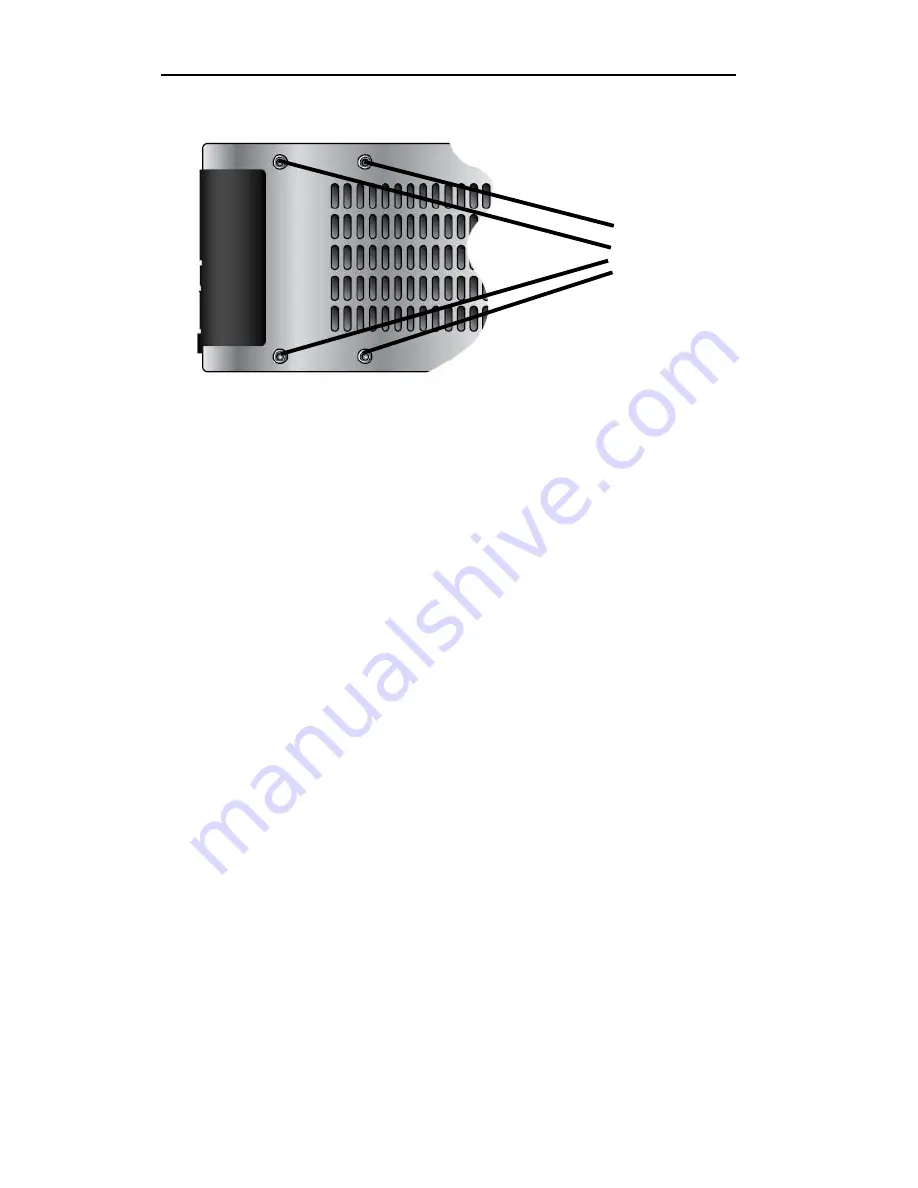
Figure 14.   Remove mounting screws

7

Replace the existing drive with the new drive. 

8

Mount the new drive using the screws you just removed. 

9

Replace the tray in the 3ware Sidecar enclosure. (For more 
details, see Figure 8 on page 18.)

10

In 3DM2, on the 

Maintenance

 page, click 

Rescan

.

11

If the unit is degraded, you can start a rebuild with this drive. 
For more information, see the online Help for 3DM2 or the 
User Guide.

Remove four 

(4) flat-head 

mounting 

screws

Summary of Contents for 9650SE-4LPME

Page 1: ...3ware Sidecar Kit with the 9650SE 4LPME Desktop Storage Solution for FreeBSD Linux and Microsoft Windows PN 720 0165 00 March 2007 Installation Guide ...

Page 2: ...torSwitch and R5 Fusion are all trademarks of AMCC PowerPC and the PowerPC logo are trademarks of International Business Machines Corporation Linux is a registered trademark of Linus Torvalds in the United States other countries or both Windows is a registered trademark of Microsoft Corporation in the United States and other countries Firefox is a registered trademark of the Mozilla Foundation PCI...

Page 3: ...Step 5 Create Units Using 3ware BIOS Manager 3BM 20 Step 6 Install the 3ware Driver and Software 21 Chapter 3 First Time RAID Configuration Using 3DM 2 23 Starting 3DM 2 and Logging In 24 Creating a Unit 26 Partitioning Formatting and Mounting Units 28 Specifying a Hot Spare 31 Chapter 4 Day to Day Use of the 3ware Sidecar 32 Turning On Your Sidecar 32 Unmounting a Unit on Your System 32 Replacing...

Page 4: ...the User Guide and the CLI Guide Online help is also available when you are using 3DM 2 3ware Disk Manager Additional support information is available in the 3ware Knowledgebase at this website http www 3ware com KB Chapter Description 1 Getting Started Overview of the 3ware Sidecar Kit and important safety factors to keep in mind during installation 2 Setting Up Your 3ware Sidecar How to install ...

Page 5: ... RAID 5 disk accesses to maximize application performance under heavy loads StorSave Battery Backup Unit BBU with write journaling to optimize data protection and performance BBU must be purchased seperately Status indication LEDs on the 3ware Sidecar Contents of the 3ware Sidecar Kit 3ware 9650SE 4LPME RAID controller 3ware Sidecar 4 drive enclosure RDE 400 XSATA This document 3ware Sidecar Kit w...

Page 6: ...standards Drives may be of any capacity or physical form factor A list of tested drives is available at http www 3ware com products sys_compatibility asp Note Shielded and unshielded interface cables for Serial ATA controllers may not exceed 1M 39 in length Operating System Requirements Windows 2000 Windows XP Windows Server 2003 both 32 bit and 64 bit x86 Red Hat Linux 32 bit and 64 bit x86 SuSE ...

Page 7: ...Netscape 7 and later In addition JavaScript must be enabled Cookies must be enabled For best viewing screen resolution should be 1024 x 768 or greater with 16 bit color or greater Note The 9650SE 4LPME can also be used in an Apple Mac Pro or Power Mac G5 with PCI Express running Mac OS X 10 4 6 or later Information about installation in these Apple systems is provided in a separate document availa...

Page 8: ...2 3ware Sidecar Enclosure Note The Alarm Reset feature is not implemented in the 3ware Sidecar 1 0 release Multi lane SATA Connector Heat Sink Chassis Control Connector PCI Express Connector Slots for battery holder BBU connector and hole for post Multi lane SATA Connector Chassis Control Connector Fan Drive Trays Alarm Reset 3 2 1 0 Port Drive Front View Rear View For Power Cable On Off Switch ...

Page 9: ... Chassis Control Cable connects the 3ware RAID controller to the 3ware Sidecar to provide drive status information Important You should only use AMCC 3ware certified cables with your 3ware RAID controller Using an incorrect cable can result in drives that are not detected The appropriate cables are included in your 3ware Sidecar kit If you must replace a cable see the list of available cables and ...

Page 10: ...uct certifications and approvals Use only the described regulated components specified in this guide Use of other products components will void the regulatory approvals of the product and may result in noncompliance with product regulations in the region s in which the product is sold Renseignements relatifs à la sécurité Ces renseignements s appliquent à la carte de contrôleur modèle 9650SE 4LPME...

Page 11: ...tilated and away from sources of heat including direct sunlight and radiators Away from sources of vibration or physical shock Isolated from strong electromagnetic fields produced by electrical devices In regions that are susceptible to electrical storms we recommend you plug your system into a surge suppressor or UPS uninterruptible power supply During an electrical storm we recommend disconnecti...

Page 12: ...pas ouvrir Avant d utiliser un système équipé d un commutateur Standby Off pause arrêt coupez l alimentation en plaçant le commutateur sur la position Standby et débranchez le cordon d alimentation Power Supply Disconnection Warning Warning Before working on a chassis or working near power supplies unplug the power cord on AC units disconnect the power at the circuit breaker on DC units Warnung Vo...

Page 13: ...isques d électrocution mettez le serveur hors tension et avant d ouvrir l ordinateur déconnectez le câble d alimentation les systèmes de télécommunication le réseau et les modems qui lui sont connectés Power Cord Warnings for the 3ware Sidecar An AC power cord was supplied with your product This is the only power cord recommended for use with this product Contact the manufacturer for a replacement...

Page 14: ...fin d éviter tout risque d électrocution ou d incendie vérifiez que le s câble s d alimentation utilisé s avec le produit respecte nt les consignes suivantes N essayez pas de modifier ou d utiliser le câble c a s il n est pas exactement le type recommandé pour s adapter aux prises avec borne de terre Le ou les câbles d alimentation sont les sectionneurs principaux de l alimentation c a Les extrémi...

Page 15: ...rdware in this package or removing the protective covers of any computer equipment turn off power switches and disconnect power cords Do not reconnect the power cords until the hardware is installed and the system cover is closed Caution Avoid contact with the heat sink on the 3ware RAID controller if your computer is on as the heat sink will be very hot The heat sink will be safe to touch after t...

Page 16: ...er from its protective bag until you are properly grounded Handle the 3ware RAID controller by its edges or by the black rail and metal bracket at its two ends Do not touch any pin contact lead or component on the 3ware RAID controller Things to Watch Out For During Installation Be careful when installing the 3ware RAID controller into your system Excessive force can damage the board or your syste...

Page 17: ...red spinup and you want to use it set the PM2 power management jumper on the disk drives to enable it Check the documentation for your disk drives to see whether this is required For more how to implement staggered spinup in the 3ware software see the 3ware Serial ATA RAID Controller User Guide 4 SATA 2 hard drives are sometimes shipped from the manufacturer with the transfer rate set to 1 5Gbps I...

Page 18: ... for the slot Save this screw it will be used to secure the 3ware RAID controller after you have seated it in the slot Warning Make sure you select a PCI Express slot not a PCI or PCI X slot Inserting a 9650SE into a PCI or PCI X slot could potentially damage the board or system and void the warranty of either the 9650SE or the motherboard If you are uncertain about which slot to use see the docum...

Page 19: ... fully seated Figure 4 Inserting Controller Into PCI Express Slot 8 Check that the 3ware RAID controller s metal bracket covers the hole in the case and secure the bracket with the screw that was used to secure the filler bracket in step 5 When you tighten the screw on the bracket to the enclosure make sure the card is not slanted in any direction otherwise the card will not work properly 9 Close ...

Page 20: ...irst drive tray in which you will install a drive Figure 5 Drive tray handle unlatched 2 Slide the drive tray out to remove it 3 Set the drive face down on a static free surface 4 Place the drive tray on top of the drive aligning the screw holes The edge of the drive that has the SATA connectors will be at the end of the tray that does not have the latch Be sure to align the screw holes ...

Page 21: ...he 3ware Sidecar www 3ware com 17 5 Mount the drive using 4 of the screws provided Figure 6 Mounting screws connect drive tray to drive Figure 7 Upside down view of the drive installed in tray Insert four 4 flat head mounting screws ...

Page 22: ... arm to latch it Figure 8 Sliding drive tray back into the 3ware Sidecar 7 Repeat steps 1 through 6 for the remaining drives Note Make sure to insert the tray with the drive facing down the latch to the right of the 3ware Sidecar and the LEDs to the left You will know the tray is inserted correctly because it will latch securely If you insert the tray with the drive facing up it will not latch sec...

Page 23: ...t the other end to the port on the 3ware Sidecar 2 Connect the Chassis Control cable On the back of your computer connect one end of the Chassis Control cable to the round port on the RAID controller Connect the other end to the port on the 3ware Sidecar The ends of the cable are keyed to help insure correct insertion Figure 9 Cables Connected to the Controller in the computer and to the 3ware Sid...

Page 24: ...e 3ware BIOS Manager 3BM Details about doing this are provided in the 3ware Serial ATA RAID Controller User Guide in the chapter First Time RAID Configuration Using 3BM The user guide is available on the 3ware CD that came with your 3ware Sidecar Kit If your operating system is already installed on a different drive in your system you do not have to configure the RAID unit yet Instead proceed to S...

Page 25: ... to the 3ware Serial ATA RAID Controller User Guide and follow the instructions in Chapter 4 Driver Installation to install the driver for your 3ware RAID controller A PDF of the user guide is available on the 3ware CD ROM or from the 3ware website http 3ware com support userdocs asp Your 3ware RAID controller card requires different drivers for Windows Linux and FreeBSD all of which are included ...

Page 26: ...ny of the options on the screens complete information is included in the Appendix Software Installation in the User Guide All of the options can be set or changed later through preferences in 3DM 2 5 When installation is complete launch 3DM and turn to the instructions in the next chapter If you prefer to use the CLI you will find information about using it in the 3ware Serial ATA RAID Controller ...

Page 27: ...troller User Guide or in the online help for 3DM 2 Tip The terms fault tolerance and redundant protection mean that in the event a drive fails your data is still accessible because there is another copy of it Table 1 RAID Configuration Types Raid Type Description RAID 0 Striped unit Provides improved performance but no fault tolerance RAID 1 Mirrored unit Provides fault tolerance and a read speed ...

Page 28: ... been installed the background process automatically starts each time you start your computer If you have not yet installed 3DM 2 do so now For details see Step 6 Install the 3ware Driver and Software on page 21 Table 2 Possible Configurations Based on of Drives Drives Possible RAID Configurations 1 Single drive or hot spare 2 RAID 0 or RAID 1 3 RAID 0 RAID 1 with hot spare RAID 5 4 RAID 5 or RAID...

Page 29: ...ontinue 3 At the 3DM 2 Login page select Administrator in the Login field 4 Enter the default password 3ware and click Login You can change the password later on the 3DM 2 Settings screen Figure 10 3DM 2 Login Screen Note If you would prefer to use a BIOS level program or a command line interface both are available 1st time RAID configuration using 3ware BIOS Manager 3BM is described in the 3ware ...

Page 30: ...oose Maintenance Figure 11 Management Maintenance menu 2 On the Maintenance page select the drives you want to include in your RAID unit and click Create Unit Depending on the type of RAID unit you will create you may not have to use all of the drives For example if you are creating a RAID 1 or a RAID 5 you might want to leave one drive as a spare to be used in the event of a drive failure Figure ...

Page 31: ...n Write Cache Auto Verify Continue on Source Error During Rebuild and the StorSave Profile Tip If you are not familiar with these options you can leave the default settings for now and change them later if desired Detailed information about each of these options is available in the online Help for 3DM 2 and in the User Guide 7 Click OK to create the unit Note If you enabled the Write Cache policy ...

Page 32: ...ovided on the next few pages To partition format and mount under Windows 1 Boot the system and log in as a system administrator 2 Partition and format the new arrays or disks using the Administrative Tools from the Start menu a Choose Computer Management from the Administrative Tools menu b Select Storage c Select Disk Management 4 Follow the steps that appear on screen to write a signature to the...

Page 33: ...rted p Disk geometry for dev sda 0kB 1074GB Disk label type gpt Number Start End Size File system Name Flags parted dev sda parted mkpart Partition type primary File system type ext2 Start 0 End 1074gb parted p Disk geometry for dev sda 0kB 1074GB Disk label type gpt Number Start End Size File system Name Flags1 17kB 1074MB 1074MB 4 Create or make the file system mkfs dev sda1 Use of the j option ...

Page 34: ...writing per group metadata begins 0 to 100 is displayed parted quit when completed 5 Mount the volume mount dev sda1 mnt To partition format and mount under FreeBSD 1 Boot the system and log in as root 2 Open a terminal window 3 Partition the unit fdisk BI dev da0 disklabel dev da0 disklabel B R r da0 4 Create or make the file system newfs dev da0c 5 Mount the volume mount dev da0c mnt You can als...

Page 35: ...ttempt to use other available drives to rebuild the unit if a hot spare is not available For more information see the online Help for 3DM or the User Guide To specify a hot spare 1 On the Maintenance page in 3DM 2 select a drive in the Available Drives list and click Create Unit 2 As the Type select Spare Disk 3 Optional Enter a name for the spare 4 Click OK Note In order to replace a failed drive...

Page 36: ... idea to turn on your 3ware Sidecar before turning on your computer This will insure that the computer recognizes the units and drives in the 3ware Sidecar If you turn on the computer before turning on the 3ware Sidecar you may need to use 3DM to rescan the controller Unmounting a Unit on Your System Before you perform an operation such as removing or deleting a unit using 3DM you will need to unm...

Page 37: ...ement Maintenance page For more information see the online Help for 3DM or the 3ware Serial ATA RAID Controller User Guide 1 Unmount the unit as described on the previous page and remove the unit in 3DM2 as described above 2 On the 3ware Sidecar pull the handle out to unlatch the drive tray from the 3ware Sidecar 3 After unlatching the tray allow 10 seconds before pulling the tray out of the unit ...

Page 38: ... new drive 8 Mount the new drive using the screws you just removed 9 Replace the tray in the 3ware Sidecar enclosure For more details see Figure 8 on page 18 10 In 3DM2 on the Maintenance page click Rescan 11 If the unit is degraded you can start a rebuild with this drive For more information see the online Help for 3DM2 or the User Guide Remove four 4 flat head mounting screws ...

Page 39: ...nd in 3DM or the 3ware CLI to locate a particular drive or unit Black No drive Solid Amber Hot spare Blinking amber Rebuilding The drive in this slot is part of a RAID unit that is currently rebuilding You can continue to use the unit For more information see the discussion of Rebuilding in the online Help for 3DM or the User Guide Solid red Drive fault This drive has failed You should replace it ...

Page 40: ...ostatic discharge When installing the BBU on the controller be sure you are grounded Use a grounding strap or work on an ESD protective mat Do not remove the 3ware controller or BBU from their protective bags until you are properly grounded Handle the 3ware RAID controller by its edges or by the metal bracket at its end Do not touch any pin contact lead or component on the 3ware RAID controller Im...

Page 41: ...ckup Unit BBU is comprised of two pieces the battery module and the BBU control module These pieces attach to the controller at the points illustrated in Figures 15 and 24 a Clips on the battery module match to slots on the controller b Connector on the BBU mates to receptacle on the controller c Post on the BBU mates to post hole on the controller Figure 15 Points of connection on the BBU a Clips...

Page 42: ...ontrol module and set it aside you will reattach it soon Figure 17 Removing the head from the plastic post 2 Position the BBU control module above the controller and align the BBU control module and the controller making sure to Mate the connector on the BBU control module with the receptacle on the controller Match the plastic post on the BBU with the hole on the controller Figure 18 b BBU recept...

Page 43: ...controller over insert the plastic screw head that you removed in step 1 into the plastic post and tighten it gently but firmly Do not over tighten Warning To avoid possible damage to the controller and the motherboard make sure the module is connected in the proper orientation and that the plastic post is attached When the plastic post and the connector are attached correctly the module is in the...

Page 44: ... 9650SE 4LPME Installation Guide 5 Hook the clips on the top of the battery module over the slots on the top edge of the controller Figure 20 Clips on the battery module hook over slots on the top edge of the controller Figure 21 Attaching the battery module to the controller ...

Page 45: ... so that the bottom clip can be inserted 7 Insert the battery power connector into the power receptacle on the BBU Figure 23 Battery power connector inserted in power receptacle The controller is now ready to install in your system Note The battery will drain if it is plugged in and there is no power to the unit If the system will not be used right away wait to do this step until the system is rea...

Page 46: ... bottom of the module Caution There is a risk of explosion if the battery is replaced by an incorrect type To obtain a replacement battery module contact AMCC For proper battery disposal resources contact RBRC the Rechargeable Battery Recycling Corporation www rbrc com Vorsicht Es entsteht Explosionsgefahr bei Auswechslung der Baterie mit einer des falschen Typs Um eine Ersatzbaterie zu erhalten w...

Page 47: ...moving the battery module 6 Disconnect the battery power cable from the BBU To do so press down on the lever like clip on the battery power connector and slide it out of the slot If desired you can remove the BBU control module to facilitate disconnecting the power cable Bottom clip a Push the battery module down gently b Lift out the bottom of the battery module to release the clip in the bottom ...

Page 48: ...tep 6 reattach it now 8 Insert the new battery module and cable it up 9 Reinstall the 3ware RAID controller close up your system and restart it 10 Run a battery test to compute the estimated battery capacity of this new battery You can run the battery test from the BBU page of either 3BM or 3DM 2 or by using the 3ware CLI For detailed instructions see the 3ware Serial ATA RAID Controller User Guid...

Page 49: ...ort userdocs asp 3ware Compatibility Lists http www 3ware com products sys_compatibility asp For specific answers to questions or to give feedback about the product visit our Web site at http www 3ware com support and log in AMCC also offers toll free 1 800 840 6055 or 1 408 542 8800 direct phone support during normal business hours Sales and ordering information For sales information send an elec...

Page 50: ......

Reviews: