background image

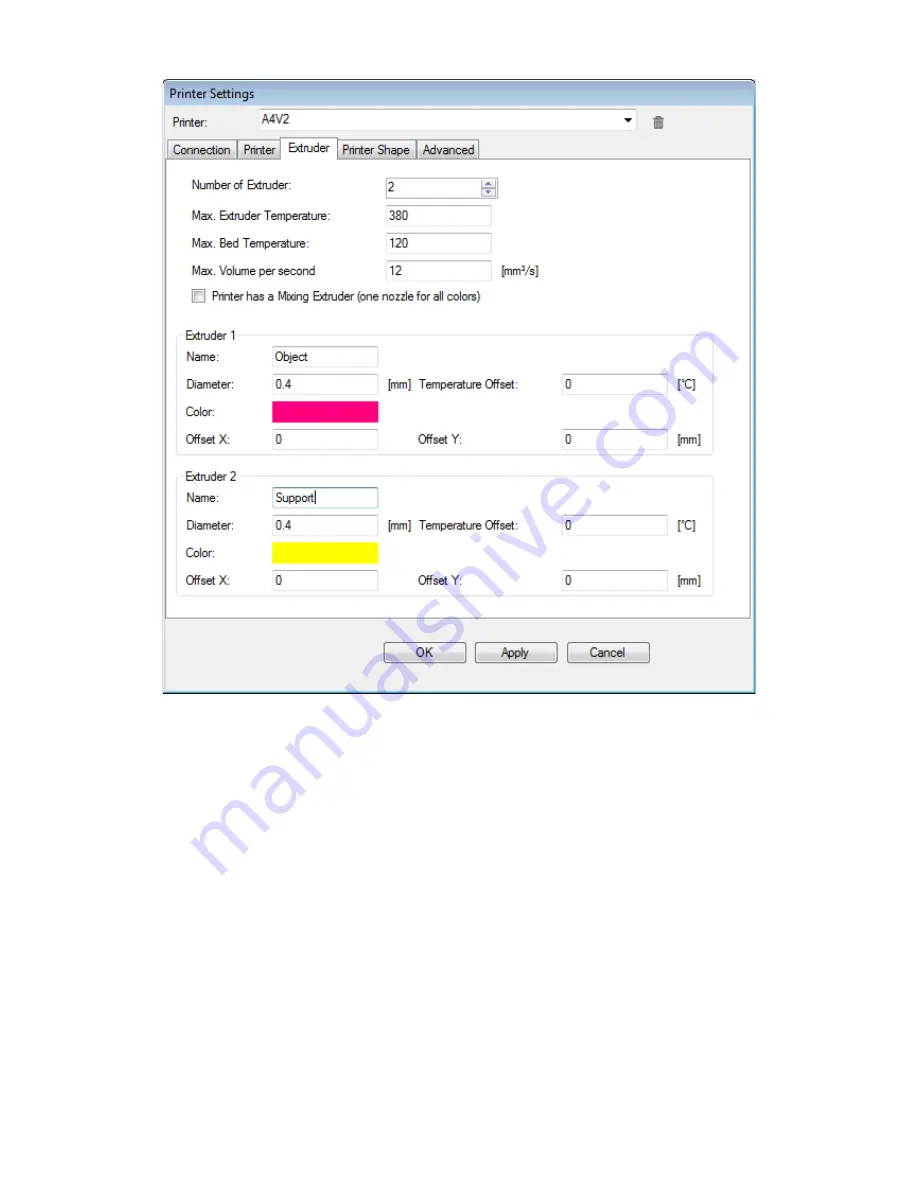
This tab will let you set the extruder characteristics.

You must set the number of extruders available on your printer and each nozzle diameter (standard
supply is 0.4mm but other sizes are available).

IMPORTANT: be sure to change preset color of each extruder (default is yellow for each one) to get
easy preview of the multi-extruder prints !

16

Fig. 13: Extruder control

Summary of Contents for A4 V2

Page 1: ...User manual 3d printers A4v2 A2 image shows optional printer stands V 191102 1...

Page 2: ...2...

Page 3: ...s manual we will teach you all the use and maintenance duties you could face during the entire lifetime of our printer s should you find any inaccuracy or simply need more information feel absolutely...

Page 4: ...ess isn t completed or the machine is remotely actuated i e using a print server Risk of fire don t turn on printer close to flammable substances Don t use any flammable substance to clean the machine...

Page 5: ...ication must be in accordance with any stipulation of additional collateral as defined below 3 Shall be substantiated with proof of original purchase including the serial number of the product D Handl...

Page 6: ...net H Limitations Warnings This limited warranty is sole and exclusive remedy by the end user against Jdeal Form where permitted by law and subject to paragraph h Except for this limited warranty Jdea...

Page 7: ...3mm HIPS spool purchased options To unpack machine never use cutters that could pierce packaging and damage content Please follow the procedure 1 Remove plastic straps using scissors Should the printe...

Page 8: ...and position it at the destination placement IMPORTANT printers have several mechanical parts below lower plate therefore DON T LIFT the printer alone with forklift or transpallets Once machine is re...

Page 9: ...feeder as shown in fig 2 taking care about piping won t touch bronze feeding roller piping won t be overtightened stressing and possibly narrowing the PTFE pipe A2 printer only longest pipe is to be...

Page 10: ...ve each feeder position Each feeder has a mandatory position please refer to fig 7 and 8 for respective printer models Extruder 1 rightmost when looking at rear side of printer has longer cabling to a...

Page 11: ...11 Fig 6 mounting remaining feeders if possible route the cabling behind gearboxes Fig 7 feeder layout of A2 printer...

Page 12: ...it until fully seated then locking putting back on the blue locking collar Perform same duty with remaining extruders taking care not to entangle piping Now you can load the filament to be used take o...

Page 13: ...er to above web site for installation instructions on you specific PC architecture After making sure that your PC is connected to the printer you can install printer management software Several progra...

Page 14: ...periperals connected to your PC inkjet printer mouse webcam camera smartphone the printer will be connected to a surely different port number You can use the REFRESH PORTS button to force an immediat...

Page 15: ...b Kill we recommend to leave ON this option Otherwise should your print process finish Friday night and you leave you printer ON for the weekend you may be getting extruder jam requiring a nozzles cha...

Page 16: ...extruders available on your printer and each nozzle diameter standard supply is 0 4mm but other sizes are available IMPORTANT be sure to change preset color of each extruder default is yellow for eac...

Page 17: ...table Xmin Xmax Pds Ymin Ymax Pdd Largh Prof Alt A2 0 610 0 0 350 0 610 350 500 A4 2 ex 0 300 0 0 200 0 300 200 200 A4 3 ex 0 300 0 0 175 0 300 175 200 Be sure that ALL the Home X Y Z settings are set...

Page 18: ...ents retain the spool curvature therefore straightening the filament s end will ease the insertion in feeding device To feed filament 1 Grab feeding device handle and lock it open using the pivoting r...

Page 19: ...19 Fig 17 Filament feeders the one in foreground is locked open disengaged Fig 16 Straightened and pointed filament...

Page 20: ...ller chewing the filament Filament removal idle machine Filament cannot be removed when machine is cold as it will be melt inside extruder therefore to remove it you need to follow those easy steps 1...

Page 21: ...C with USB connection or network connection thru print server or locally fro m the front panel when printing from SD card Once machine is paused you can then proceed to 1 opening the feeder handle loc...

Page 22: ...color is changing if new filament color is different need to change temperature set extruder temperature to match the needed one for new filament Wait for extruder temperature to settle 5 Feed 50mm a...

Page 23: ...the heated print plate magnets will align and lock automatically Tray printing surface needs to be clean and free from remains from previous prints the film coating should be intact otherwise you shou...

Page 24: ...update requesting immediate reboot Print is lost if someone unplugs USB connection printing thru SD card Pros printing unharmed by communication issues maximum printing speed being free from USB slow...

Page 25: ...y On thick parts without fragile zones hitting the part sideways will pop off the part from the tray Be very careful when using blades or other sharp tools you risk damage to part tray protective film...

Page 26: ...procedure if printer is still powered 6 Remove PTFE lock ring 1 7 Push on the tube adapter 2 with the PTFE pipe while also pushing on the plastic collar 8 While pushing the collar pull the PTFE pipe...

Page 27: ...e at higher level than before Tighten temporarily the extruder locking screw 16 Put back on the tube adapter 17 Plug in the extruder electrical connection 18 Perform the Z nozzle leveling procedure 19...

Page 28: ...polymer traces but also from fingerprints dirt sweat grease may prevent proper polymer adhesion to the tray Use alcohol based cleaner to degrease the tray isopropyl alcohol would be great but also th...

Page 29: ...the feeding roller 4 Using a needle and or a small brush clean the feeding roller teeth 5 Put back on the roller taking care to maintain alignment with previous position Extruder cleaning In case of...

Page 30: ...extruders remove machine cover 2 turn off machine and follow procedure to remove PTFE piping from extruders 3 unplug the 1 feeder be sure to pull the connector NOT the cable 4 Route the feeder cable t...

Page 31: ...lockrings 11 Plug the motor connector into SPFU 12 Feed the supplied 6x4 PTFE pipe thru the opening on the back used to route the existing 1 piping 13 Feed the soft polymer filament into 6x4 PTFE pip...

Page 32: ...oing thru above check you can proceed to the calibration procedure please remember that each procedure step is meant to be performed on ALL extruder mounted on your machine 1 Check that there is at le...

Page 33: ...lease screw 1 and go back to step 10 of this sequence 13 Move down the printing plate Z axis a couple mm will suffice 14 Release tube holder setting screw 2 15 Screw in the tube holder to bring it to...

Page 34: ...e cover The liquid reservoir should be filled up to 4 5mm from the top To check the level you must remove the upper left part cover be sure to remove the AC cable before attempting cover removal If ne...

Page 35: ...r machine just use Repetier Host 1 Connect to your printer 2 Enable the log 3 Using the manual control tab use the GCODE control to send the M505 command 4 Machine will reply with the version number c...

Page 36: ...machine 21 Changing filament type 22 Placing print tray 23 Printing 24 Print removal 25 Nozzle change 26 Standard maintenance 28 Filament handling 28 Printing tray cleaning 28 Print tray surface reco...

Reviews: