


93
© 3M 2011. All Rights Reserved.
3M™ Digital Projector X56
Maintenance
Replacing the internal clock battery
This projector has internal clock that uses a battery. When
the clock of the network function does not work correctly,
please try solution by replacement of the battery:
HITACHI
MAXELL
, part number
CR2032
or
CR2032H
.
OPEN
CLOSE
OPEN
CLO
SE
OPEN
CL
OS
E
CL
OS
E
CL
OS
E
OPEN CLOSE
Raised dot
Battery
Knob
Battery
Cover
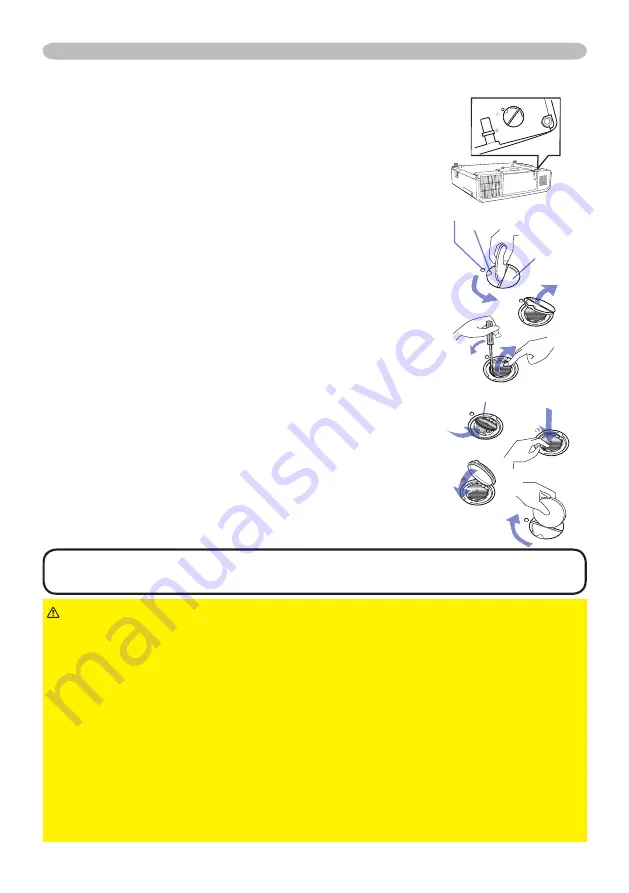
1.
Turn the projector off, and unplug the power cord. Allow
the projector to cool suffi ciently.
2.
After making sure that the projector has cooled
adequately, slowly turn over the projector, so that the
bottom is facing.
3.
There is a raised dot near the battery cover at the
bottom of the projector. Turn the cover in the direction
indicated
OPEN
to position one end of the slit on the
cover with the dot, using a coin or the like. And then
pick the cover up to remove it.
4.
Pry up the battery using a fl athead screwdriver or the
like to take it out. While prying it up, put a fi nger lightly
on the battery since it may pop out of the holder.
5.
Replace with a new battery of the specifi ed type. With
the plus side facing up, slide the battery under the claw
of the spring fi tting. And press down on the battery until
it snaps into place.
6.
Replace the battery cover in place, then turn it in the
direction indicated
CLOSE
to position the knob of the
cover with the dot on the bottom case to fi x the cover,
using a coin or the like.
NOTE
• The internal clock will be initialized by removing the battery. For
setting the clock, see the
Network Guide
.
►Be careful of handling a battery, as a battery can cause explosion,
cracking or leakage, which could result in a fi re, an injury, and environment pollution.
• Use only the specifi ed and perfect battery. Do not use a battery with damage,
such as a scratch, a dent, rust or leakage.
• When replacing the battery, replace it with a new battery.
• When a battery leaked, wipe the leakage out well with a waste cloth. If the leakage
adhered to your body, immediately rinse it well with water. When a battery leaked in
the battery holder, replace the batteries after wiping the leakage out.
• Make sure the plus and minus terminals are correctly aligned when loading a battery.
• Do not work on a battery; for example recharging or soldering.
• Keep a battery in a dark, cool and dry place. Never expose a battery to a fi re or water.
• Keep a battery away from children and pets. Be careful for them not to swallow a
battery. If swallowed consult a physician immediately for emergency treatment.
• Obey the local laws on disposing a battery.
CAUTION


