background image

12

                     © 3M 2004.        3M™ Multimedia Projector X65


O

O

O

O

P

P

P

P

E

E

E

E

R

R

R

R

A

A

A

A

T

T

T

T

II

II

O

O

O

O

N

N

N

N

S

S

S

S


((

((

c

c

c

c

o

o

o

o

n

n

n

n

tt

tt

ii

ii

n

n

n

n

u

u

u

u

e

e

e

e

d

d

d

d

))

))

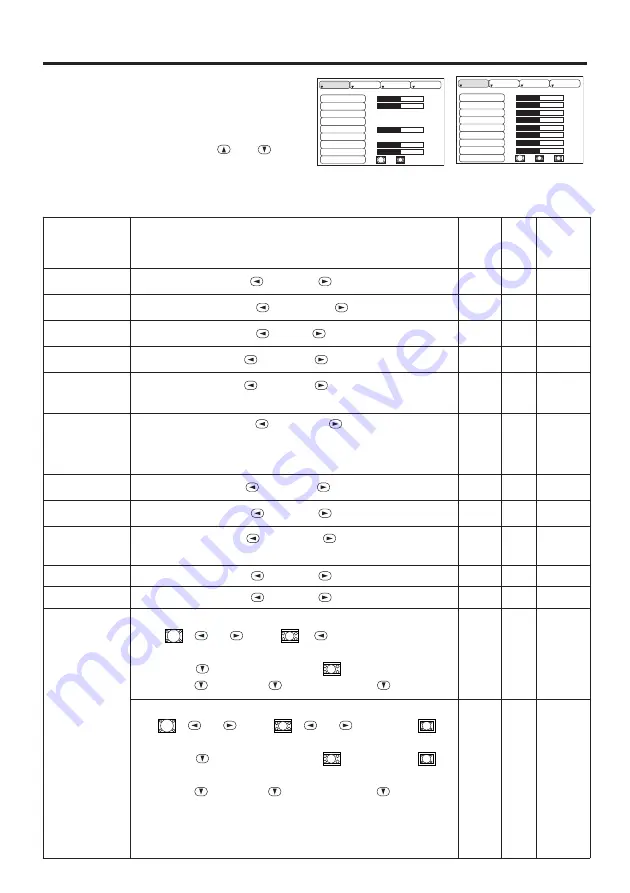
Setup Menu

The following adjustments and settings are possible
when SETUP is selected at the top of the menu. Part
of the Setup menu differs between RGB input and
video input. Select an item with the 

and

buttons, and start operation. Use the Single menu to
reduce menu size (see Table 3, MENU SELECT).

Table 4. Setup Menu

VIDEO

S-VIDEO

COMPONENT VIDEO

RGB IN 1
RGB IN 2

DVI

BRIGHT

CONTRAST

V POSIT
H POSIT

H PHASE

H SIZE

COLOR BAL R
COLOR BAL B

ASPECT

0

-2

+1 

0
0

100
100

800

SETUP

INPUT

OPT.

IMAGE

BRIGHT

CONTRAST

SHARPNESS

COLOR

TINT

H PHASE

COLOR BAL  R
COLOR BAL  B

ASPECT

0

+1
+1

0
0
0
0
0

SETUP

INPUT

OPT.

IMAGE

Item

Description

RGB IN 1
RGB IN 2

DVI

VIDEO

S-VIDEO

COMPONENT

BRIGHT

Adjustment: 

Dark 

Light 

CONTRAST

Adjustment:

Weak 

Strong 

V POSIT

Adjustment:

Down 

Up 

-

-

H POSIT

Adjustment:

Left 

Right 

-

-

H PHASE

Adjustment:

Left 

Right 

• Adjust to eliminate flicker.

-

H SIZE

Adjustment:

Small 

Large 

• The image may not be displayed correctly if the horizontal
size is excessive. In such cases, press the RESET button,
and initialize the horizontal size.

-

-

SHARPNESS

Adjustment:

Soft 

Clear 

-

-

COLOR

Adjustment:

Light 

Dark 

-

-

TINT

Adjustment:

Red 

Green 

• Valid only when NTSC or NTSC 4.43 signal is received.

-

-

COLOR BAL R

Adjustment:

Light 

Dark 

COLOR BAL B

Adjustment:

Light 

Dark 

ASPECT

Select Image Aspect Ratio :

Full [

16:9[

]  

Select Position of Image:

Press the 

button while 16:9[

] is selected.

Center

Down 

Up (

Center )

-

Select Image Aspect Ratio:

4:3[

16:9[

4:3 small[

]

Select Position of Image :

Press the 

button while 16:9[

] / 4:3 small[

]

is selected.
Center

Down

Up (

Center )

• 4:3 small cannot be selected with the input of 720p or
1080i component.
• 4:3 small may not be displayed correctly with some input
signals.

-

-

Summary of Contents for Multimedia Projector X65

Page 1: ...Multimedia Projector X65 Operator s Guide...

Page 2: ...No Signal Menu 16 MAINTENANCE 17 Lamp 17 Air Filter 19 Other Maintenance 19 Page TROUBLESHOOTING 20 OSD Message 20 Indicators Message 21 Symptom 22 SPECIFICATIONS 23 ACCESSORIES 24 TABLES Table 1 Ins...

Page 3: ...t your dealer Keep the original packing material for future reshipment NOTE Projector STANDBY ON LASER BLANK RGB VIDEO AUTO MENU MENU SELECT KEYSTONE RESET FREEZE PinP MAGNIFY POSITION OFF VOLUME MUTE...

Page 4: ...Filter Cover Air Filter and Intake for the Cooling Fan INPUT Button LAMP Indicator TEMP Indicator POWER Indicator RESET Button MENU Button Ventilation Openings exhaust REAR RIGHT VIEW OF THE PROJECTOR...

Page 5: ...NK Button RGB Button MOUSE RIGHT Button Used to click the right mouse button RESET Button Used to click the right mouse button FREEZE Button MUTE Button PinP Button KEYSTONE Button VOLUME Button These...

Page 6: ...t NOTE CAUTION Use only the specified batteries with this remote control transmitter Also do not mix new and old batteries This could cause battery cracking or leakage which could result in fire or pe...

Page 7: ...Distance from the projector to the screen 10 Table 1 Installation Reference a CAUTION Install the projector in a suitable environment according to instructions of the Product Safety Guide and this man...

Page 8: ...be connected This is not needed for a USB device because USB is plug play capable The cables may have to be used with the core set to the projector side Use the cables which are included with the proj...

Page 9: ...a system configured with peripheral equipment including a computer display and an operating system This projector is recognized as a plug play monitor Use the standard display drivers Plug play may n...

Page 10: ...POWER indicator is blinking 2 The system assumes the Standby mode when cooling is complete and the POWER indicator ceases blinking and changes to orange Check that the indicator is orange and set the...

Page 11: ...the MAGNIFY mode with a video signal is input After approximately 10 seconds of inactivity the icon is extinguished and the POSITION mode is cleared automatically and buttons may operate as the mouse...

Page 12: ...tivity MENU SELECT Select Menu Type Press the MENU SELECT button Allows the user to select the normal menu or the single menu Only the selected item is displayed on the single menu and other items are...

Page 13: ...IN 2 DVI VIDEO S VIDEO COMPONENT BRIGHT Adjustment Dark Light CONTRAST Adjustment Weak Strong V POSIT Adjustment Down Up H POSIT Adjustment Left Right H PHASE Adjustment Left Right Adjust to eliminat...

Page 14: ...operation requires approximately 10 seconds It may not function correctly with some input signals Pressing the AUTO button in this case may correct this problem This function is the same as for the A...

Page 15: ...factory fixed screen is displayed TURN OFF displays the blue screen When MyScreen or ORIGINAL is selected the screen is going to the black after several minutes MyScreen Set MyScreen Mode Select the...

Page 16: ...FF Select STOP 0 min with the button When STOP is selected the system does not enter the standby mode even if no signal is received SYNC ON G SYNC ON G Valid Select TURN ON with the button SYNC ON G I...

Page 17: ...d when no signal is input My Screen is a mode that the customer customized screen is displayed This is the blue screen at the factory setting Refer to the description of MyScreen below ORIGINAL is a m...

Page 18: ...lamp If unsure contact your local service center If it is probable that the lamp has exploded explosive sound is heard disconnect the power plug from the power outlet and ask your dealer to replace la...

Page 19: ...esetting the Lamp Timer Reset the lamp timer after replacing the lamp When the lamp has been replaced after the LAMP indicator is red or the CHANGE THE LAMP message is displayed complete the following...

Page 20: ...h Switch power OFF and remove the power cord from the power outlet before beginning maintenance work Please read the Product Safety Guide thoroughly to ensure that maintenance is performed correctly D...

Page 21: ...y chance Power will be switched OFF automatically in hours Replace the lamp as shown in P 17 18 Lamp Always reset the lamp timer after replacing the lamp CHANGE THE LAMP AFTER REPLACING LAMP RESET THE...

Page 22: ...ks red Turns off Lamp or lamp door is not found or hasn t been fitted in correctly Switch power OFF and wait for 45 minutes until the equipment cools Check fitting of the lamp and lamp door and switch...

Page 23: ...s not correctly connected Connect correctly 7 8 The volume is set to minimum Press VOLUME on the remote control or display the menu screen and adjust the volume 11 15 Mute is turned on Press the MUTE...

Page 24: ...TTL level D sub 15 pin shrink jack 2 DVI TMDS DC 150 1200 mV AC 1 56 Vp p TTL Level Positive Negative AUDIO IN RGB1 200mVrms 50 k max 3 0Vp p Stereo mini jack DVI RGB2 Video signal input VIDEO IN 1 0V...

Page 25: ...2 How to Order Please order these parts through your dealer or contact 3M Customer Service at the following number In U S or Canada 1 800 328 1371 In other locations contact your local 3M sales office...

Page 26: ...it our Internet Website Intended Use Before operating this machine please read this entire manual thoroughly The 3MTM Multimedia Projectors are designed built and tested for use indoors using 3M lamps...

Reviews: