background image

Maintenance 

  November 6 2014 – Revision 2.1 

Page 50 of 77 

3M™ Drive-Thru Systems Model G5 and Model XT-1 

Operating Instructions 

Cleaning the Contacts in the Headset Charger wells 

Unplug Headset Charger from the wall. Turn Headset Charger upside down and 
shake out any loose debris. With a clean pencil eraser, gently rub eraser 
contacts. Wipe off eraser shavings with a clean soft cloth. 
 
Use a cloth or cotton swab, lightly moistened, to remove grease and crumbs 
from your equipment. You may use a dry toothbrush to dislodge any hard 
crumbs. 

 
NOTE
: Make sure the Headset Charger is unplugged before cleaning and that 
all Headsets and batteries have been removed. 
Never clean your drive-thru audio equipment with spray cleaners or solvents 
as they can damage the internal electronics and cause corrosion. 

G5 Batteries 

Care, Handling and Storage 


Avoid dropping batteries.   


Do not carry batteries in your pockets or leave them in hot, damp or 
dirty places. 


Clean the battery contacts periodically using a water–moistened swab. 


Be careful not to short the battery contacts together. 


Do not set the batteries contact–side down on a bare metal countertop. 

Low Battery Message 

When the battery voltage is too low, the headset sounds a “change battery now” 
message at fifteen-second intervals to alert the operator to install a fully charged 
battery.  The “change battery now” message continues UNTIL THE State of 
Charge on the headset dips below its critical threshold at which point the headset 
turns off automatically to prevent damage to the batteries. 

Charging Batteries 

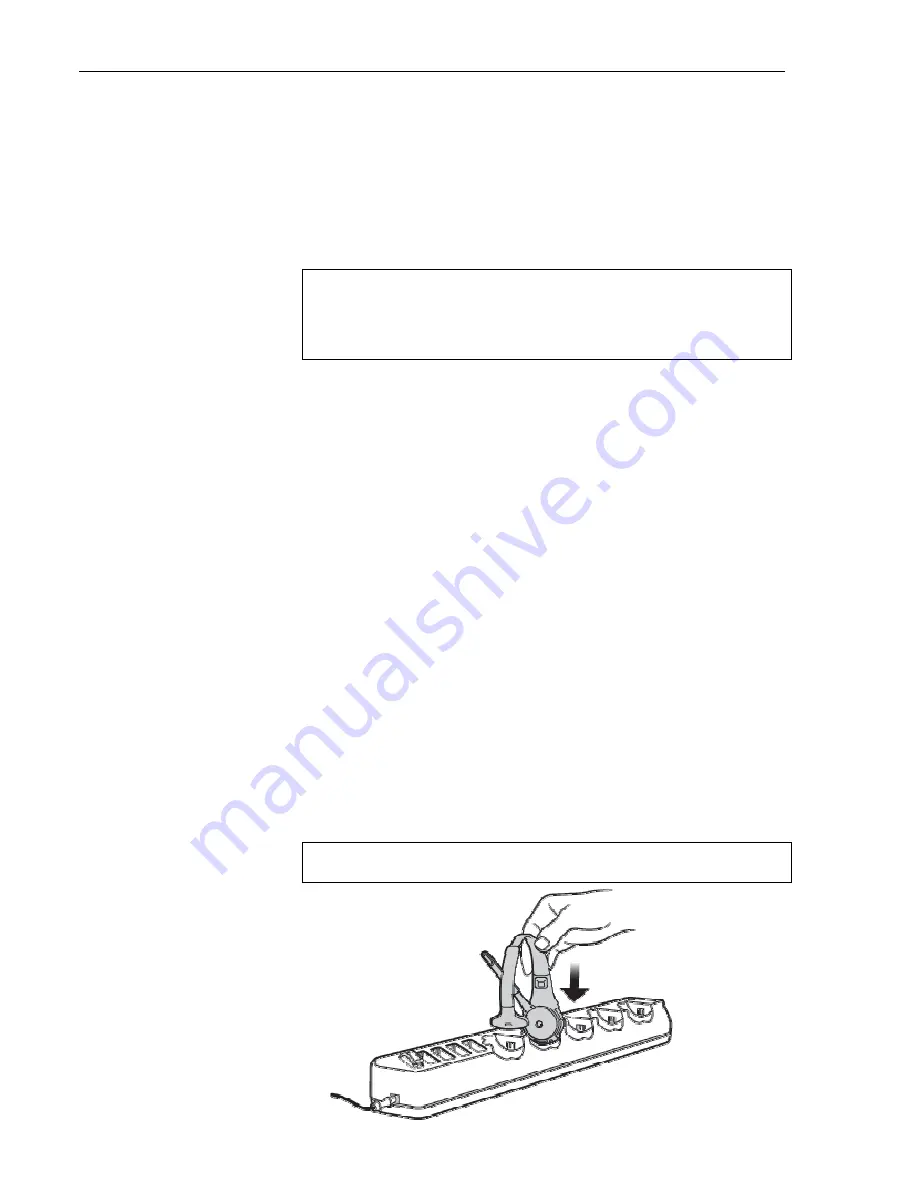
To charge a battery, insert the battery in one of the Battery Charger slots or 
place the G5 headset (with the battery inserted) into the Headset Charger slot. 


The LED(s) on the battery will now flash Green indicating the battery 
is currently being charged. 
Refer to the “G5 Battery Indicator Light Modes” section for more 
information.  

Note: Discharged 

batteries

 require 3 ½ hours to charge 


Summary of Contents for G5

Page 1: ...3M Drive Thru Systems Model G5 and Model XT 1 Operating Instructions ...

Page 2: ...November 6 2014 Revision 2 1 3M Commercial Solutions Division 3M Drive Thru Systems Model G5 and Model XT 1 Operating Instructions ...

Page 3: ...er Message Volume 15 Change the Monitor Volume 16 Inbound Listen 16 Outbound Talk 16 Vehicle Present 16 Vehicle Approach 17 Page Messages 17 Greeter Messages 17 Change the Night Volume 17 Registering Headsets 18 Add Headsets 18 Remove Headsets 18 List All Headsets 19 Resetting Inactive Days 19 Checking Headset Software Revision 19 Change Noise Reduction Level 19 Inbound Microphone Noise Reduction ...

Page 4: ...the Backup Intercom 29 OPERATION 31 3M Drive Thru Headset G5 31 Overview 31 Assembling a 3M Drive Thru Headset G5 31 Installing ID Tags 31 Assembling the Control Pod and Carrier 31 Component Identification and Description 34 Indicator Light Modes 35 Fitting the Headset 37 Replace the Battery 38 Out of Range 39 Cleaning 39 XT 1 Headsets 39 Overview 39 Component Identification and Description 40 Ind...

Page 5: ...eries 53 Disposing of Batteries 53 Making Sure Batteries are Ready for Use 53 Important Information about Rechargeable Batteries 54 TROUBLESHOOTING 55 Headset Indicator Lights 55 General Troubleshooting 57 Battery and Battery Charger Troubleshooting 59 APPENDIX DECLARATION OF CONFORMITY 60 APPENDIX BASE STATION SPECIFICATIONS 61 Physical 61 Electrical 61 Functional 61 APPENDIX GREETER MODULE 63 Gr...

Page 6: ... Instructions Alert Message External Trigger Inputs 69 Message Names 70 Dual Lane Systems Lane 2 70 Tandem Pull Ahead Playback Message 71 Greeter Setup For Systems with V2 V3 or V4 Base Station software 71 Greeter Setup System Defaults 72 Greeter Setup Customer Settings 73 Greeter Setup Example Settings 74 INDEX 75 ...

Page 7: ...ctions in quick service drive through restaurants and convenience stores It has not been evaluated for other uses or locations Signal Words Explanation of Signal Word Consequences WARNING Indicates a potentially hazardous situation which if not avoided could result in death or serious injury and or property damage CAUTION Indicates a potentially hazardous situation which if not avoided could resul...

Page 8: ...ower supply indoors and in dry locations only To reduce the risks associated fire explosion property damage Do not open crush or expose to heat above 55 C 130 F For additional charging and use instruction refer to operators manual The battery used in this device may present a risk of fire or chemical burn if mistreated Do not disassemble heat above 55 C 130 F or incinerate Replace model XT 1 batte...

Page 9: ...pment generates uses and can radiate radio frequency energy and if not installed and used in accordance with the instruction manual may cause harmful interference to radio communications Operation of this equipment in a residential area is likely to cause harmful interference in which case the user will be required to correct the interference at his own expense Canada Note CAN ICES 3 A NMB 3 A Thi...

Page 10: ...sposal Notice to European Union customers These products must be disposed respectively recycled at the end of their lifetime according to the till then mandatory laws and rules Under European Union EU Directive on Waste Electrical and Electronic Equipment Directive 2012 19 EU products of electrical and electronic equipment cannot be discarded as municipal waste anymore and manufacturers of covered...

Page 11: ...ress Mode Enter your user passcode Press Mode again The display will show the user name and ID number e g User1 ID 1 For basestations with software version 2 29 or 3 14 or 3 42 To enter the configuration mode From the Run mode menu press and hold Mode While continuing to hold Mode enter your user passcode Release Mode The display will show the user name and ID number e g User1 ID 1 Notes The defau...

Page 12: ...itable Variable items that cannot be edited appear inside of square brackets In some cases the item is editable but only from a different location in the menu information An on screen explanation of a key point or reminder appears within curved brackets Buttons Following is a brief description of the buttons on the display and their functions Directional arrow buttons You can use these buttons to ...

Page 13: ...ce call to 3M or as a confirmation in some items Pressing and holding the Service button while editing a field that permits alphabet letter entry e g store address shifts the letter to upper case In run mode press and hold the Service button then enter your passcode to initiate an internet request for help from 3M A 3M representative will call your store telephone number shortly after you initiate...

Page 14: ...the same address space as the DHCP address PC 192 168 99 1 DHCP Subnet mask Base Station 255 255 255 0 255 255 255 0 PC 255 255 255 0 No requirement Default gateway Base Station 192 168 99 1 192 168 0 1 or the switch router or hub address PC Leave blank 192 168 0 1 or the switch router or hub address E mail server 192 28 32 161 Your E mail address suffix mmm com Logging into the Base Station with ...

Page 15: ...ts the volume of the speaker at the customer order point Note To avoid feedback set the outbound talk volume as low as possible To change the outbound talk volume Enter the configuration mode see page 11 Select a new value for 01 Drivethru Volume Outbound Talk Volume The range is 0 silent to 20 maximum Vehicle Alert Volume Changing the vehicle alert volume affects the volume of the vehicle alert s...

Page 16: ...or Inbound Listen Volume The range is 0 silent to 20 maximum Outbound Talk Changing the outbound talk volume affects how loudly the monitor plays the outbound order taker communication You can also disable the monitor playing outbound talk Note To avoid feedback and echo set the outbound talk volume as low as possible To change the outbound talk monitoring settings Enter the configuration mode see...

Page 17: ...es Note To avoid feedback and echo set the volume as low as possible To change the page message volume monitoring settings Enter the user service mode see page 11 Select 02 Monitor Volume To enable or disable the monitor playing internal paging messages change the value for PAGE Messages Enable to ON or OFF To change the volume level select a new value for PAGE Messages Volume The range is 0 silen...

Page 18: ... is the serial number that gets registered on the base station Once registered it should not need to be registered again unless it is intentionally removed Add Headsets The procedure below applies to both G5 and XT 1 headsets Each headset has a unique serial number This number is broadcast to the base station whenever the headset signs on Notes One headset should not be registered to more than one...

Page 19: ...igate to 08 Headset Setup Currently Editing Headset Press or if necessary to scroll to the headset ID number for the headset you want to reset Select CLEAR Checking Headset Software Revision To check the software revision number for a headset Enter the base station configuration mode see page 11 Navigate to 08 Headset Setup Currently Editing Headset Press or if necessary to scroll through the head...

Page 20: ... is 18 MM Minutes 01 to 60 SS Seconds 01 to 60 MMM Month Jan Feb Mar Apr May Jun Jul Aug Sep Oct Nov or Dec DD day 01 to 31 Year Last two digits of the year 00 to 99 20 is fixed and cannot be changed Change Global Settings Global settings are an assortment of options that you must choose based upon the basic configuration of your system Text and Audio Prompts Language You can choose between Englis...

Page 21: ...tion configuration mode see page 11 Select 07 Global Settings To enable or disable the monitor playing the outbound talk change the value for PAGE Channel Heard by Order Taker to NO or YES Number of Base Stations at this Site When there are two base stations used together tandem dual or side by side drive thrus they must be configured to work together Perform the following procedure to enable the ...

Page 22: ...Language Perform the following procedure to select the language s of the store closed and pull ahead prompts The prompts can be spoken in English Spanish French German or repeated in multiple languages Enter the base station configuration mode see page 11 Change the value for 07 Global Settings Order Point Prompts in English to Yes or No Press Enter to implement the change or press Mode to abandon...

Page 23: ...configuration mode see page 11 Change the value for 07 Global Settings Order Takers in CROSS Lane Mode to 1 or 2 If you select 1 non order takers will hear the orders from lanes 1 and 2 If you select 2 non order takers will hear only the orders on the lane for which the headset is configured Perform the following procedure to enable or disable paging to be heard by operators on both lanes Enter th...

Page 24: ...dsets must be of version 5 12 or later If even one headset of an older version signs on the feature will automatically be disabled despite it s value remaining set as DYNAMIC base station emits 3 audible chirps and Run Screen will display a message Headset XXXXXXX allows kitchen noise In the event the Kitchen Noise Reduction feature has been disabled due to a headset with an older version of softw...

Page 25: ... following kit XT 1 Basestation Software Update Kit XT 1 78 6911 4957 5 The Software upgrade kit consists of An installation CD including the Install program basestation software files and manuals and the USB cable Haptics Vibration Alerts on Headsets Perform the following procedure to enable or disable the Haptics Vibration Alerts on the Headset upon a vehicle detect at the Order Point Enter the ...

Page 26: ...see page 11 Navigate to 10 Site Scheduling Regular Site Schedule Change the value for each day of the week and each of the four defined fields Open Day Night and Close Press and to scroll up and down the list Note The greeter will not play messages while the store is closed except for the built in or custom store closed message Holiday Exception Schedule The holiday exception schedule can be used ...

Page 27: ...ng To enable or disable self monitoring change the value for Self Monitoring Enabled to Yes or No If self monitoring is enabled Select a value for Number of Inactive Days Allowed The range is 7 to 255 The number represents how many days of inactivity must pass for any given headset before the system interprets the absence as a problem and forwards the information to 3M Select a value for Resend Er...

Page 28: ...sed by the installer or in case of complete system restoration or backup Load Installation Settings Installation settings are a complete set of configuration data that the installer can save after the initial installation configuration is completed It is essentially a backup save point in case configuration settings are inadvertently changed in ways that are not easy to identify or correct To load...

Page 29: ...the configuration mode see page 11 Select 15 Factory Setup Change the value of Restore All Factory Settings to Yes Create and Load Templates You can save an entire base station configuration as a file on a PC and use the file as a template for other base stations You must be using a PC to use templates Reboot System Perform the following procedure to cleanly power down then power up without unplug...

Page 30: ......

Page 31: ...ional headset Installing ID Tags In 3MTM drive thru systems with Reminder and Alert features in V5 release software installed you can by installing ID tags on each headset easily Assign and identify headsets to crew members Attend to hygiene concerns Each Control Pod and Carrier shipped has a bag enclosed with 8 different colored tags that can be interchanged by the staff The Control Pod and Carri...

Page 32: ...Once the Charging Contact Block is set into in the Receptacle it will act as hinge or pivot point See Figure 2 Gently press the two halves together until they securely snap into place at the top You may need to apply a slight downward pressure to align the connections appropriately When the Control pod is connected to Carrier you will hear a slight click sound See Figure 3 Slide locking mechanism ...

Page 33: ...Operation 3M Drive Thru Systems Model G5 and Model XT 1 Operating Instructions November 6 2014 Revision 2 1 Page 33 of 77 Figure 2 Figure 3 Figure 4 ...

Page 34: ...our finger up and down the Volume control area to set volume on the headset Upward motion increases the volume while the downward motion decreases the volume Page Has several functions related to in store communication a Talk to all headsets on the same lane or both lanes depending upon the configuration but not to the order point Press and hold the page button during normal operation to communica...

Page 35: ...e all 4 LEDS lit Green From the top in the diagram on the left if 4 successive LEDs lit green indicates a charge between 75 and 100 3 successive LEDs lit green indicates a charge between 50 and 74 2 LED lit green indicates a charge between 25 and 49 1 LED lit green indicates a charge between 0 and 24 One of the LEDs is blinking Green The battery is in the Charger and is currently charging From the...

Page 36: ...after power on Headset is registered but has not yet synchronized or signed on to the base station Headset is out of range of basestation Flashing Red Green Headset is not registered and has not found a base station Steadily Flashing Red Headset is the active order taker but the outbound talk to the customer is muted Single Red Flash changed from flashing green Short red flash Battery is inserted ...

Page 37: ...gistration Blue flash when vehicle arrives in a lane in addition to the vehicle present beep single beep on Lane1 or double beep on Lane 2 Fitting the Headset Make the following adjustments to the headset to make it comfortable less likely to fall off and easy for you to hear and speak clearly 1 Adjust the size of the headband until the ear pad rests against one ear and the comfort pad cushion res...

Page 38: ...a battery make sure it is fully charged It is important to remember that an unused 3M Battery G5 loses five percent of its charge per week If a battery has not been used for several weeks make sure to charge it prior to use Orient the headset in the position as shown in the illustration below Position your thumb right under the latch and your index finger nail in the groove where the battery meets...

Page 39: ... headsets every day If they are dirty clean them Even if they don t look dirty every headset should be cleaned on a regular schedule Before cleaning remove the battery from the headset Use a soft cloth and a little water to wipe the surfaces clean We recommend using a 3M 5040 7065 Cleaning Wipe or a Scotch Brite High Performance Cloth lightly dampened with plain clean water Do NOT soak the headset...

Page 40: ...n store communication 1 Talk to all headsets on the same lane or both lanes depending upon the configuration but not to the order point Press and hold the page button during normal operation to communicate with other headsets There is an option in Global settings to allow the order taker to hear or not to hear page messages 2 Release the order taker If the order taker taps the page button he or sh...

Page 41: ...e 1 or Lane 2 will also be heard in the earpiece Alternating Flashing Green and Amber Page Monitor Mode Red Orange Red Green Red Orange Red Green Headset registered to four base stations Perform the following procedure to clear the headset registration data 1 Start with the Headset powered on It does not have to be in sync with any Base Station 2 Press and HOLD the power button 3 Press and release...

Page 42: ...in the headset When a battery is low the system plays a change battery now message in the headset every 15 seconds Note When installing a battery make sure it is fully charged It is important to remember that an unused 3M Wireless Communication System Model XT 1 battery loses five percent of its charge per week If a battery has not been used for several weeks make sure to charge it prior to use 1 ...

Page 43: ...ay If they are dirty clean them Even if they don t look dirty every headset should be cleaned on a regular schedule Before cleaning remove the soft foam ear pad and microphone windscreen If used Use a soft cloth and mild cleaning solution to wipe the surfaces clean We recommend using a 3M 5040 7065 Cleaning Wipe or a Scotch Brite High Performance Cloth lightly dampened with 3M Food Service Degreas...

Page 44: ...e 5 Navigating in the Base Station in Run Mode To navigate the base station in Run mode you only need to use Enter Mode and the directional arrow buttons up down left and right The remaining buttons function only in manager or installer configuration modes Change Order Taking Mode There are seven order taking modes which offer different combinations of speaking listening automatic standby vehicle ...

Page 45: ...hone to hear the customer order The order point microphone will remain on until the vehicle leaves In Automatic Listen AL the order point microphone turns on and stays on whenever a vehicle is detected The order point microphone will remain on until the vehicle leaves In Always On the order point speaker is always on so the customer can always be heard regardless of whether a vehicle is detected a...

Page 46: ...operly The choices between them tend to vary according to the number of people available how many duties they must perform simultaneously and possibly employee preferences If you plan to have the order taker standing outside with a headset Outside mode is the best choice The order point speaker microphone and vehicle detector are disabled This allows hands free communication to staff inside the st...

Page 47: ...aker needs to answer both order points essentially the two order points cross over Operators will hear signals from both order points single repeating beep from order point 1 or a double repeating beep beep from order point 2 The headset buttons T1 and T2 communicate only with order point 1 and order point 2 respectively For paging pressing the page button is heard by all headsets Change Volume Mo...

Page 48: ...following steps NOTE The Pod Carrier and Batteries work ONLY when using authentic parts from 3M All three components have OEM authentication algorithm implemented and will recognize and reject non authentic parts Disassembling the Carrier from the Pod Remove the battery Unlock the Pod from the Carrier by sliding the Control Pod Locking Mechanism to the unlocked position using a flat head screwdriv...

Page 49: ...r pad remove the worn damaged ear pad from the ear cup and replace it with a new pad To replace the headband pad remove the worn damaged headband pad from the end of the headband and replace it with a new pad G5 Headset Charger Location The G5 headset charger can be placed flat on an even surface or mounted on a wall being parallel or perpendicular to the ground as shown in illustration below Make...

Page 50: ...ot carry batteries in your pockets or leave them in hot damp or dirty places Clean the battery contacts periodically using a water moistened swab Be careful not to short the battery contacts together Do not set the batteries contact side down on a bare metal countertop Low Battery Message When the battery voltage is too low the headset sounds a change battery now message at fifteen second interval...

Page 51: ...ons Important Information about Rechargeable Batteries Keep the following information in mind as you operate the system and as you establish operating procedures Each G5 battery contains an internal protective device to prevent unsafe discharge rates But as with any battery avoid shorting across the battery contacts with metal items Never carry a battery in a pocket or place it in a drawer where i...

Page 52: ... back of the battery housing XT 1 Battery Charger Location The battery charger should be placed on a flat surface such as a desktop or table in a clean dry environment Cleaning the Contacts If the indicators fail to light during charger operation clean the contacts using a water moistened cotton swab XT 1 Batteries Care Handling and Storage Avoid dropping batteries Do not carry batteries in your p...

Page 53: ...hts the battery is approximately 80 charged An additional 1 2 hour of charging is required to achieve maximum charge Charging Status Indicator Disposing of Batteries To help protect the environment and conform to regulations 3M Wireless Communication System Model XT 1 rechargeable batteries must be returned to 3M at the end of their useful life Contact your 3M representative for additional instruc...

Page 54: ...y avoid shorting across the battery contacts with metal items Never carry a battery in a pocket or place it in a drawer where it can accidentally be shorted by keys coins etc Have adequate charging capacity for the number of headsets in your system One 3 slot battery charger will handle up to three headsets Use of more than three headsets requires a 6 slot battery charger Batteries perform best at...

Page 55: ...he active order taker but the outbound talk to the customer is muted Single Red Flash changed from flashing green Headset has successfully synchronized and signed on with a base station Lane 1 or Lane 2 will also be heard in the earpiece Alternating Flashing Green and Amber Page Monitor Mode Red Orange Red Green Red Orange Red Green Headset registered to four base stations Perform the following pr...

Page 56: ...ly after power on Headset is registered but has not yet synchronized or signed on to the base station Headset is out of range of basestation Flashing Red Green Headset is not registered and has not found a base station Steadily Flashing Red Headset is the active order taker but the outbound talk to the customer is muted Single Red Flash changed from flashing green Short red flash Battery is insert...

Page 57: ...eptacle If the LCD display does not come on check for power at the wall outlet Headsets are not registered to Base Station Register headsets The Base Station is defective Call for authorized service A single headset has green LED flashing Headset is not registered to base station Register the headset Defective headset If the other headsets register OK the single headset needs repair Headset has lo...

Page 58: ...olume controls up Defective backup intercom or wiring Call for authorized service No Talk or Page to other headsets from a single headset or Talk or Page buttons require excessive pressure to operate Worn or defective Talk or Page switch Call for authorized service Defective headset Low Talk volume on a single headset The holes in front of the microphone are plugged with dirt or grease Call for au...

Page 59: ...eplace the battery G5 Battery Indicator Light Modes Indicator Mode Description Green LEDs The battery is out of the G5 battery Charger and the button has been pressed and held down Each LED represents 25 charge A fully charged battery would have all 4 LEDS lit Green From the top in the diagram on the left if 4 successive LEDs lit green indicates a charge between 75 and 100 3 successive LEDs lit gr...

Page 60: ...Appendix Declaration of Conformity 3M Drive Thru Systems Model G5 and Model XT 1 Operating Instructions November 6 2014 Revision 2 1 Page 60 of 77 Appendix Declaration of Conformity ...

Page 61: ...x 5 cm Electrical Parameter Specification or Requirement Input Power 120 VAC 50 60 Hz 15A Standard 3 prong outlet required station includes AC adapter Radio Frequency 2 4 GHz ISM Does not require FCC license Speaker outputs 5W Functional Parameter Specification or Requirement Maximum number of order points per base station 1 Maximum number of headsets per base station more than 15 Maximum number o...

Page 62: ... x 2 0 162mm x 143mm x 51mm 19 5 x 3 2 x 2 7 495mm x 81mm x 68mm Weight fully loaded 1 3 lbs 0 6kg 2 9 lbs 1 3kg Electrical Parameter Specification or Requirement G5 Desk Charger G5 Wall Charger Input power at full load 23 watts 16 watts Input voltage requirement 100 240V 50 60hz Note G5 chargers must be used with 3M supplied power adaptor Functional Parameter Specification or Requirement G5 Desk ...

Page 63: ...age slot for a total of 4 seconds Alert messages can be recorded in any of the 16 message slots allowing for a maximum of 16 Alert messages However the system has 4 Alert Message Input Triggers so only 4 Alert messages can be used at any one time CLOSED The custom Store Closed message follows all the rules of a Greeter Message FORWARD The custom Tandem Lane Pull Forward message follows all the rul...

Page 64: ...parts set to Morning NO 5 Repeat the daypart assignments for each day of the week Msg 001 TUE 6 When done activate the message schedule by selecting YES Act YES 7 Repeat steps 3 6 for each message you wish to schedule and activate Record Message After determining the number and type of messages to use in the drive thru operation the user will then record each message into the Greeter Module memory...

Page 65: ... and release Service key then release the page button 12 The system will pad the message with silence to ensure no left over audio from an old message 13 The new message duration is now displayed in the Duration field Duration 03 14 To hear the new greeting played back scroll to PLAY and press the Service key 15 The name of the message can also be changed on this screen Select the message name fie...

Page 66: ...figured schedule automatically Perform the following procedure to define the messaging dayparts specifying the name start time and end time for each 1 Enter the greeter configuration menu 2 Select 4 Message Daypart Definitions MESSAGE DAY PART DEFINITIONS Message Day Part Start End 01 Breakfast 06 00 10 00 02 Morning 10 00 11 00 3 Using the and Enter keys select a message daypart Use the keypad to...

Page 67: ... 2 Change the value of the playback setting Your choices are YES The greeting will play on the headsets as well as the order point NO The greeting will only be heard at the order point and the monitor if selected below GREETER MESSAGE PROPERTIES Playback Through The Monitor YES Tone To Headsets During Playback NO Restaurant Closed Playback Message OFF Set Playback through Monitor You have the choi...

Page 68: ...or enabling the Store Closed message is located in the System Menu Global Settings Store Is Now Closed menu GREETER MESSAGE PROPERTIES External Detector Playback Message OFF Greeter Revision 03 Turn on External Detector Playback Message If an external detector is used and connected to the EXT_MSG trigger pin on the base station circuit board you can assign a message to be played back whenever the ...

Page 69: ...hen the current vehicle departs or the call is dropped by the order taker N means the message will be skipped and not play if the scheduled play time occurs during an active order Delay mm ss Upon the start of a new day part the playback of the first message will be delayed by this setting entered in minutes and seconds If the delay places the message start time into an active order the message is...

Page 70: ...orresponding message will play when the selected external input is activated Message choices include all messages of Type ALERT Message Names Perform the following procedure to customize the message names The names can also be edited from the Record Message menu 1 Enter the greeter configuration menu 2 Select 8 Message Names MESSAGE NAMES 001 Breakfast 1 002 003 Breakfast 2 004 005 Lunch 1 006 MES...

Page 71: ...Revision 03 Tandem Pull Ahead Playback Message You can assign a custom message to be played to customers at the Lane 2 order point when the Lane 1 order point is available to pull forward The custom message must be recorded as Type FORWARD To select which pull ahead playback message is chosen 1 Navigate to Tandem Pull Ahead Playback Message 2 Change the value of the playback setting Your choices a...

Page 72: ...art 12 00 00 00 00 Message Assignments Msg Name Type Dayparts 1 Breakfast 1 GREETER 2 GREETER 3 Breakfast 2 GREETER 4 GREETER 5 Lunch 1 GREETER 6 GREETER 7 Lunch 2 GREETER 8 GREETER 9 Dinner 1 GREETER 10 GREETER 11 Reminder 1 REMINDER 12 Reminder 2 REMINDER 13 Reminder 3 REMINDER 14 Reminder 4 REMINDER 15 Cooler Open ALERT 16 Door Open ALERT Alert Reminder Properties Msg Name Type Priority Delay C...

Page 73: ...nd Time 1 2 3 4 5 6 7 8 9 10 11 12 Message Assignments Msg Name Type Dayparts 1 2 3 4 5 6 7 8 9 10 11 12 13 14 15 16 Alert Reminder Properties Msg Name Type Priority Delay Count Repeat Monitor REMINDER Y 0 00 1 0 01 00 ON OFF REMINDER Y 0 00 1 0 01 00 ON OFF REMINDER Y 0 00 1 0 01 00 ON OFF REMINDER Y 0 00 1 0 01 00 ON OFF ALERT N 0 00 1 0 01 00 ON OFF ALERT N 0 00 1 0 01 00 ON OFF ALERT N 0 00 1 ...

Page 74: ... Msg Name Type Dayparts 1 Daily Promo GREETER 10 2 GREETER 10 3 Store Closed CLOSED 4 CLOSED 11 Travel Path REMINDER 10 12 Hand Washing REMINDER 10 16 Back Door Open ALERT 10 Alert Reminder Properties Msg Name Type Priority Delay Count Repeat Monitor 11 Travel Path REMINDER Y 0 00 1 0 30 00 ON OFF 12 Hand Wash REMINDER Y 0 00 1 1 00 00 ON OFF 16 Door Open ALERT N 0 00 1 0 01 00 ON OFF ...

Page 75: ... mode 47 Crossing lane 23 cut out headset 58 Date 20 Dead battery 59 Delay time greeting 66 70 Dimensions 61 Display buttons 12 navigating 11 Disposal battery 51 53 Ear cup 37 41 Ear pad 48 49 52 Echo 20 Enter Select button 13 Ethernet port 13 Factory settings 29 FCC information 8 Feedback 58 Fitting headset 37 41 Full duplex definition 21 Global settings 20 Green light charger 53 59 Greeter setup...

Page 76: ...changing 66 Product Overview 7 Prompt language 22 pull ahead 22 store closed 22 PTT Push to talk See Talking modes Pull ahead prompt 22 Reboot 29 Registering headsets 18 Regular site schedule 26 Removing headsets 19 Restaurant closed message 67 Revision levels 29 Rotate ear cup 37 41 Run mode 44 Safety rules 7 Schedule 26 Select greeter messsage 65 68 69 Self monitoring 19 27 Service Shift button ...

Page 77: ... 1 the cost of shipping products to or from 3M for repair 2 repair or replacement of existing cable or wiring 3 product failure caused by misuse abuse improper installation or unapproved modifications or 4 intercom products that are installed or serviced by a non 3M authorized party To obtain warranty service please contact your authorized 3M dealer or 3M Building Commercial Services Division 3M C...

Reviews: