12
Allevi 3 | User Guide
Step 5
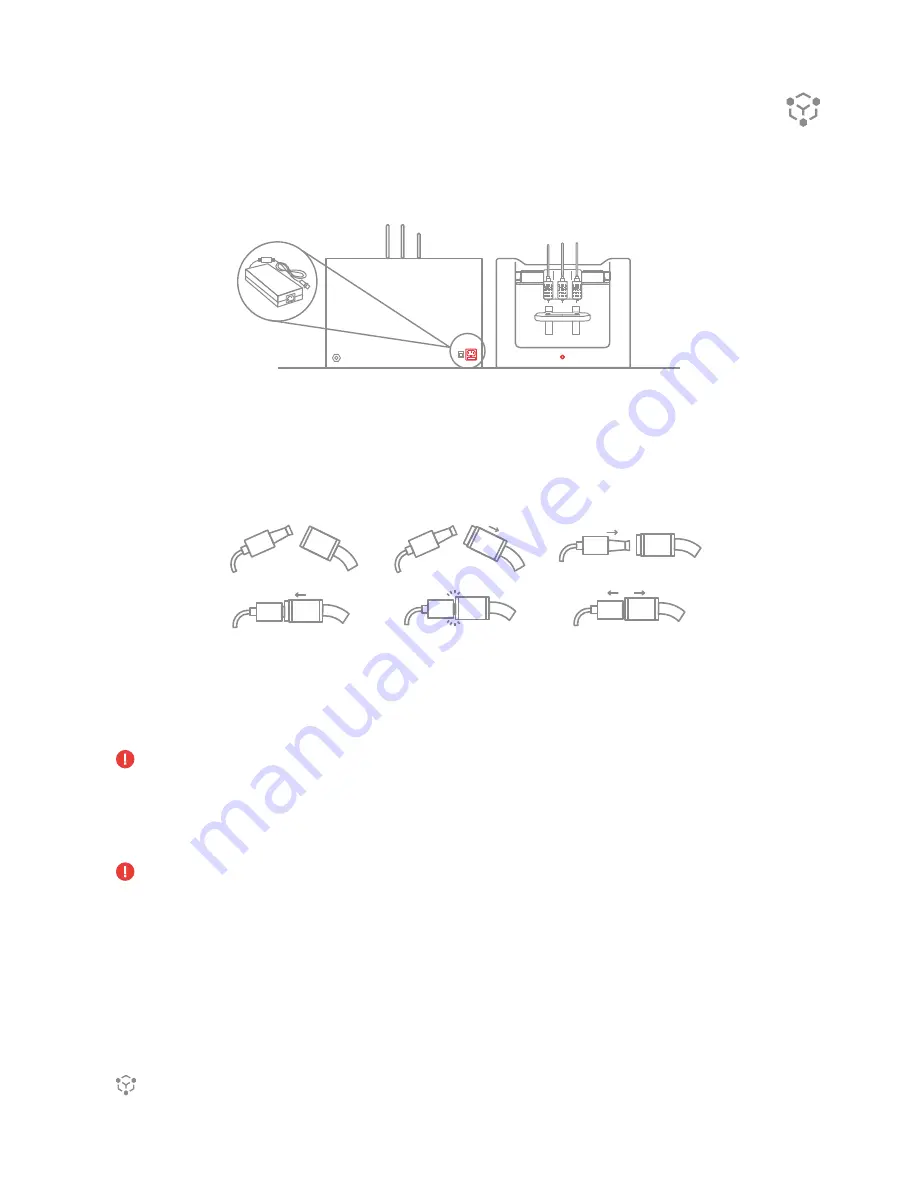
Power on the bioprinter by pressing the power button located on front of the bioprinter. It will turn
red.
Step 6
Connect the air compressor to the black air hose, and the air hose to the air input junction on the
printer. The connection between the hose and the junction can be tricky. Follow this diagram:
A Gather both the air input junction (left) and the air hose (right). B Pull back the collar of the air
hose.
C Insert the air input junction in the air hose. D Slide the collar of the air hose back into place.
E The connection should be formed! F Give the connection a light tug to ensure it is secure.
Note: The air compressor must remain turned on for the entirety of the print.
Using the knob near the outlet valve, set the pressure on both gauges to 120 PSI. This will ensure you have
plenty of pressure to use during printing. Any adjustment to your printing pressure is made in the software,
so leave the air compressor on this setting. After use, turn the air compressor off.
Note: The air compressor needs to be periodically drained to eliminate any condensation inside. To do
so, refer to the air compressor manufacturer manual. This should be done following every day of use.
Please refer to the air compressor manufacturer manual for all preventative maintenance.
C
D
E
F
A
B
5.
4.
Summary of Contents for Allevi 1
Page 1: ...Allevi 3 User Guide 1 1 2...
Page 2: ...BUILD WITH LIFE...
Page 4: ...WELCOME...
Page 8: ...GETTING STARTED...
Page 10: ...28mm 77 50mm Diameter 88 30mm 9 Allevi 3 User Guide PRINT BED DIMENSIONS...
Page 18: ...START PRINTING...
Page 24: ...23 Allevi 3 User Guide...
Page 25: ...MAINTENANCE TROUBLESHOOTING...
Page 28: ...Copyright Allevi Inc 2022 Allevi Inc 2929 Arch St 17th Floor Philadelphia PA 19104...
Page 29: ......


