background image

35

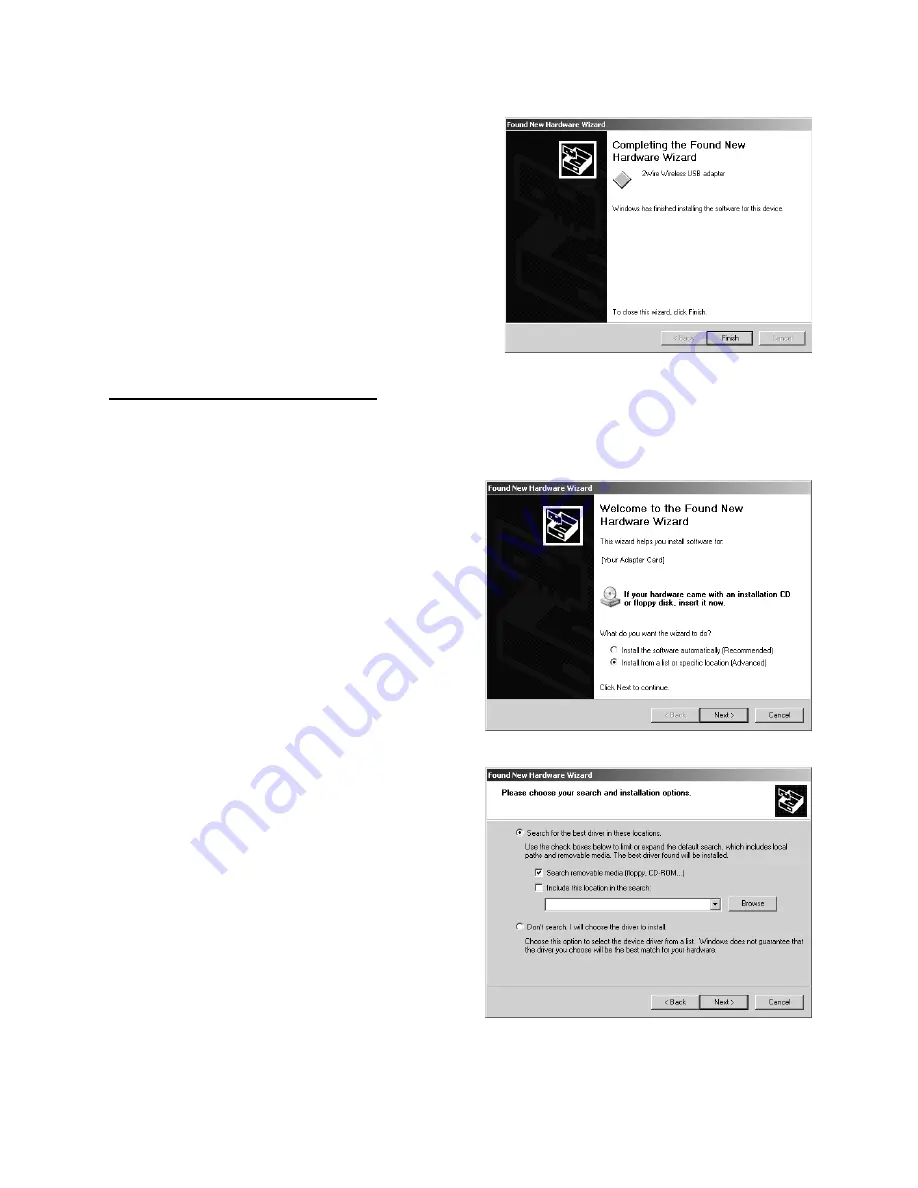
Installing Drivers For Windows XP

7.

Click 

Finish

 to complete the installation.

1.

Power on your computer and insert the HomePortal Setup Wizard for Windows XP CD into your 
CD-ROM drive.

2.

When the Found New Hardware Wizard 
window opens, select 

Install from a list or 

specific location (Advanced)

 and click 

Next

 to continue.

3.

When prompted to choose your search and 
installation options, ensure that the 

Search 

removable media


(floppy, CD-ROM) 

checkbox is selected.

Summary of Contents for HomePortal

Page 1: ...I n s t a l l a t i o n G u i d e f o r M o d e l s 1 0 0 a n d 1 0 0 W ...

Page 2: ...re prior arrangements with participating financial institutions 2Wire the 2Wire logo OfficePortal and HomePortal are trademarks of 2Wire Inc All other trademarks are trademarks of their respective owners ___________________________________________________________________________________________________________________________ Owner s Record The serial number is located on the bottom of your 2Wire ...

Page 3: ...r connections 6 USB Connection 7 Install the 2Wire Gateway USB driver 8 Check your connections 10 Home Phoneline Networking HomePNA Connection 10 Check your connections 11 Network with Ethernet Hub or Switch 12 Check your connections 13 Wireless Connection 13 Check your connections 14 Step 3 Install the HomePortal Software Installing the HomePortal Setup Wizard on Windows PCs 15 Starting the Setup...

Page 4: ...ers For Windows XP 28 2Wire Wireless USB Adapter 30 Installing the Wireless USB Adapter 30 Installing Drivers For Windows 98SE 31 Installing Drivers For Windows ME 32 Installing Drivers For Windows 2000 33 Installing Drivers For Windows XP 35 Appendix B Third party Wireless Adapter Configuration Locate the serial number and wireless encryption key 37 Agere ORiNOCO PC Card Silver or Gold 38 Cisco A...

Page 5: ...e this kind of computer you can use Ethernet cable to connect the Ethernet connection jack on the computer to the LOCAL ETHERNET port on the HomePortal You can identify an Ethernet connection jack by its rectangular shape and size which is slightly larger than a standard telephone jack Ethernet is recommended if your primary computer will be in the same room as the HomePortal For today s home netw...

Page 6: ...ortal keeps your data safe Wireless Wireless networking uses radio waves to connect your computers to your network A PC Card PCMCIA wireless adapter looks like a flat metal credit card with a piece of black plastic attached at one end Other types of wireless adapters can be attached using a USB connector Wireless technology is recommended for networking computers in the same room as the HomePortal...

Page 7: ...nternet sharing and security capabilities For more information on the HomePortal firewall see Technical Support at www 2Wire com If you have any of the following or similar applications installed on your computers remove or disable them according to the manufacturer s instructions before proceeding Third Check your computer s browser and system requirements Verify that your computers meet the foll...

Page 8: ... computer with CD ROM 5 MB of available hard disk space for 2Wire HomePortal software Windows 98 98SE Windows ME Windows NT 4 0 with Service Pack 6 Windows 2000 Windows XP or Mac OS 8 6 or higher Network interface card s appropriate to your HomePortal model ...

Page 9: ...See Appendix B for detailed configuration instructions Connection Type Go to Ethernet Requires A computer with an Ethernet port Recommended for Primary computer in the same room as the HomePortal page 6 USB Requires A Windows 98 98 SE ME or 2000 computer with an available USB port Recommended for Primary computer in the same room as the HomePortal page 7 Home phoneline networking HomePNA Requires ...

Page 10: ...s to your network Connect the provided telephone cable from the LINE port on the HomePortal to a telephone jack IMPORTANT Don t forget to reboot your cable or DSL modem after new connections are made and make sure that your modem is powered on before proceeding Check your connections With your computer completely started verify the POWER and HOME NETWORK indicator lights on the front of the HomePo...

Page 11: ...Connect the provided USB cable from the PC port on the HomePortal to your computer s USB port 3 Connect the provided AC power adapter from the HomePortal s POWER port to an electrical outlet The green POWER light on the front of the HomePortal should come on 4 Connect the remaining cable from the broadband modem to your broadband service cable or DSL wall jack 5 This connection is only required if...

Page 12: ... may vary somewhat on Windows ME Windows 2000 and Windows XP 1 Power on your computer The Add New Hardware Wizard opens Click Next to continue 2 Select Search for best driver for your device and click Next to continue 3 Place the HomePortal Setup Wizard CD in the CD ROM tray and select CD ROM drive Click Next to continue Note Make sure only the CD ROM drive is selected Otherwise Windows may load t...

Page 13: ...driver and click Next 5 Click Next Note If asked to insert your Windows CD please do so and follow the on screen instructions If you don t have your Windows CD handy look for the Windows cab files in the locations listed below C WINDOWS options cab C WINDOWS C WINDOWS system C Win98 6 Click Finish 7 Remove the CD from the CD ROM tray then click Yes to restart your computer ...

Page 14: ... computer does not have a HomePNA port you will need to install a PCI HomePNA adapter or an external HomePNA adapter Specific instructions for installing HomePNA network adapters can be found in the individual adapter s package if purchased separately or on your HomePortal Setup Wizard CD if included with your HomePortal The HomePNA adapter shown in this example is a 2Wire PC Port Phoneline Adapte...

Page 15: ...ilter to the same phone jack Note Your HomePNA card or adapter is not the analog V90 dial up modem that may be integrated in your computer Please make sure that you connect both separately IMPORTANT Don t forget to reboot your cable or DSL modem after new connections are made and make sure that your modem is powered on before proceeding Check your connections With your computer completely started ...

Page 16: ...g an Ethernet cable 4 Using another Ethernet cable not provided connect each additional computer to the hub or switch 5 Plug the hub or switch into an electrical outlet 6 Connect the provided AC power adapter from the HomePortal s POWER port to an electrical outlet The green POWER light on the front of the HomePortal should come on 7 Connect the remaining cable from the broadband modem to your bro...

Page 17: ...e HomePortal s POWER port to an electrical outlet The green POWER light on the front of the HomePortal should come on 3 Connect the remaining cable from the broadband modem to your broadband service cable or DSL wall jack 4 Install your wireless adapter according to the manufacturer s instructions see note below Note If you use a 2Wire wireless adapter PC card or USB adapter for wireless networkin...

Page 18: ...ed and your wireless card properly configured verify the POWER and HOME NETWORK indicator lights on the front of the HomePortal are green If they are not see Diagnosing connection problems on page 22 The BROADBAND LINK indicator light will not turn green until the HomePortal software has been installed and an Internet connection has been established Continue to Step 3 Install the HomePortal Softwa...

Page 19: ... XP users should use the HomePortal Setup Wizard for Windows XP CD Starting the Setup Wizard manually on Windows PCs After one minute if the Setup Wizard does not run automatically follow these steps 1 Double click the My Computer icon located on the desktop 2 Double click the icon that corresponds to your CD ROM drive then double click Setup exe 3 Follow the onscreen instructions First computer o...

Page 20: ...on Double click the 2Wire install icon and click Continue 3 Click Install to copy the HomePortal software to a folder called 2Wire HomePortal on the Macintosh hard drive To copy the files to a different folder click Select Folder from the pull down menu and select another folder Click Install and follow the onscreen instructions First computer only After the Setup Wizard completes the BROADBAND LI...

Page 21: ...less adapter you will need to manually configure your adapter of choice to communicate with the HomePortal BEFORE installing the HomePortal software See Appendix B for detailed configuration instructions Connection Type Go to USB Requires a Windows 98 98 SE ME Windows 2000 or Windows XP computer with an available USB port If you connected your first computer via USB this connection type is not ava...

Page 22: ... is not available for Macintosh Windows 95 Windows 95 OSR2 or Windows NT 1 Connect the provided USB cable from the PC port on the HomePortal to the USB port on your computer Before installing your HomePortal software on this computer you must install a 2Wire Gateway USB driver See page 8 for detailed instructions on installing this driver Repeat Step 3 Install the HomePortal Software on page 15 US...

Page 23: ...fic instructions for installing HomePNA network adapters can be found in the individual adapter package if purchased separately or on your HomePortal Setup Wizard CD if included with your HomePortal The HomePNA adapter shown in the following example is a 2Wire PC Port Phoneline Adapter 1 Install the HomePNA adapter according to the manufacturer s instructions After your adapter is successfully ins...

Page 24: ...pter you will need to manually configure your adapter of choice to communicate with the HomePortal BEFORE installing the HomePortal software See Appendix B for detailed configuration instructions 1 Install your wireless adapter according to the manufacturer s instructions see note above After your adapter is successfully installed repeat Step 3 Install the HomePortal Software on page 15 Wireless C...

Page 25: ...onnected to your broadband service Blinking orange The HomePortal is attempting to establish a physical broadband connection Solid red The HomePortal has not detected a broadband signal Solid orange The HomePortal has established a physical broadband connection but was not able to successfully connect to your Internet Service Provider or has not yet been configured Blinking green The HomePortal is...

Page 26: ...ower cord are firmly plugged into the brick Note If the POWER indicator light is red signifying a system error or does not light after performing the steps above contact 2Wire Customer Care BROADBAND LINK indicator light is red If the BROADBAND LINK indicator light is red the HomePortal has not established a connection to your broadband service provider 1 Go to the HomePortal default page http hom...

Page 27: ...network while remaining connected to the LAN Follow these steps to install the Wireless PC Card Step 1 Install the Wireless PC Card Step 2 Install the drivers Step 3 Reboot your computer so Windows recognizes the adapter The following sections give you detailed instructions for completing each step Note If you are running Windows XP drivers are located on the HomePortal Setup Wizard for Windows XP...

Page 28: ...are Wizard opens Click Next to continue 2 When the next window opens select Search for a better driver for your device Recommended and click Next 3 Insert the HomePortal Setup Wizard CD into your CD ROM drive uncheck Floppy disk drives select the CD ROM drive checkbox and click Next ...

Page 29: ...opied click Finish 6 When the System Setting Change window opens click Yes to reboot your computer and complete the installation 1 Power on your computer and insert the HomePortal Setup Wizard CD into your CD ROM drive 2 When the Add New Hardware Wizard window opens select Automatic search for a better driver Recommended and click Next ...

Page 30: ...o reboot your computer and complete the installation 1 Power on your computer and insert the HomePortal Setup Wizard CD into your CD ROM drive 2 When the Found New Hardware Wizard window opens click Next to continue 3 The next window prompts you to install device drivers Select Search for a suitable driver for my device recommended and click Next ...

Page 31: ...indow opens uncheck Floppy disk drives select the CD ROM drives checkbox and click Next 5 When the Driver Files Search Results window opens click Next 6 When the Digital Signature Not Found window opens click Yes to copy the driver files ...

Page 32: ...rtal Setup Wizard for Windows XP CD into your CD ROM drive 2 When the Found New Hardware Wizard window opens select Install from a list or specific location Advanced and click Next to continue 3 When prompted to choose your search and installation options ensure that the Search removable media floppy CD ROM checkbox is selected ...

Page 33: ... opens click Continue Anyway to copy the driver files If the Hardware Installation window does not open continue to step 5 5 Click Finish to complete the installation 6 To manually configure the Windows XP wireless client refer to Appendix B ...

Page 34: ...steps to install the Wireless USB Adapter Step 1 Install the Wireless USB Adapter Step 2 Install the drivers Step 3 Reboot your computer so Windows recognizes the adapter The following sections give you detailed instructions for completing each step Note If you are running Windows XP drivers are located on the HomePortal Setup Wizard for Windows XP CD Installing the Wireless USB Adapter The suppli...

Page 35: ...are Wizard opens Click Next to continue 2 When the next window opens select Search for a better driver for your device Recommended and click Next 3 Insert the HomePortal Setup Wizard CD into your CD ROM drive uncheck Floppy disk drives select the CD ROM drive checkbox and click Next ...

Page 36: ...opied click Finish 6 When the System Setting Change window opens click Yes to reboot your computer and complete the installation 1 Power on your computer and insert the HomePortal Setup Wizard CD into your CD ROM drive 2 When the Add New Hardware Wizard window opens select Automatic search for a better driver Recommended and click Next ...

Page 37: ...o reboot your computer and complete the installation 1 Power on your computer and insert the HomePortal Setup Wizard CD into your CD ROM drive 2 When the Found New Hardware Wizard window opens click Next to continue 3 The next window prompts you to install device drivers Select Search for a suitable driver for my device recommended and click Next ...

Page 38: ...indow opens uncheck Floppy disk drives select the CD ROM drives checkbox and click Next 5 When the Driver Files Search Results window opens click Next 6 When the Digital Signature Not Found window opens click Yes to copy the driver files ...

Page 39: ...rtal Setup Wizard for Windows XP CD into your CD ROM drive 2 When the Found New Hardware Wizard window opens select Install from a list or specific location Advanced and click Next to continue 3 When prompted to choose your search and installation options ensure that the Search removable media floppy CD ROM checkbox is selected ...

Page 40: ... opens click Continue Anyway to copy the driver files If the Hardware Installation window does not open continue to step 5 5 Click Finish to complete the installation 6 To manually configure the Windows XP wireless client refer to Appendix B ...

Page 41: ...er and may have a slightly different appearance than the screens shown in these instructions Locate the serial number and wireless encryption key Your HomePortal is configured with unique security parameters that must be configured into your wireless adapter On the bottom of your HomePortal you will find two important pieces of information required for configuring your adapter the serial number an...

Page 42: ...er The ORiNOCO Client Manager screen appears 2 From the Actions menu select Add Edit Configuration Profile 3 The Add Edit Configuration Profile screen appears 4 To create your profile click Add The Edit Configuration screen appears Enter a profile name in the Profile Name field The profile name identifies your wireless profile and should be no more than 29 characters in length 5 From the Network T...

Page 43: ...he word 2WIRE in capital letters 8 Click Next In the Set Security field check the Enable Data Security checkbox Verify that the Use Hexadecimal 0 9 a f A F radio button is selected 9 In the Key field enter your ten digit Wireless Encryption Key located on the bottom of your HomePortal 10 Verify that Key 1 is selected in the Encrypt data with pull down menu this is the default 11 To select a power ...

Page 44: ...ears 15 Click OK Cisco Aironet Consult the documentation provided with your wireless adapter to install the Cisco Aironet adapter then follow these steps 1 Double click the Aironet Client Utility icon on your desktop The Aironet Client Utility screen appears 2 Click the Profile Manager button The Profile Manager screen appears 3 Click Add ...

Page 45: ...e Wireless Network Name is case sensitive so it is important that you enter the word 2WIRE in capital letters 8 In the Power Save Mode field verify that the CAM Constantly Awake Mode radio button is selected this is the default 9 In the Network Type field verify that the Infrastructure radio button is selected this is the default 10 Select the Network Security tab In the WEP field select the Use S...

Page 46: ...le Management field indicating that your Cisco adapter is properly configured 14 Click OK D Link Air DWL 650 Consult the documentation provided with your wireless adapter to install the D Link Air DWL 650 then follow these steps 1 From the Start menu select Programs D Link DWL 650 Control Utility Configuration Utility ...

Page 47: ...d 2WIRE in capital letters 6 In the Tx Rate pull down menu verify that Fully Automatic is selected this is the default 7 In the PS Mode pull down menu verify that Disabled is selected this is the default 8 Click Apply Changes 9 Select the Encryption tab 10 From the Encryption WEP pull down menu select 64 Bit 11 In the WEP Key Entry field select the Manual Entry radio button 12 In the Key 1 field e...

Page 48: ...ort wireless adapter then follow these steps 1 From the Apple pull down menu select AirPort to open the AirPort dialog box 2 In the AirPort Network panel click the Choose Network pull down menu 3 Select your wireless network name Your wireless network name is 2WIRE followed by the last three digits of your HomePortal serial number located on the bottom of your HomePortal ...

Page 49: ...tal is pre configured to take advantage of wireless security Referring to the instructions provided with your wireless adapter enable wireless security Wireless security is sometimes referred to as WEP wired equivalent privacy 64 bit encryption or 40 bit encryption 4 Enter the encryption key Once you have enabled security on your wireless adapter you need to enter the unique security key for your ...

Page 50: ...less access point displays as 2WIRE in all capital letters followed by the last three digits of the HomePortal serial number located on the bottom of your HomePortal 4 In the Network key field enter your ten digit Wireless Encryption Key located on the bottom of your HomePortal 5 Click Connect 6 A notification message now appears next to the Wireless Network Connection icon indicating that your wi...

Page 51: ...unded Operation with cables connected to peripherals that are not shielded and grounded may result in interference to radio and television reception CAUTION To comply with FCC RF exposure requirements a separation distance of at least 8 inches 20 cm must be maintained between the antenna of this and all persons FCC Part 68 This equipment complies with Part 68 of the FCC rules On the bottom of this...

Page 52: ...nsee specifications iii that are modified after delivery by 2Wire iv combined with other products processes or materials where the alleged infringement relates to such combination v where Licensee continues allegedly infringing activity after being notified thereof or after being informed of modifications that would have avoided the alleged infringement vi where Licensee s use of such Product is n...

Page 53: ...vernment contract use duplication or disclosure by the U S Government is subject to restrictions set forth in FAR subparagraphs 52 227 19 a and d for civilian agency contracts and DFARS 252 227 7013 ii for Department of Defense contracts No failure or delay in exercising any right hereunder will operate as a waiver thereof nor will any partial exercise of any right or power hereunder preclude furt...

Page 54: ... Product RMA Before returning any product contact 2Wire Customer Support and obtain an RMA number by calling US Canada only 1 800 877 5718 for filter and adapter products 1 877 347 8680 for residential gateway products or Return the product to the place of purchase If 2Wire Customer Support determines that the product may be defective they will issue you an RMA number to place on the outer package...

Page 55: ...5100 000108 000 Rev D ...

Reviews: