29
EN
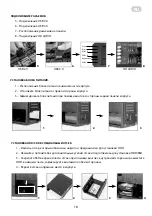
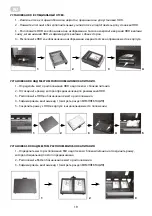
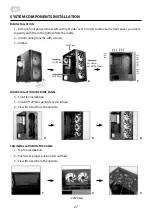
1 – PSU Space at bottom of chassis.
2 – Insert PSU from right side of chassis to the proper position.
3 – Fix with hex screw from rear plate.
POWER SUPPLY INSTALLATION.
1
2
3
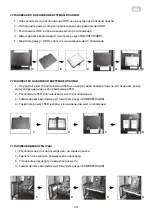
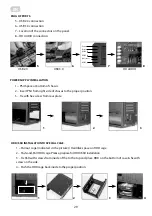
5 – USB 2.0 connection.
6 – USB 3.0 connection.
7 – Location of the connectors on the panel.
8 – HD AUDIO connection.
PLUG OF PORTS.
5
6
7
8
USB 2.0
USB 3.0
HD AUDIO
Power
Reset
USB 3.0
USB 2.0
USB 2.0
Indicators
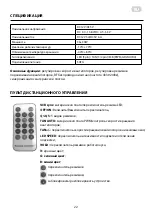
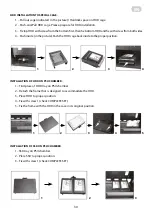
1 – Pull out cage (indicated in the picture) / Harddisk space on HDD cage.
2 – Push-and-Pull HDD cage. Please, prepare for HDD/SSD installation.
3 – Fix SSD with screws from inside of the to the top and place HDD on the bottom of case & fix with
screw on the side.
4 – Push the HDD cage back inside to the proper position.
HDD/SSD INSTALLATION TO SPECIAL CAGE.
1
2
3
4
Summary of Contents for GAMING CONTEGO NEO
Page 1: ...RU UA EN COMPUTER CASE OPERATION GUIDE 2E GAMING CONTEGO NEO GW05 2 COMPONENTS...
Page 3: ...3 UA 8 1 6 5 b 5 c 5 2 a 2 2 b 4 4 4 b 4 b 7 3 3 3 b 4 1 c 1 c 1 c...
Page 5: ...5 UA 4 5 6 1 2 3 1 3 1 2 3 1 2 2 120 3 2 3 120 2 140 200 1 120 2 120 2 120 4 5 6...
Page 6: ...6 UA 4 5 6 1 2 3 4 1 2 3 4 4 1 5 2 1 120 6 3 1 2 3...
Page 12: ...12 UA 1 2 3 4 5 6 1 2 3 4...
Page 14: ...14 RU 8 1 6 5 b 5 c 5 2 a 2 2 b 4 4 4 b 4 b 7 3 3 3 b 4 1 c 1 c 1 c...
Page 16: ...16 RU 4 5 6 1 2 3 1 3 1 2 3 1 2 2 120 3 2 3 120 2 140 200 1 120 2 120 2 120 4 5 6...
Page 17: ...17 RU 4 5 6 1 2 3 4 1 2 3 4 4 1 5 2 1 120 6 3 1 2 3...
Page 23: ...23 RU 1 2 3 4 5 6 1 2 3 4...
Page 36: ......
Page 37: ...2 1 2 3 4 5 6 12 ______________________________________________________________...
Page 38: ......
Page 40: ......

