


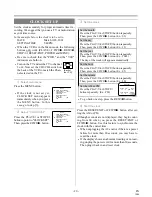

1) Pulse el botón MENU.
2) Pulse el botón PLAY/
▲
o STOP/
▼
para indicar "AJUSTE CA-
NAL". Luego, pulse el botón F.FWD/
B
.
3) Seleccione "TV" o "CATV" con el botón PLAY/
▲
o STOP/
▼
.
4) Pulse el bel botón F.FWD/
B
una vez o dos veces.
Una vez finalizada la operación de exploración, el sintonizador se
detendrá en el canal memorizado más bajo.
SELECCIÓN DEL IDIOMA
Si desea cambiar el idioma de la pantalla del televisor, siga los pasos
siguientes:
Nota: Esta función es efectiva solamente para el idioma en el menú
de la pantalla, pero no para el origen audio.
1) Pulse el botón MENU.
2) Pulse PLAY/
▲
o STOP/
▼
para indicar "SELEC. IDIOMA".
Luego pulse el botón F.FWD/
B
.
3) Seleccione "ENGLISH" o "ESPAÑOL" con el botón PLAY/
▲
o
STOP/
▼
.
4) Pulse el botón RESET/EXIT para volver al modo del televisor.
NOTA: Si por alguna razón el menú está en inglés, pulse el botón
MENU hasta que aparezca el menú principal, pulse el botón PLAY/
▲
para indicar "LANGUAGE SELECT", pulse el botón F.FWD/
B
, pul-
se el botón PLAY/
▲
para indicar "ESPAÑOL", y luego pulse el botón
RESET/EXIT.
SISTEMA MTS (sonido de televisión multicanal)
Podrá grabar o escuchar un programa en MTS estéreo utilizando un
amplificador y altavoces estéreo.
Consulte la figura 1 de la página 22.
COMPROBACIÓN DEL MODO MTS SELEC-
CIONADO
Cuando reproduzca una cinta VHS o reciba una emisión en el canal
del sintonizador de la videograbadora que esté viendo, el estado apa-
recerá cuando usted pulse el botón DISPLAY del mando a distancia.
SAP: Segundo programa de audio, lo que significa que su programa
también puede recibirse en un segundo idioma, o que puede recibirse
algunas veces una emisora de radio.
HIFI: Alta Fidelidad que produce mejor sonido que la videograbadora
estéreo estándar.
●
Cuando un programa emita en estéreo, ESTEREO aparecerá en la
pantalla del televisor.
●
Cuando un programa se emita en el modo de segundo programa
de audio, SAP aparecerá en la pantalla del televisor.
●
Cuando un programa se emita en estéreo y en el modo de segundo
programa de audio, ESTEREO y SAP aparecerán en la pantalla
del televisor.
NOTA: Aunque un programa puede emitirse en estéreo y en el
modo de segundo programa de audio, usted no podrá grabar en esté-
reo y en el modo de segundo programa de audio al mismo tiempo.
●
Mientras la videograbadora esté en el modo estéreo, ESTEREO
aparecerá en la pantalla del televisor. Mientras la videograbadora
esté en el modo mono (MONO), ESTEREO desaparecerá de la
pantalla del televisor.
NOTA: Si reproduce cintas que no son de HIFI, ESTEREO de-
saparecerá de la pantalla del televisor y la videograbadora repro-
ducirá en mono.
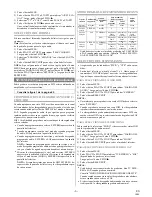
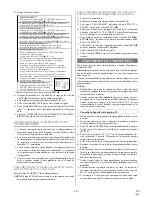
MODO DE GRABACIÓN/MONITOREO DE MTS
Tipo de
emisión
Visualización
en pantalla
Selección
TV ESTEREO
/SAP
Pista de audio de
Hi-Fi (2 canales)
Pista de
audio
normal
Canal
Izquierdo
Canal
derecho
Normal
(audio mono)
-Ninguna-
Inválida
Mono
Mono
Mono
Emisión
estéreo
ESTEREO
Inválida
L
R
L+R
Emisión
bilingüe
SAP
TV ESTEREO* Programa de
audio
principal
Programa de
audio
principal
Programa de
audio
principal
SAP*
Programa de
audio
secundario
Programa de
audio
secundario
Programa de
audio
secundario
Emisión
estéreo y
bilingüe
ESTEREO
SAP
TV ESTEREO*
L
R
L+R
SAP*
Programa de
audio
secundario
Programa de
audio
secundario
Programa de
audio
secundario
* Usted deberá seleccionar el modo de grabación en TV ESTEREO
o SAP cuando grabe una emisión. Consulte "PARA SELECCIO-
NAR EL MODO ESTEREO O SAP".
SELECCIÓN DEL SISTEMA MTS
●
Asegúrese de que los indicadores "PWR." y "VCR" estén encen-
didos.
●
Encienda el televisor y ajústelo al canal 3 ó 4. Ahora ponga el
conmutador CH3/CH4 del panel trasero de la videograbadora en
la posición que concuerde con el canal seleccionado en el televisor.
PARA SELECCIONAR EL MODO HIFI
1) Pulse el botón MENU.
2) Pulse el botón PLAY/
▲
o STOP/
▼
para indicar "SALIDA DEL
AUDIO". Luego, pulse el botón F.FWD/
B
.
3) Pulse el botón PLAY/
▲
o STOP/
▼
para indicar "ESTEREO".
4) Pulse el botón RESET/EXIT.
NOTAS:
●
Normalmente, para reproducir con sonido HIFI deberá seleccio-
narse "ESTEREO".
●
Cuando reproduzca cintas que no sean HIFI, la videograbadora
reproducirá automáticamente en el modo mono.
●
La videograbadora graba automáticamente emisiones MTS con
sonido estéreo HIFI si no se selecciona el modo de grabación SAP
antes de comenzar a grabar.
PARA SELECCIONAR EL MODO MONO
Podrá cambiar la selección a "MONO" si desea escuchar cintas HIFI
con la reproducción de audio normal.
1) Pulse el botón MENU.
2) Pulse el botón PLAY/
▲
o STOP/
▼
para indicar "SALIDA DEL
AUDIO". Luego, pulse el botón F.FWD/
B
.
3) Pulse el botón PLAY/
▲
o STOP/
▼
para indicar "MONO".
4) Pulse el botón RESET/EXIT para volver al modo del televisor.
PARA SELECCIONAR EL MODO ESTEREO O SAP
1) Pulse el botón MENU.
2) Pulse PLAY/
▲
o STOP/
▼
para indicar "TV ESTEREO" o "SAP"
(dependiendo de que desee seleccionar).
Luego, pulse el botón F.FWD/
B
.
3) Pulse el botón RESET/EXIT.
NOTAS:
●
Usted deberá seleccionar el modo de grabación, bien TV ESTE-
REO o SAP, cuando grabe una emisión.
Consulte "MODO DE GRABACIÓN/MONITOREO DE MTS".
Cuando reproduzca una cinta en la videograbadora más adelante,
ésta se reproducirá en estéreo o SAP.
●
Si selecciona el modo de segundo audio cuando éste no se encuen-
tre disponible, la videograbadora grabará audio normal.
1B14
H7942ES
- 6 -
ES


