


Chapter 33 DHCP
XS1930 Series User’s Guide
271
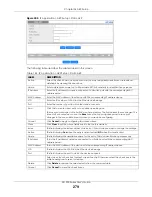
33.4.7 DHCPv4 VLAN Port Configure
Use this screen to apply a different DHCP option 82 profile to certain ports in a VLAN. To open this screen,
click
IP Application > DHCP > DHCPv4 > VLAN > Port
.
Figure 194
IP Application > DHCP > DHCPv4 > VLAN > Port
The following table describes the labels in this screen.
Select an entry’s check box to select a specific entry. Otherwise, select the check box in the
table heading row to select all entries.
Delete
Select the configuration entries you want to remove and click
Delete
to remove them.
Cancel Click
Cancel
to clear the check boxes.
Table 140 IP Application > DHCP > DHCPv4 > VLAN (continued)
LABEL
DESCRIPTION
Table 141 IP Application > DHCP > DHCPv4 > VLAN > Port
LABEL
DESCRIPTION
VID
Enter the ID number of the VLAN you want to configure here.
Port
Enter the number of port(s) to which you want to apply the specified DHCP option 82 profile.
You can enter multiple ports separated by (no space) comma (,) or hyphen (-). For example,
enter “3-5” for ports 3, 4, and 5. Enter “3,5,7” for ports 3, 5, and 7.
Option 82 Profile Select a pre-defined DHCP option 82 profile that the Switch applies to the specified port(s) in this
VLAN. The Switch adds the Circuit ID sub-option and/or Remote ID sub-option specified in the
profile to DHCP requests that it relays to a DHCP server.
The profile you select here has priority over the one you select in the
DHCP > DHCPv4 > VLAN
screen.
Add
Click this to create a new entry or to update an existing one.
This saves your changes to the Switch’s run-time memory. The Switch loses these changes if it is
turned off or loses power, so use the
Save
link on the top navigation panel to save your changes
to the non-volatile memory when you are done configuring.
Cancel
Click this to reset the values above based on the last selected entry or, if not applicable, to
clear the fields above.
Clear
Click
Clear
to reset the fields to the factory defaults.
Index
This field displays a sequential number for each entry. Click an index number to change the
settings.
VID
This field displays the VLAN to which the port(s) belongs.
Содержание XS1930 Series
Страница 17: ...17 PART I User s Guide ...
Страница 38: ...38 PART II Technical Reference ...
Страница 153: ...Chapter 13 Spanning Tree Protocol XS1930 Series User s Guide 153 Figure 112 MSTP and Legacy RSTP Network Example ...
Страница 187: ...Chapter 21 Classifier XS1930 Series User s Guide 187 Figure 134 Classifier Example ...


