Prestige 643 ADSL Router
2-2
Hardware Installation & Setup
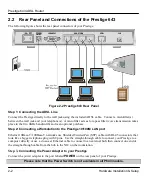
2.2 Rear Panel and Connections of the Prestige 643
The following figure shows the rear panel connectors of your Prestige:
Figure 2-2 Prestige 643 Rear Panel
Step 1: Connecting the ADSL Line
Connect the Prestige directly to the wall jack using the included ADSL cable. Connect a microfilter(s)
between the wall jack and your telephone(s). A microfilter acts as low-pass filter (voice transmission takes
place in the 0 to 4KHz bandwidth) and is an optional purchase.
Step 2: Connecting a Workstation to the Prestige 10/100M LAN port
Ethernet 10Base-T/100Base-T networks use Shielded Twisted Pair (STP) cable with RJ-45 connectors that
look like a bigger telephone plug with 8 pins. Use the straight-through cable to connect your Prestige to a
computer directly or use a crossover Ethernet cable to connect to an external hub, then connect one end of
the straight-through cable from the hub to the NIC on the workstation.
Step 3.
Connecting the Power Adapter to your Prestige
Connect the power adapter to the port labeled
POWER
on the rear panel of your Prestige.
Please note that the Power Switch is not available in all P643 models.
Содержание Prestige 643
Страница 1: ...Prestige 643 ADSL Router User s Guide Version 2 50 February 2002 ...
Страница 3: ...Prestige 643 ADSL Router FCC iii ...
Страница 14: ......
Страница 21: ......
Страница 27: ......
Страница 67: ......
Страница 77: ......
Страница 87: ......
Страница 94: ......
Страница 140: ......
Страница 184: ......
Страница 190: ......
Страница 191: ......


