


Chapter 6 Wireless
P-2601HN(L)-F1 Series User’s Guide
93
6.4 The WPS Screen
Use this screen to configure WiFi Protected Setup (WPS) on your ZyXEL Device.
WPS allows you to quickly set up a wireless network with strong security, without
having to configure security settings manually. Set up each WPS connection
between two devices. Both devices must support WPS. See
for more information about WPS.
Note: The ZyXEL Device applies the security settings of the
SSID1
profile (see
). If you want to use the WPS feature, make sure you
have set the security mode of
SSID1
to
WPA-PSK
,
WPA2-PSK
or
No Security
.
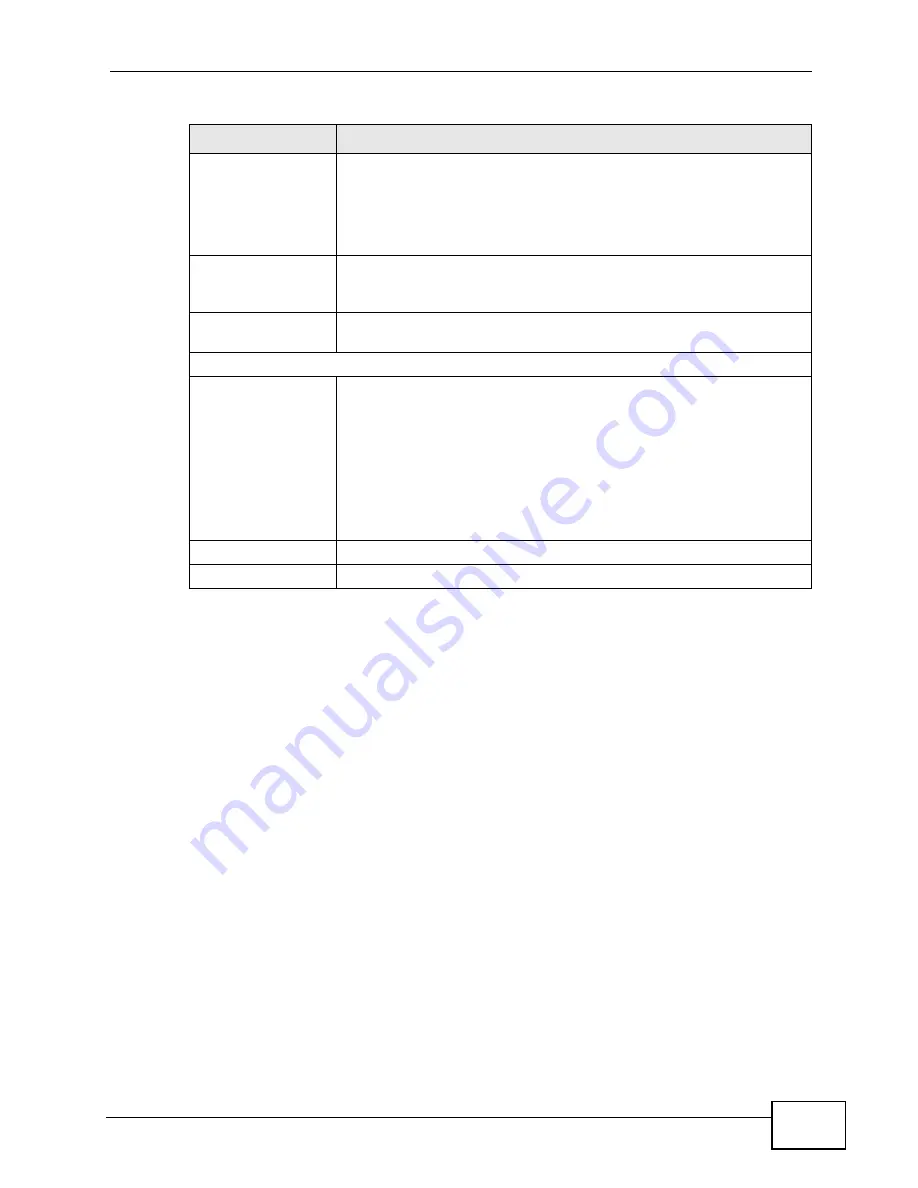
Wireless Network
Name (SSID)
The SSID (Service Set IDentity) identifies the service set with which
a wireless device is associated. Wireless devices associating to the
access point (AP) must have the same SSID.
Enter a descriptive name (up to 32 English keyboard characters) for
the wireless LAN.
Hide SSID
Select this check box to hide the SSID in the outgoing beacon frame
so a station cannot obtain the SSID through scanning using a site
survey tool.
BSSID
This shows the MAC address of the wireless interface on the ZyXEL
Device when wireless LAN is enabled.
Security Level
Security Mode
Select Basic (WEP) or More Secure (WPA(2)-PSK, WPA(2)) to
add security on this wireless network. The wireless clients which
want to associate to this network must have same wireless security
settings as the ZyXEL Device. After you select to use a security,
additional options appears in this screen.
Or you can select No Security to allow any client to associate this
network without any data encryption or authentication.
See
for more details about this field.
Apply
Click Apply to save your changes.
Back
Click Back to exit this screen without saving.
Table 14
Wireless > More AP: Edit (continued)
LABEL
DESCRIPTION
Содержание P-2601HN(L)-F1 Series
Страница 2: ......
Страница 8: ...Safety Warnings P 2601HN L F1 Series User s Guide 8 ...
Страница 10: ...Contents Overview P 2601HN L F1 Series User s Guide 10 ...
Страница 19: ...19 PART I User s Guide ...
Страница 20: ...20 ...
Страница 59: ...59 PART II Technical Reference ...
Страница 60: ...60 ...
Страница 110: ...Chapter 6 Wireless P 2601HN L F1 Series User s Guide 110 ...
Страница 130: ...Chapter 8 Routing P 2601HN L F1 Series User s Guide 130 ...
Страница 134: ...Chapter 9 DNS Route P 2601HN L F1 Series User s Guide 134 ...
Страница 178: ...Chapter 16 VoIP P 2601HN L F1 Series User s Guide 178 Figure 81 VoIP SIP SIP Service Provider ...
Страница 202: ...Chapter 16 VoIP P 2601HN L F1 Series User s Guide 202 ...
Страница 206: ...Chapter 17 Logs P 2601HN L F1 Series User s Guide 206 ...
Страница 212: ...Chapter 18 System Monitor P 2601HN L F1 Series User s Guide 212 ...
Страница 220: ...Chapter 21 SNMP P 2601HN L F1 Series User s Guide 220 ...
Страница 232: ...Chapter 26 Backup Restore P 2601HN L F1 Series User s Guide 232 ...
Страница 290: ...Appendix B Setting Up Your Computer s IP Address P 2601HN L F1 Series User s Guide 290 ...
Страница 298: ...Appendix C Pop up Windows JavaScript and Java Permissions P 2601HN L F1 Series User s Guide 298 ...
Страница 322: ...Appendix D Wireless LANs P 2601HN L F1 Series User s Guide 322 ...
Страница 332: ...Appendix F Open Software Announcements P 2601HN L F1 Series User s Guide 332 ...
Страница 344: ...Index P 2601HN L F1 Series User s Guide 344 ...


