Page 13
F8 Fresnel
Barn Door Installation
The F8 includes a set of compact 4-way barn doors as part of the kit. The barn doors
are installed by way of 4 barn door ears. There are two positions for the barn door
ears – open (the packed position) and locked (or the forward position). Please refer to
figures 1 and 2 to understand the different positions of the barn door ears.
fig 3
Page 7
fig 1 – open
fig 2 – locked
fig 4
fig 3
F8 Fresnel
Barn Door Installation
The F8 includes a set of compact 4-way barn doors as part of the kit. The barn
doors are installed by way of 4 barn door ears. There are two positions for the
barn door ears – open (the packed position) and locked (or the forward
position). Please refer to figures 1 and 2 to understand the different positions
of the barn door ears.
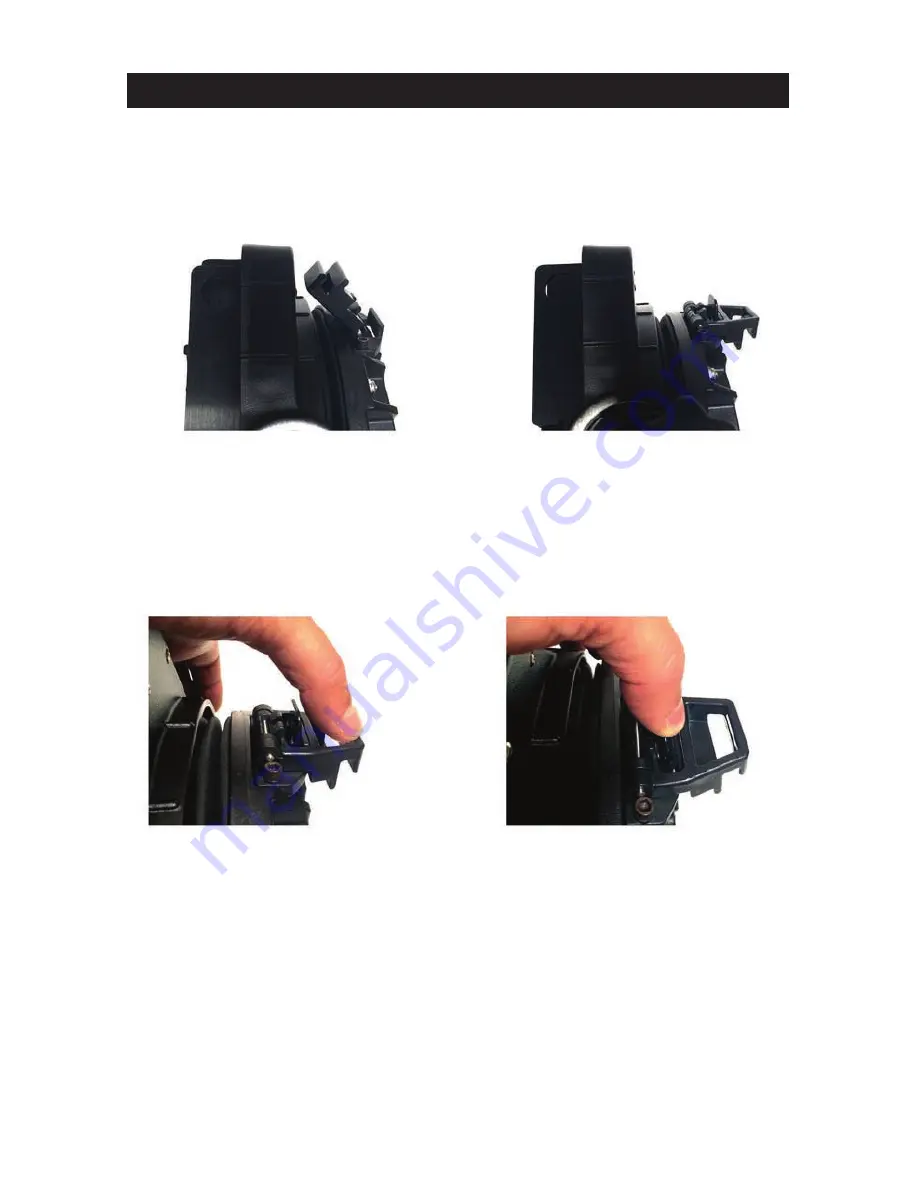
To lock the barn doors ears in place to securely hold the barn doors or any
scrims or gels, push the barn door ears forward (towards the front of the light).
Each barn door ear will ‘click’ into a locked position (fig 3). To release each
barn door ear, push center tab of the barn door ear towards the back of the
fixture and the barn door ear will release (fig 4). Make sure that each barn door
ear is securely locked into position before proceeding to the next one.
To properly install the barn doors, clip and lock the two lower barn door ears
(the two closest to the ground). Clip and lock the top barn door ear that is
furthest from your reach. This will leave one barn door ear still in its flipped
back (packed) position (fig 5). Loop and attach a safety cable to a high secure
point within your fixture, grid, or stand (fig 6). Attach the other end to one of the
top holes found on the four corners of the face of the center portion of the barn
door (fig 7). This tethers the barn door so in case of an accidental release, the
barn doors will hang next to the fixture and not fall away from the fixture.
Failure to properly tether the barn doors can create a dangerous circumstance
for anyone positioned below the fixture.
Fig 1 - Open
Fig 2 - Locked
To lock the barn doors ears in place to securely hold the barn doors or any scrims
or gels, push the barn door ears forward (towards the front of the light). Each barn
door ear will ‘click’ into a locked position (fig 3). To release each barn door ear, push
center tab of the barn door ear towards the back of the fixture and the barn door ear
will release (fig 4). Make sure that each barn door ear is securely locked into position
before proceeding to the next one.
fig 3
Page 7
fig 1 – open
fig 2 – locked
fig 4
fig 3
F8 Fresnel
Barn Door Installation
The F8 includes a set of compact 4-way barn doors as part of the kit. The barn
doors are installed by way of 4 barn door ears. There are two positions for the
barn door ears – open (the packed position) and locked (or the forward
position). Please refer to figures 1 and 2 to understand the different positions
of the barn door ears.
To lock the barn doors ears in place to securely hold the barn doors or any
scrims or gels, push the barn door ears forward (towards the front of the light).
Each barn door ear will ‘click’ into a locked position (fig 3). To release each
barn door ear, push center tab of the barn door ear towards the back of the
fixture and the barn door ear will release (fig 4). Make sure that each barn door
ear is securely locked into position before proceeding to the next one.
To properly install the barn doors, clip and lock the two lower barn door ears
(the two closest to the ground). Clip and lock the top barn door ear that is
furthest from your reach. This will leave one barn door ear still in its flipped
back (packed) position (fig 5). Loop and attach a safety cable to a high secure
point within your fixture, grid, or stand (fig 6). Attach the other end to one of the
top holes found on the four corners of the face of the center portion of the barn
door (fig 7). This tethers the barn door so in case of an accidental release, the
barn doors will hang next to the fixture and not fall away from the fixture.
Failure to properly tether the barn doors can create a dangerous circumstance
for anyone positioned below the fixture.
Fig 3
Fig 4
To properly install the barn doors, clip and lock the two lower barn door ears (the two
closest to the ground). Clip and lock the top barn door ear that is furthest from your
reach. This will leave one barn door ear still in its flipped back (packed) position (fig
5). Loop and attach a safety cable to a high secure point within your fixture, grid, or
stand (fig 6). Attach the other end to one of the top holes found on the four corners
of the face of the center portion of the barn door (fig 7). This tethers the barn door
so in case of an accidental release, the barn doors will hang next to the fixture and
not fall away from the fixture. Failure to properly tether the barn doors can create a
dangerous circumstance for anyone positioned below the fixture.


