Zy Safe Izzygo F18 Скачать руководство пользователя страница 24

24

GB

 - User guide

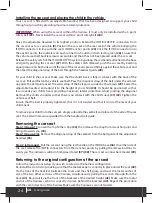
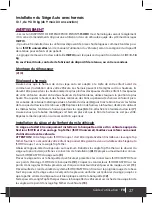
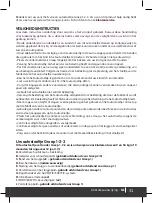
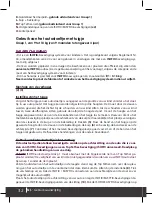
Installing the car seat and placing the child in the vehicle


Your car seat is fitted with an adjustable headrest that has been designed to support your child 

throughout growth by providing maximum lateral protection.

IMPORTANT:

 When using the car seat without the harness, it must only be installed with a 3-point 

safety belt 

(23)

.  Never install the car seat within 2-point safety belt 

(24)

!

Raise the adjustable headrest to its highest position. Extend the ISOFIX/EASYFIX connectors from 

the car seat as far as possible 

(9)

. Position the car seat on the rear seat of the vehicle bringing the 

ISOFIX connectors in line with the seat’s ISOFIX anchor points 

(25)

. Click the ISOFIX connectors into 

the anchor points; the indicators on each connector should turn from red to green 

(26)

. Ensure that 

the vehicle seat belt buckle remains accessible and that it has not been placed under the car seat.

Release the safety catch of the ISOFIX/EASYFIX system by pulling the red handle attached to the base 

and gently pushing the car seat 

(27)

. With the safety catch released, push the car seat by exerting 

equal pressure on both sides until the rear of the car seat is pressed firmly against the vehicle seat and 

then feed the diagonal strap of the belt through the headrest guide 

(28)

Sit your child in the car seat. Make sure that the child’s back is fully in contact with the back of the 

car seat. Pull and fasten the vehicle seat belt. Pass the diagonal strap of the belt under the armrest 

opposite the belt guide used. The waist strap of the belt passes under both armrests 

(29)

. Lower the 

adjustable headrest and adjust it to the height of your child 

(30)

. It should be positioned so that 

it surrounds your child’s head, providing maximum lateral protection, whilst guiding the diagonal 

belt over the child’s shoulder so that there is no contact with the child’s neck 

(31) (32)

. Tighten the 

vehicle seat belt.

Ensure that the belt is properly tightened, that it is not twisted and that it is not at the level of your 

child’s neck.

To remove your child from the car seat, simply unbuckle the seatbelt and place it at the side of the car 

seat. The belt will remain suspended from the headrest belt guide. 

Removing the car seat 

Step 1 (Group 1):

 Loosen the Top Tether strap 

(33)

, then release the strap from its anchor point and 

bring it towards you 

(34)

.

Step 1 (Group 2/3):

 Remove the diagonal strap of the seatbelt from the belt guide of the adjustable 

headrest 

(35)

.

Step 2 (all groups):

 Pull the car seat using the red handle on the ISOFIX base 

(36)

. On either side of 

the seat, release the ISOFIX connectors from their anchor points by pulling the release buttons to-

wards you. The indicators will turn from green to red 

(37) (38)

. The car seat can now be removed 

(39)

.

Returning to the original configuration of the car seat  

Follow the instructions below if you wish to return to the harness configuration.

Re-install the crotch strap, making sure that the metal keeper is correctly in place under the seat 

(40)

.


Via the front of the backrest, between the cover and the shell, grasp and twist the metal anchor of 

one of the two other sections of the harness, simultaneously pulling the section through from the 

back 

(41)

. Re-install it via the front of the backrest at the desired height 

(42)

. Make sure the metal 

anchor of the harness section is correctly in place behind the backrest 

(43)

. Repeat the procedure 

with the second section of the harness. Make sure the harnesses are not twisted.

Содержание Izzygo F18

Страница 1: ...l de instrucciones EN Instruction manual FR Manuel d utilisation IT Istruzioni per l uso NL Gebruiksaanwijzing TR Kullanim kilavuzu RU CADEIRA AUTO ISOFIX Gr 1 2 3 SILLA AUTO ISOFIX Gr 1 2 3 CAR SEAT...

Страница 2: ...2 1 A B D H I N 4 E M G F C L K J O...

Страница 3: ...3 4 5 6 2 3 7...

Страница 4: ...4 8 7 10 9 11 Click 12...

Страница 5: ...5 14 13 15 16 17 18...

Страница 6: ...6 19 20 21 23 24 22...

Страница 7: ...7 26 25 Click 27 28 29 30...

Страница 8: ...8 31 32 33 34 36 35...

Страница 9: ...9 37 38 39 40 41 42...

Страница 10: ...10 43 44 45 46 47...

Страница 11: ...cadeira por outra capa para al m da recomendada pelo constru tor pois a mesma interv m directamente no comportamento do dispositivo de reten o Se tiver qualquer d vida relativamente instala o e corre...

Страница 12: ...e da capa 5 Volte a colocar a fita do arn s altura pretendida utilizando as mesmas aberturas quer atrav s da capa quer atrav s da estrutura 6 e volte a fix la por tr s do encosto 7 Certifique se de q...

Страница 13: ...res dos arneses segure a parte inferior dos arneses e puxe em simult neo 18 Prima o bot o vermelho da fivela dos arneses para libertar totalmente a crian a Determinados modelos de cadeiras auto ISOFIX...

Страница 14: ...passe a fita diagonal do cinto atrav s da guia do apoio de cabe a 28 Sente a crian a na cadeira auto Certifique se de que as costas da crian a est o em contacto com o encosto da cadeira auto Puxe e ap...

Страница 15: ...o batente met lico fica correctamente posicionado no seu nicho central por tr s do encosto 44 Guardar as instru es 45 Inclinar a cadeira auto atrav s da tampa basculante de incli na o Proceder inclina...

Страница 16: ...vocar lesiones al ocupante del asiento en caso de choque est n fijados de forma estable No utilizar el dispositivo de sujeci n de ni os sin la funda No sustituir la funda del asiento por otra funda di...

Страница 17: ...ndo las mismas ranuras tanto en la funda como en el soporte 6 y reconectarla con la parte superior del respaldo 7 Aseg rese de que el tope met lico est bien colocado y que la cinta del arn s no est re...

Страница 18: ...s y tire de forma simult nea 18 Presione el bot n rojo de la hebilla del arn s para liberar totalmente a su ni o De forma opcional algunos modelos de asientos para coches ISOFIX est n equipados con un...

Страница 19: ...ara coche Los apoyabrazos elevables permiten facilitar su acceso al asiento y su colocaci n Aseg rese de que su espalda est bien apoyada con el respaldo del asiento para coche Tire del cintur n del ve...

Страница 20: ...asiento para coche Aseg rese de que su tope met lico est bien colocado en su alojamiento central en la parte posterior del respaldo 44 Conservaci n de las instrucciones 45 Inclinaci n de la silla aut...

Страница 21: ...ident are cor rectly stowed away Do not use the car seat without its cover Do not replace the car cover with a cover that has not been recommended by the manufacturer as it plays a direct role in ensu...

Страница 22: ...ll 6 and reattach it behind the backrest 7 Make sure that the metal anchor is correctly positioned and that the end of the strap is not twisted Repeat the procedure with the second strap Installing th...

Страница 23: ...d with a buckle that sets off an audible alarm available as an option This alarm warns the parents if the child opens the buckle at an inopportune moment dur ing the journey IMPORTANT A properly adjus...

Страница 24: ...the height of your child 30 It should be positioned so that it surrounds your child s head providing maximum lateral protection whilst guiding the diagonal belt over the child s shoulder so that there...

Страница 25: ...el down and push the locking flap at the center of the panel 46 until both ends of the locking flap are housed in the notches of the seat base above 47 Ensure that the tilt hatch is locked and secure...

Страница 26: ...lessures l occupant du si ge en cas de choc soient solidement arrim s Ne pas utiliser le dispositif de rete nue pour enfants sans la housse Ne pas remplacer la housse du si ge par une autre housse que...

Страница 27: ...ant dans la housse que dans la coque 6 et r attachez le l arri re du dossier 7 Assurez vous que la but e m tallique soit bien en place et que le brin de harnais ne soit pas vrill R p tez la m me op ra...

Страница 28: ...teurs situ s sur les brins sup rieurs des harnais saisissez la partie inf rieure des harnais et tirez simultan ment 18 Appuyez sur le bouton rouge de la boucle des harnais pour lib rer totalement votr...

Страница 29: ...n exer ant une pression uniforme sur le dossier du si ge jusqu ce que la partie arri re du si ge auto soit bien plaqu e contre la banquette puis faites passer le brin diagonal de la ceinture travers l...

Страница 30: ...Top Tether en la faisant cheminer entre le dossier et la housse du si ge auto Assurez vous que sa but e m tallique soit bien en place dans son logement central l arri re du dossier 44 Rangement de la...

Страница 31: ...wondingen kunnen veroorzaken bij een ongeval goed zijn vastgezet Gebruik het autostoeltje niet zonder bekleding Vervang de bekleding van het autostoeltje uitsluitend door bekleding die door de fabrika...

Страница 32: ...t de hoogte van het tuigje aanpassen door een van de bovenbanden van het tuigje los te maken Daarvoor dient u het metalen bevestigingsplaatje aan de achterkant van de kuip te draaien 4 en het plaatje...

Страница 33: ...ndelen van het tuigje neemt u beide delen van de bretels bij elkaar en voert ze in de gesp u dient een klik te horen 16 Voor het vasttrekken van het tuigje Trek aan de verstelbanden van het tuigje U h...

Страница 34: ...laats van rood 26 Controleer of u de gesp van de autogordel nog kunt bereiken en of de gesp niet onder het stoeltje is geklemd Ontgrendel de veiligheidspal van het ISOFIX EASYFIX systeem door aan het...

Страница 35: ...niet is gedraaid Plaats de Top Tether riem weer terug door de riem tussen de rugleuning en de bekleding van het autostoeltje te leiden Controleer of het metalen bevestigingsplaatje goed op zijn plaats...

Страница 36: ...l occupante del sedile in caso di urto siano saldamente fissati Non utilizzare il dispositivo di ritenuta per bambini senza la fodera Per sostituire la fodera del seggiolino utilizzarne esclusivamente...

Страница 37: ...re l altezza delle imbracature rimuovere una delle estremit superiori delle imbracature facendo ruotare il dispositivo di arresto metallico sul retro dello schienale 4 quindi tirarla attraverso le ape...

Страница 38: ...bino nel seggiolino per auto Per bloccare l imbracatura unire le due estremit delle bretelle e introdurle nella fibbia fino a sentire un clic 16 Per stringere l imbracatura tirare le cinghie di regola...

Страница 39: ...nti di ancoraggio ISOFIX del sedile 25 Inserire i connettori ISOFIX EASYFIX nei punti di ancoraggio Gli indicatori presenti su ciascun connettore devono diventare da rossi a verdi 26 Assicurarsi che l...

Страница 40: ...di arresto metallico dell estremit dell imbraca tura sia correttamente posizionato sul retro dello schienale 43 Ripetere l operazione per la seconda estremit dell imbracatura Verificare che le imbrac...

Страница 41: ...41 RU 1 2 3 1 2 3 1 2 3 9 36 9 12 1 A B 2 3 C 2 1 D E 1 F 2 1 G ISOFIX EASYFIX H 2 I ISOFIX EASYFIX 2 J 2 1 K 2 1 L M 1 41 RU...

Страница 42: ...N ISOFIX EASYFIX 2 1 9 18 9 4 ISOFIX R44 04 ISOFIX ISOFIX ISOFIX B1 9 18 2 3 4 5 6 7 ISOFIX ISOFIX ISOFIX 1 ISOFIX 1 8 ISOFIX EASYFIX 9 ISOFIX EASYFIX ISOFIX EASYFIX 10 ISOFIX EASYFIX 11 ISOFIX EASYF...

Страница 43: ...43 RU 13 14 15 16 17 18 ISOFIX 2 3 15 36 3 12 R44 04 16...

Страница 44: ...44 RU 19 4 5 20 21 22 23 24 ISOFIX EASYFIX 9 ISOFIX EASYFIX ISOFIX 25 ISOFIX EASYFIX 26 ISOFIX EASYFIX 27 28 29 30 31 32 1 1 33 34 1 2 3 35 2 ISOFIX EASYFIX 36 ISOFIX EASYFIX...

Страница 45: ...45 RU 37 38 39 40 41 42 43 44 45 Isofix 46 47 1 2 3 30...

Страница 46: ...ile de i tirmeyiniz bu ba lama sistemlerinin verimli bir ekilde al mas n sa lamada do rudan rol oynar Ara koltu unuzun kurulumuna ya da do ru kullan m na ili kin pheye d meniz halinde l tfen imalat il...

Страница 47: ...ara lar n arka koltu una sabitlenmelidir L tfen ara k lavuzunuza bak n z UYARI ISOFIX Grup 1 ara koltu unuz temin edilmi olan ST BA LAMA P kullan larak sabitlenme lidir ISOFIX Grup 1 ara koltu unuzu...

Страница 48: ...anmak zere dikkatli bir ekilde saklay n z Gerekli ise emniyet kemerini a mak i in k rm z emniyet kemeri d mesine bas n z Emniyet kemerinin her bir st b l m i in 4 ve 5 Ad mlar tekrarlay n z Emniyet ke...

Страница 49: ...rasyona d nmek isterseniz a a daki talimatlar izleyiniz Kas k kay n yeniden tak n z metal kilit k pr s n n koltu un alt ndaki yerinde do ru bir ekilde oldu undan emin olunuz 40 Koltuk arkal n n n k sm...

Страница 50: ...50...

Страница 51: ...51...

Страница 52: ...TAI 23 UNIT C D JL SULTAN ISKANDAR MUDA JAKARTA SELATAN 12240 IMPORTADO POR GRPF ZIPPY BRASIL COM RCIO DE CONFE ES LTDA CNPJ 29 739 053 0001 00 IMPORTADO EN VENEZUELA POR PHOENIX WORLD TRADING C A N D...

Отзывы: