background image

Get to know your phone

Volume keys

Earpiece

Headset port

Back key

Microphone

Charging/

data port

Status and  

notification  

bar

Touch 

screen

Menu key

Home key

Power key

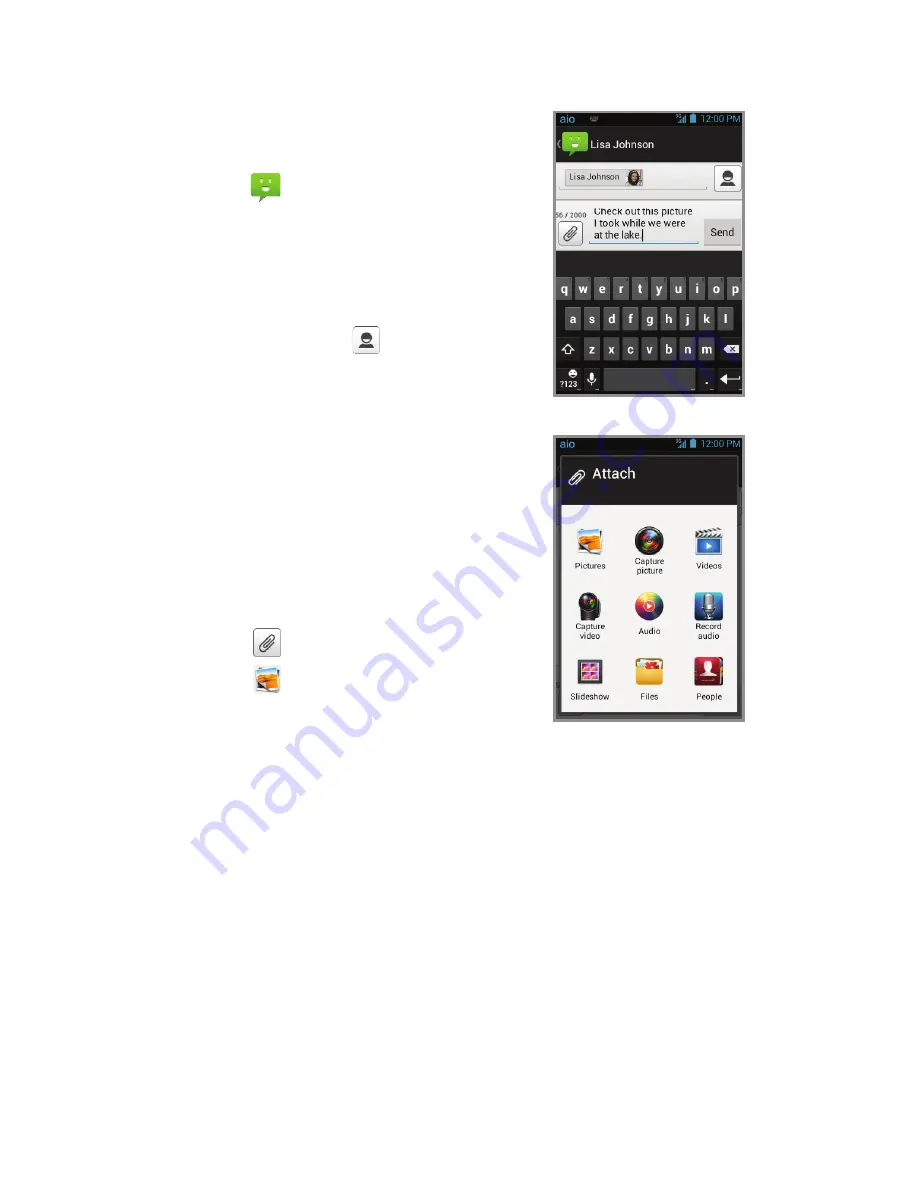
Text and picture messaging

Send a text message

1.   From the home screen,  

tap 

2.   Tap 

Compose

 to start a  

new text message.

3.   In the 

To 

field, enter a  

number or a contact  

name or tap   to  

access your contacts.

4.   Tap  the 

Type message  

field and enter your  

message. 

5.   Tap 

Send

 to send the  

message.

Send a picture message

1.   Follow steps 1-4 above. 
2.   Tap 

.

3.   Tap 

 and select  

desired picture.

4.   Tap 

Send

 to send  

the message.

Please don’t text and drive. 

Содержание Prelude

Страница 1: ...ZTE Prelude Quick start guide ...

Страница 2: ...Get to know your phone Volume keys Earpiece Headset port Back key Microphone Charging data port Status and notification bar Touch screen Menu key Home key Power key ...

Страница 3: ...SIM with the cut corner facing out and the gold colored contacts facing down 3 Insert microSD card not included with gold colored contacts facing down 4 Insert battery making sure the connectors align 5 Replace back cover and charge your phone ...

Страница 4: ... at any time to return to the main home screen Tap and hold to access your recent apps Tap to access applications on your phone Notifications panel The Notifications panel provides quick access to alerts including new messages emails and software updates Tap the top of the home screen and drag your finger down to see the Notifications panel Swipe right to clear individual notifications or tap to c...

Страница 5: ...d hold the icon of the item you wish to add and then drag it to a home screen To move an icon tap and hold it and drag it to a new location To delete it drag it to Remove Organizing home screens Tap and hold an icon and drag it to folder To keep your stuff together just how you like drag additional icons to add them to an existing folder To rename a folder tap it and then tap the name to bring up ...

Страница 6: ...home screen tap 2 Select an option to place a call Keypad Manually enter telephone number Call log Return or retry a call Contacts Call from your address book Favorites Frequent contacts Check voicemail 1 From the home screen tap 2 Tap and hold ...

Страница 7: ...age 3 In the To field enter a number or a contact name or tap to access your contacts 4 Tap the Type message field and enter your message 5 Tap Send to send the message Send a picture message 1 Follow steps 1 4 above 2 Tap 3 Tap and select desired picture 4 Tap Send to send the message Please don t text and drive ...

Страница 8: ...essages and then tap Next Your email will begin to synchronize with your phone Create and send an email message 1 From the home screen tap 2 To compose a new message tap 3 Tap the To field and enter email address or name 4 Enter a subject and email message 5 Tap Send to send message 6 To attach files to the email message tap tap Attach file and make your selection Note To set up corporate email co...

Страница 9: ...voicemail messages Easily save important numbers to your Favorites list and respond to messages by calling back or texting To update and use apps 1 From the main home screen swipe right to see next home screen or tap to open the App tray 2 Tap the applicable icon and then tap the button at the bottom of the screen to go to Google Play 3 In Google Play tap Update 4 Tap Accept download 5 Once instal...

Страница 10: ... games and more 1 Tap a category to browse popular apps games movies and music organized by popularity or category 2 Tap to search the Play Store for a specific game or app 3 To install tap the app and follow instructions Once installed you will see a notification in the Notifications panel Open the app from this notification or by locating the app in the App tray Note A Google Checkout payment me...

Страница 11: ...Volume key to take a photo View pictures 1 From the home screen tap 2 Tap Take a video 1 In camera mode tap to switch to the camcorder 2 Tap to start and tap to stop recording video Send a picture 1 After taking a picture tap the thumbnail in the corner of the screen and then tap 2 Scroll through options to send via text messaging or email Picasa and more ...

Страница 12: ... 1 this device may not cause harmful interference and 2 this device must accept any interference received including interference that may cause undesired operation 2013 Aio Wireless LLC All rights reserved Aio Aio Wireless and the Aio logo are trademarks of Aio Wireless LLC Other marks are the property of their respective owners 2013 ZTE CORPORATION All rights reserved No part of this publication ...

Страница 13: ...Cambio de idioma 1 Desde la pantalla principal toca 2 Toca Configuración del sistema 3 Toca Teclado e idioma 4 Toca Idioma 5 Toca el idioma que desearías usar ...

Страница 14: ...teléfono Botones de volumen Audífono Puerto para los audífonos Botón de retroceso Micrófono Puerto de carga datos Barra de estado y notificaciones Pantalla táctil Botón de menú Botón de inicio Botón de encendido ...

Страница 15: ...tarjeta SIM con la esquina cortada hacia afuera y los contactos dorados hacia abajo 3 Inserta la tarjeta microSD no incluida con los contactos dorados hacia abajo 4 Inserta la batería y asegúrate de que los conectores estén alineados 5 Vuelve a colocar la tapa ...

Страница 16: ...a principal Toca por unos segundos para tener acceso a tus aplicaciones más recientes Toca para tener acceso a las aplicaciones en tu téléfono Panel de notificaciones El panel de notificaciones te proporciona acceso rápido a alertas que incluyen mensajes correos electrónicos y actualizaciones de software Toca la parte superior de la pantalla principal y arrastra tu dedo hacia abajo para ver el pan...

Страница 17: ...r unos segundos el icono del elemento que deseas agregar y luego arrástralo hasta la pantalla principal Para mover un icono tócalo por unos segundos y arrástralo hasta su nueva ubicación Para eliminarlo arrástralo hasta Eliminar Organizar las pantallas principales Toca por unos segundos un icono y arrástralo a una carpeta Para mantener tus cosas juntas como quieres arrastra iconos y agrégalos a un...

Страница 18: ...e una opción para hacer una llamada Teclado ingresa manualmente un número telefónico Registro de llamadas devuelve o reintenta una llamada Contactos llama desde tu agenda Favoritos contactos frecuentes Para revisar el correo de voz 1 Desde la pantalla principal toca 2 Toca por unos segundos ...

Страница 19: ...ingresa un número o el nombre de un contacto toca para tener acceso a tus contactos 4 Toca el campo Escribir mensaje e ingresa tu mensaje 5 Toca Enviar para enviar el mensaje Envía una imagen 1 Sigue los pasos del 1 al 4 descritos arriba 2 Toca 3 Toca y selecciona la fotografía deseada 4 Toca Enviar para enviar el mensaje No envíes mensajes de texto al momento de conducir ...

Страница 20: ...e Tu correo electrónico empezará a sincronizarse con tu teléfono Crea y envía un mensaje de correo electrónico 1 Desde la pantalla principal toca 2 Para escribir un mensaje nuevo toca 3 Toca el campo de Para e ingresa una dirección de correo electrónico o un nombre 4 Ingresa un asunto y el mensaje de correo electrónico 5 Toca Enviar para enviar el mensaje 6 Para agregar archivos al mensaje de corr...

Страница 21: ...eros importantes en tu lista de Favoritos y responde a los mensajes llamando o enviando un mensaje de texto Para actualizar y usar las aplicaciones 1 Desde la pantalla principal deslízate hacia la derecha para ver la siguiente pantalla principal o toca para abrir la bandeja de aplicaciones 2 Toca el icono correspondiente y luego toca el botón de la parte inferior de la pantalla para ir a Google Pl...

Страница 22: ...Toca una categoría para recorrer aplicaciones populares juegos películas y música organizadas por su popularidad o por categoría 2 Toca para buscar en Play Store un juego o aplicación específica 3 Para instalar toca la aplicación y sigue las instrucciones Una vez instalada verás una notificación en el panel de notificaciones Abre la aplicación desde esta notificación o ubicando la aplicación en No...

Страница 23: ...una foto Para ver las imágenes 1 Desde la pantalla principal toca 2 Toca Para tomar un video 1 En el modo de cámara toca para cambiar a la videograbadora 2 Toca para comenzar y toca para detener la grabación Para enviar una fotografía 1 Después de tomar una fotografía toca la vista en miniatura en la esquina de la pantalla y luego toca 2 Desplázate por las opciones para enviarla por mensaje de tex...

Страница 24: ...ntes dos condiciones 1 este equipo no puede ocasionar interferencia perjudicial y 2 este equipo debe aceptar cualquier interferencia recibida incluyendo interferencia que pueda causar una operación no deseada 2013 Aio Wireless LLC Todos los derechos reservados Aio Aio Wireless y el logo de Aio son marcas registradas de Aio Wireless LLC Las demás marcas son propiedad de sus respectivos propietarios...

Отзывы: