6
The torque control unit is also fitted with a locking mechanism. The locking mechanism locks the torque switch once
tripped and thus prevents it from re-triggering and thus also the actuator from pulsing. The locking mechanism also prevents
the torque switch, after actuator rotation reversing, from tripping, and thus enables the electric motor’s breakaway torque to
be fully utilized. The locking mechanism operates in both directions of motion of the actuator’s output shaft, both in limit
positions and in the interim position, over 1 to 2 revolutions of the output shaft, after reversing of its motion.
With a load in the form of a counter-moment attached to the actuator output shaft the torque-operated shaft 22 and thus
also the segments 23 and 24 will move a bit round and hence the motion is transferred to the tripping lever 45 or 46. Should
the torque on the actuator output shaft reach the value to which the torque tripping unit is set, the tripping lever will depress
the push-button of the respective micro-switch, which disconnects the electric motor from the mains and the actuator stops.
Torque unit setting procedure
To set the tripping torque to another value, differing from the default value set at the manufacturing plant, proceed
as follows: release locking nut 44
(Figure 3),
and the relevant locking screw 25
(for “closing” direction)
or 26
(for opening
direction).
Subsequently, put a screwdriver into the recess in the top segment 23 or 24 and rotate the segment until the
recess in segment 27 or 28 points at the relevant point on the scale. This point is identified by dividing the difference
between the maximum and minimum adjustable torque in Nm by the number of increments between the maximum and
minimum torque signs. This approach shows us how many Nm of tripping torque falls on one increment on the scale. By
interpolation, identify the point on the scale, to which the recess in segment 27 or 28 should point.
The coloured line on the scale that is closer to number 10 indicates the setting point of maximum tripping torque,
the other line identifies the setting point of minimum torque. The torque control unit must never be set up in a way that
the recess in the bottom segment lies outside the area between the two coloured lines on the scale.
Once the tripping torque has been set up, tighten locking screw 25 or 26 and locking nut 44.
b) The signalling unit
(Figure 4)
secures transmission of electric signal of the actuator input shaft’s position. The unit is
driven by gear 38 from the output shaft through a gearbox to cams 30, 31, controlling micro switches 36
(SO)
and 37
(37).
The switching moment of signal switches can be selected in any point of the actuator's working stroke, except the narrow
area around end positions
(signal switch must switch before the position switch while the output shaft is still moving).
Top cam 37 operates for the
“closing”
direction and bottom cam 36 pertains to
"opening"
direction. Signalling unitin
Figure 4 is designed as a separate installation assembly. It is installed on bracket 39, below which gears are fitted,
organized according to the kinematic diagram
(Figure 5).
The transmission is set up so that adjusting gear K3 can be
moved to various levels
(I, II, III, IV, V)
once locking screw 47 is released. By adjusting wheel K3, the setting range of
signalling switches and transmitter will change depending on the working stroke. Next to the Figure 5 there is a table with
the ranges of settings for the individual positions of the adjusting wheel K3.
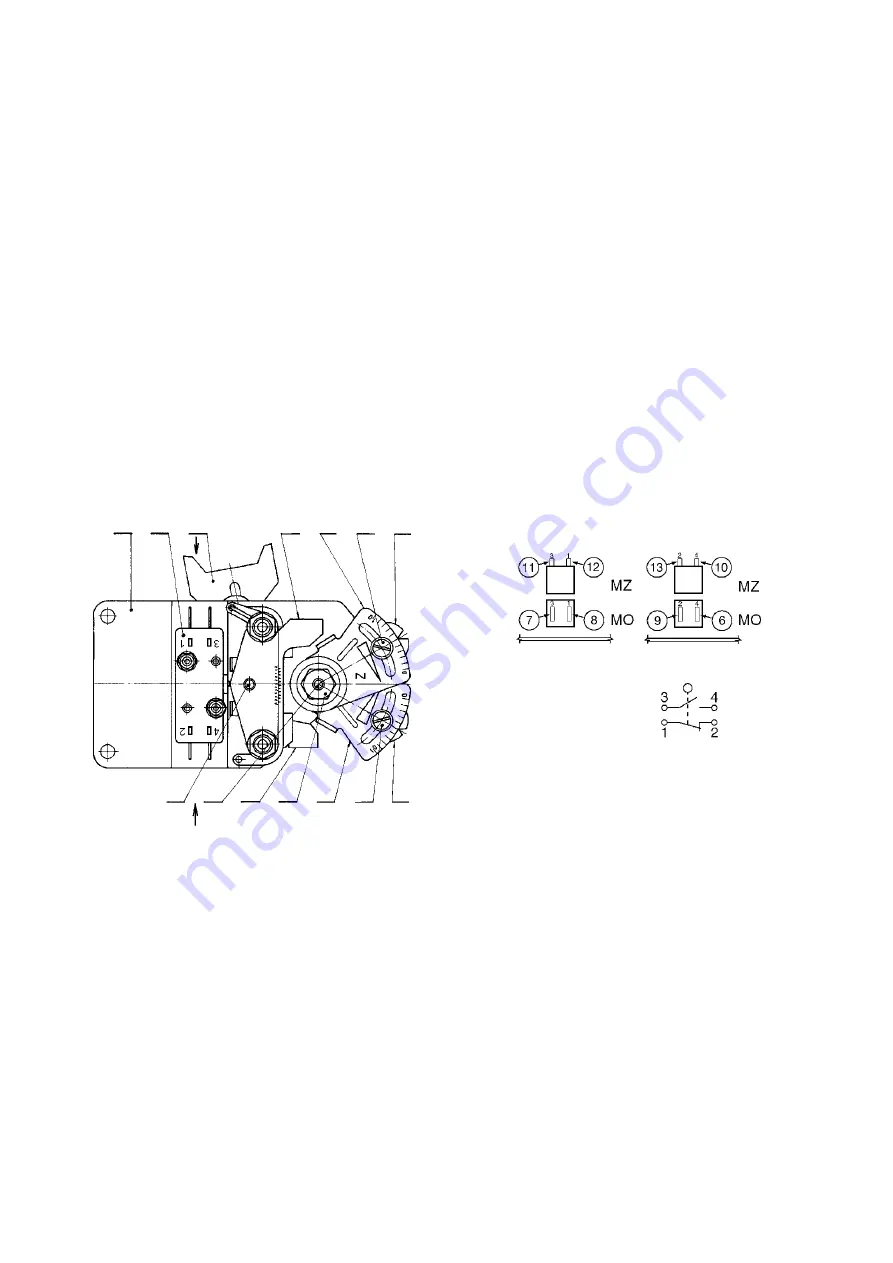
Explanatory notes:
19 – Base plate
20 – Micro switches MZ, MO
21 – Adjuster
22 – Torque control shaft
23 – Top "closing“ segment
24 – Top "opening“ segment
25 – Locking “closing” screw
26 – Locking “opening” screw
27 – Bottom “closing” indicator
28 – Bottom “opening” indicator
29 – Locking shaft
44 – Locking nut
45 – Tripping “opening” handle
46 – Tripping “closing” handle
Micro-switches
schematic diagram
Fig. 3 –
Torque unit
Numbers in circles correspond to terminal numbers on the
terminal board. Micro switches do not allow two voltages with
varying values or phases to be connected to the contacts of
one micro switch.
19
20
21
46
23
25
27
28
26
24
44
45
22
P
4
29
P
3
P
4
P
3
Содержание 52 020
Страница 2: ...ZPA Pe ky a s is certified company in accordance with ISO 9001 as amended...
Страница 28: ...28 Lock 38 8 22 5 65 45 85...
Страница 34: ...34 NOTES...


