background image

©2022, Zortrax S.A. All rights reserved. All trade names, logos and trademarks mentioned in the following 
document are registered trademarks of Zortrax and are subject to legal protection.

13

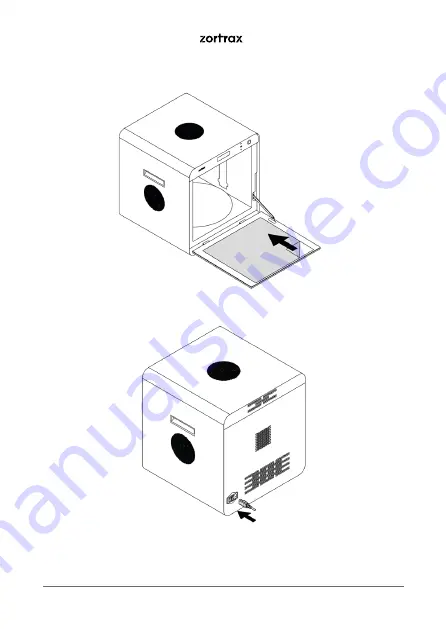
5. Remove the protective foils from the inside and outside of the device. Close the front door.

6. Plug the power cable in.

Содержание Curing Station

Страница 1: ...Device User Guide Curing Station...

Страница 2: ...rax Curing work 7 Zortrax 3D Printing Technology Glossary 7 What s in the Box 8 Main Components 9 First Use Preparation 11 Navigating through the Menu 15 How to Cure a Print 16 Basic Maintenance and S...

Страница 3: ...storage and disposal Furthermore the users should take into consideration the risk of possible damage of the device resulting from defects in material and workmanship The users are responsible for qua...

Страница 4: ...orm for assistance when necessary Keep the device away from heat sources flammable materials equipment emitting radiation sources of fire humidity water and other liquids To prevent any inadvertent us...

Страница 5: ...e at the back of the device Avoid overloading the outlet with too many devices The device must be well grounded Always make sure that the ground complies with local and national regulations Use only t...

Страница 6: ...1 7 m 5 7 It should be noted that the packages must not project beyond the outline of the pallet Packages stacked on the pallet should be then bound together and wrapped in foil The pallet prepared a...

Страница 7: ...parts are placed This makes the models free of weak spots caused by insuffi cient UV exposure The Zortrax Curing Station has multiple systems ensuring safety of its operators The post processing devic...

Страница 8: ...and delivered with the device The set contains tools and protective equipment The tools from the starter kit are required for operating the device as well as for performing maintenance work UV LCD TEC...

Страница 9: ...ax S A All rights reserved All trade names logos and trademarks mentioned in the following document are registered trademarks of Zortrax and are subject to legal protection 9 Main Components 1 Front v...

Страница 10: ...22 Zortrax S A All rights reserved All trade names logos and trademarks mentioned in the following document are registered trademarks of Zortrax and are subject to legal protection 10 2 Back view clos...

Страница 11: ...ames logos and trademarks mentioned in the following document are registered trademarks of Zortrax and are subject to legal protection 11 First Use Preparation 2 Take the device out of the box 1 Open...

Страница 12: ...d in the following document are registered trademarks of Zortrax and are subject to legal protection 12 3 Remove the protective foil and place the device on a flat and stable surface 4 Remove the box...

Страница 13: ...logos and trademarks mentioned in the following document are registered trademarks of Zortrax and are subject to legal protection 13 5 Remove the protective foils from the inside and outside of the d...

Страница 14: ...ks mentioned in the following document are registered trademarks of Zortrax and are subject to legal protection 14 7 Place the model s on the glass table inside the device 8 Run the curing program wit...

Страница 15: ...the range of 10 to 100 Rotation Speed this option allows you to set the rotation speed of the glass table in the range of 10 to 100 Buzzer Settings this option allows you to change the Button Click So...

Страница 16: ...ortrax and are subject to legal protection 16 How to Cure a Print Caution Wear safety gloves during all procedures 1 Make sure that the models you are about to cure have been cleaned properly and ther...

Страница 17: ...legal protection 17 3 Remove the model from the platform by hand or use a spatula If you have problems with removing the print use a cutting knife Remove the raft and support structures from your mode...

Страница 18: ...llowing document are registered trademarks of Zortrax and are subject to legal protection 18 5 Run the curing program with appropriate time settings using the Start Curing option from the menu 6 Once...

Страница 19: ...encing any repair it is important to turn the device off and let it cool down Remember to always wear gloves and glasses The device is delivered with a full set of tools needed to carry out maintenanc...

Страница 20: ...zortrax com support form 04 Left fan not working The left fan does not work or the reading of the fan s RPM is not possible Contact Zortrax Support Center through the support form https support zortra...

Страница 21: ...Contact Zortrax Support Center through the support form https support zortrax com support form If the device begins to operate in an unidentified way safely unplug it from the power supply and immedia...

Страница 22: ...ource UV light 405 nm wavelength UV light power 75 mW cm2 Chamber Metal with a mirrored surface supporting even light distribution around 3D prints Door Made of a glass layer with a PMMA filter Displa...

Страница 23: ...ing solvent Detailed information regarding usage and waste disposal of the liquid detergent utilized to clean 3D prints should be found in the SDS delivered by the producer of the liquid Waste electri...

Страница 24: ...office office zortrax com technical support support zortrax com more information zortrax com update 16 12 2022 2022 Zortrax S A All rights reserved...

Отзывы: